
Published March 16, 2026 11:56AM
Yoga Journal’s archives series is a curated collection of articles originally published in past issues beginning in 1975. This article on Utthita Hasta Padangusthasana first appeared in the March-April 1996 issue of Yoga Journal.
We usually think of yoga postures as static physical positions, a perception perhaps encouraged by connotations of the word “posture.” But postures are better conceived of as coordinated sequential movements with a beginning, middle, and end, more like a movie than a photo. It’s the middle phase—which is just one aspect or frame of the entire process—that we tend to isolate and emphasize as “the posture,” virtually ignoring what comes before and after it.
Mountain Posture (Tadasana), a basic upright stance, is the jumping off point, as well as the terminus, of all the standing postures. It is a condition of poise in which our major skeletal segments—the skull, rib cage, pelvis, and spine—are strung like beads on the thread of our body’s central line of gravity. Here we ponder the chain of movements to come, and establish the fundamental awareness of the steady and comfortable uprightness that provides a constant background to our entire practice.
Next we smoothly fit ourselves into the energetic demands of the series of coordinated movements and shift into what we typically call “the posture.” Much of the success of this middle phase—whether we actually “fit in” or become fitful or discomfited—depends on our willingness to consciously immerse ourselves in the transition, to stay alert and receptive during the passage and not hurry ahead to what we imagine to be the destination. Finally, after exploring the fresh slants of the modified standing position, we return to our home base, Tadasana.
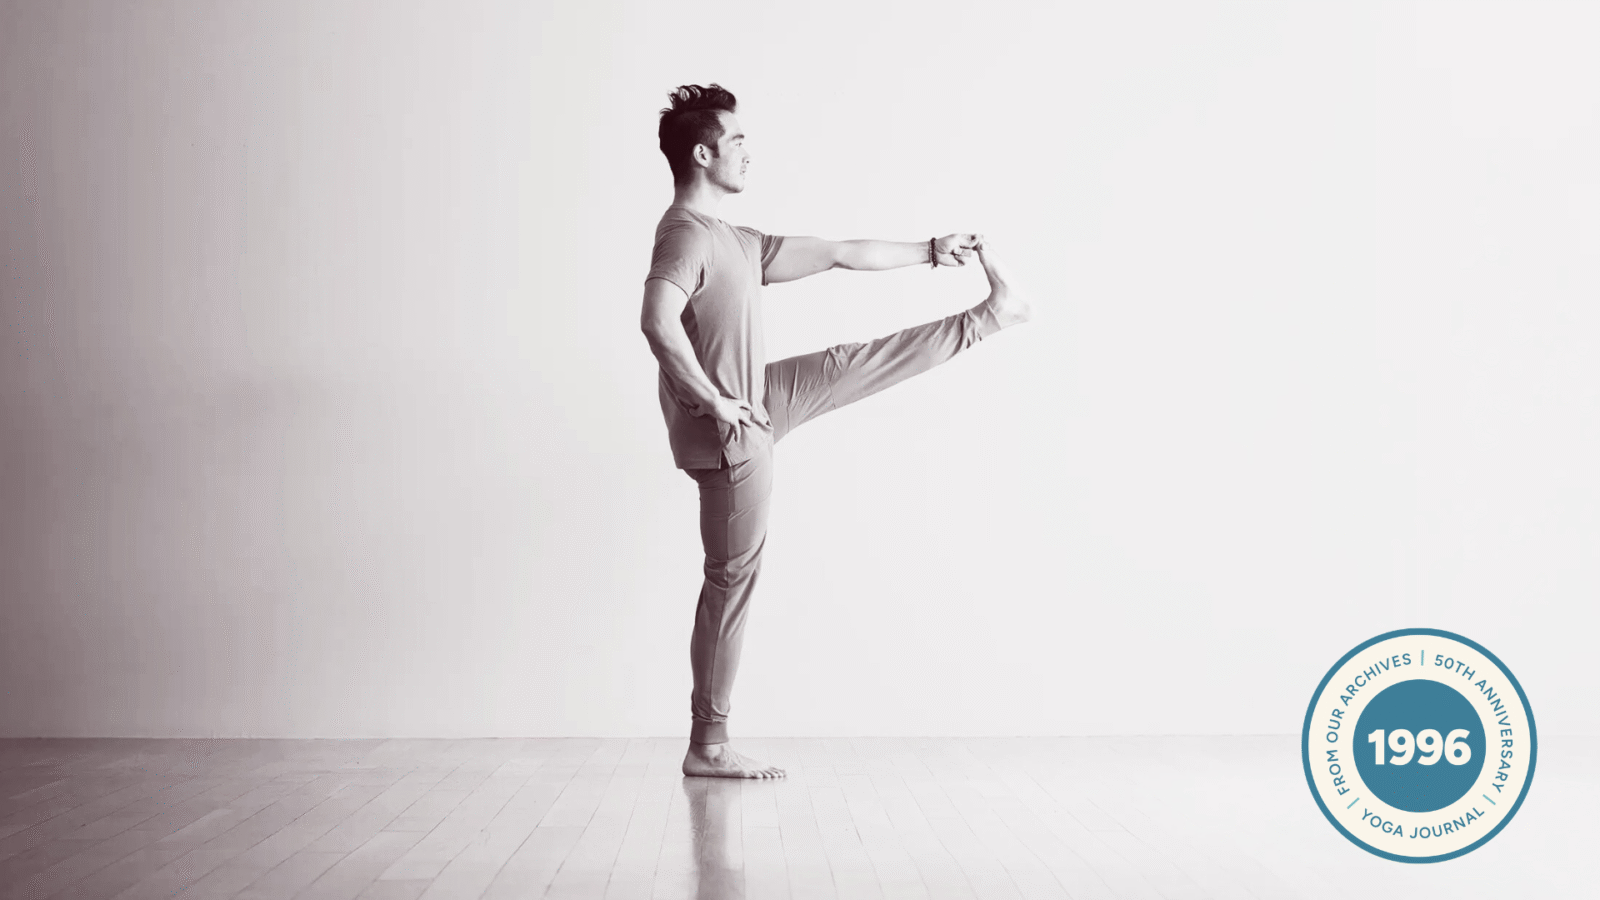
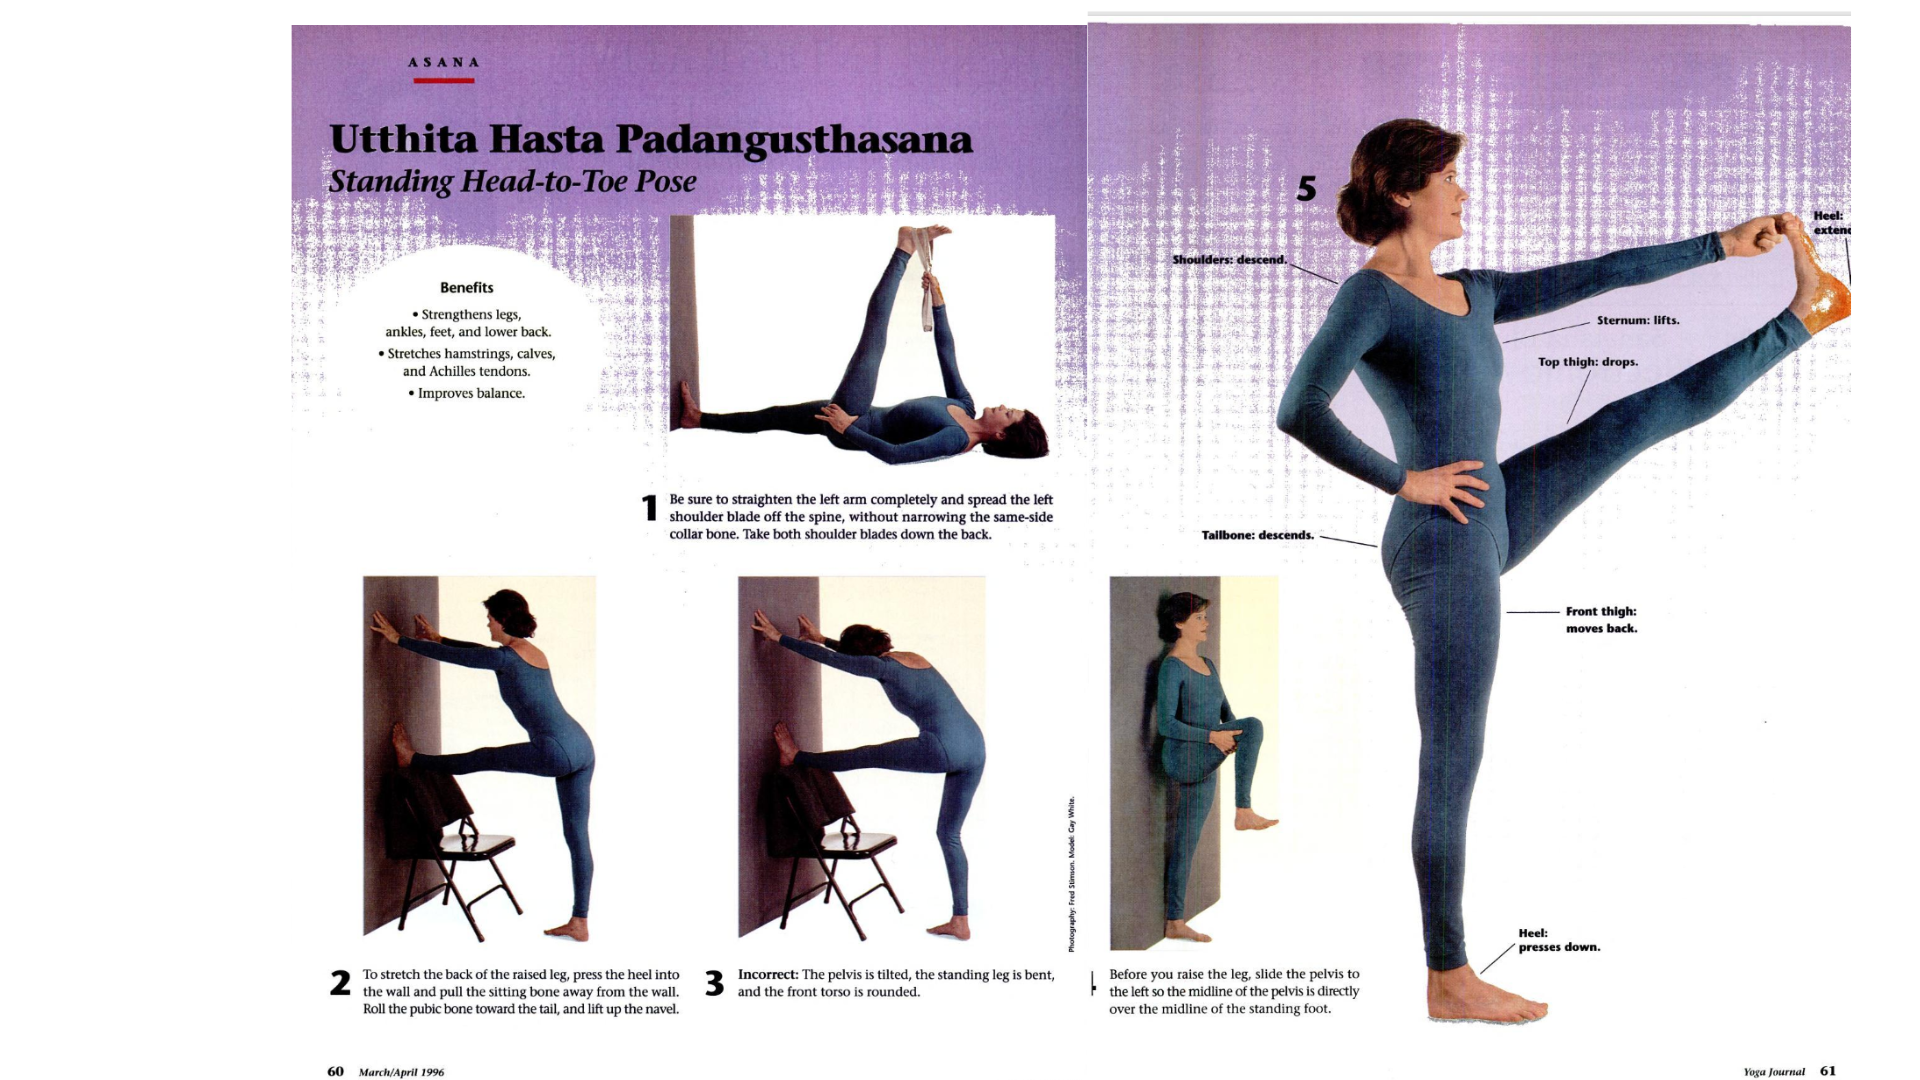
Utthita Hasta Padangusthasana is a pose that is a mouthful and literally means the “elevated (or standing) hand-and-big-toe posture.” It begins and ends in Tadasana and asks us to stand in a most unusual way-with one leg raised parallel (or slightly above parallel) to the floor, held in place by the grip of the index and middle fingers and the thumb of the same-side hand on the big toe.
How to Find Your Balance in Any Standing Pose
To more accurately evoke the fluency of posture, movement pioneer Moshe Feldenkrais coined the word “acture.” An acture, says Feldenkrais, has four qualities: an absence of effort, “no matter what the actual expenditure of energy is”; an absence of resistance, meaning not acting “against ourselves”; the presence of reversibility, which means that at any time, the acture can be “stopped, withheld from continuing, or reversed without any preliminary change of attitude and without effort”; and ease of the breath.
Begin by focusing on the “bottom” of Utthita Hasta Padangusthasana (and all standing postures, for that matter), the functional unit of the ankle and foot, which shoulders our weight when we stand. The sole connects us to the earth and, with its intelligently designed system of arches, acts as a shock absorber when we walk, run, hop, skip, or jump along. This system of arches forms a kind of vault that, when we stand, contacts the floor at three points: the bases of the big and little toes and the center of the heel.
Look at your right sole. Press your right thumb into the ball of the big toe and left thumb into the ball of the little toe. Wiggle these two points back and forth awhile, to loosen things up a bit, then stretch them away from each other to widen the ball of the foot. Since all the standing postures are, to some extent, balancing positions, awareness of this widening while executing these asanas will expand our area of contact with the floor and make us more secure.
Turn your sole up and run a thumb counterclockwise around the circumference of the heel a few times, as if limning a wheel. The image of this wheel spinning counterclockwise reinforces the arch and prevents pronation (usually called a flat foot), the inward collapse of the foot vault. The “hub” of this wheel—press it with your thumb—is the center of the heel, the third point of the vault. Now repeat with the left foot (its heel rotates clockwise).
Stand with the feet hip-width apart, second toes parallel, and spread the balls of the feet. Sway the body over the feet, first clockwise, then counter-clockwise, and feel each of the six points on the soles as they press in turn into the floor. Start with large circles, then gradually narrow down until you stop with all six points evenly touching the floor. Stay with this even contact for a few minutes. This is the position of contact you will want to recreate in all your standing postures.
Don’t just stand there! Attend, for example, to the pulsing of the feet on the floor, feeling the way, as Stanley Keleman puts it, “the feet in conjunction with the ground form a reverberating drum.” According to B.K.S. Iyengar, this is the seed of self-awareness, which “starts from the skin on the soles of the feet when standing.”
Remember, though, that physical performance is not the only measure of your success. Rather, the value of such outer performance must be judged in light of the quality of awareness that you bring to the “acture,” the inner sense of effortlessness, self-acceptance, and composure word related to posture—with the accompanying spontaneity of breath, from the inception of the asana, through its various phases, to its end.
How to Prep for Utthita Hasta Padangusthasana
All these exercises (for which I’m indebted to Mabel Todd and her student Barbara Clark) train us to “stand our ground.” They make our feet and ankles stronger and more flexible—and in turn improve our balance—by integrating the toes with the ankle and leg, centering the foot under the ankle, and reinforcing the vault.
Remember to apply all of the preliminary exercises. Try the following exercise, first with the right foot lifted off the floor, then the left. Get a sand bag (or any firm support two or three inches thick, such as a folded blanket) and a block.
1. Utthita Hasta Padangusthasana Prep Exercise
Set the balls of your feet onto the sand bag or a folded blanket, heels on the floor, and exhale into a Standing Forward Bend (Uttanasana). (If the floor is too far away, bend your knees slightly or support your hands on a block.) In your imagination, shorten the bases of the big toes toward the inner heels without lifting the toes off the bag, then pull up strongly along the back of the leg toward the knee. If you need tactile aid, brush a finger along the route, from the base of the big toe to the inner heel and up the inner calf.
Once this is established, touch along the outer edges of the feet from the heels to the little toes and feel like you’re growing the toes until they’re the longest ones on your feet. Then pinch the fronts of the ankles together with your hands, squeezing the inner malleolus out and the outer in. Finally, bring your hands to the calves just below the knees and stroke down to the floor, planting the heels deep into the earth.
Now inhale, come up, step off the bag and, with these lessons in mind, stand in a “steady and comfortable” Tadasana.
2. Utthita Hasta Padangusthasana Lying Down
Supta Padangusthasana, the “reclining big toe posture,” is the supine equivalent of Utthita Hasta Padangusthasana. I use it as a preparation for Utthita Hasta Padangusthasana because I can rehearse many of the details of the standing posture without any concern about keeling over.
Get a long strap, a sticky mat, and a blanket or two. Lie supine on your mat with your knees slightly bent and heels against a wall. Let the front groins (where the front thighs joins the pelvis) sink toward the floor, as if they’re being weighed down by an enormous sand bag. As the groins sink, push through the legs, dig the heels into the wall, and straighten the knees.
Simultaneously scrub the back of the pelvis along the mat and elongate—but don’t flatten—the lower back.
Exhale, draw the right knee toward the chest, wrap the hands around the shin, and squeeze the thigh against the abdomen. Notice if the left knee crooks and if the pressure of the heel against the wall lessens. If so, make the top of the left thigh even heavier and, as you continue to hug the right thigh to the belly, dig the left heel into the wall.
This solid contact of heel to wall will help elongate the spine. But if, at any time during this practice, the back of your neck crimps and your chin juts up toward the ceiling, lay a folded blanket under your head to protect the cervical spine.
The full posture is customarily performed by gripping the big toe of the right foot in the manner described tor Utthita Hasta Padangusthasana, but even if you can easily do this, use a strap. First double the strap, then split it so that one half spans the back of the ball of the foot— where the ball meets the vault-and one half spans the front of the heel-where the heel meets the vault.
Now imagine that you’re pushing the right groin toward the wall, extend through the heel, and straighten the leg with an exhale. If you can, take the leg perpendicular to the floor; if you can’t, hold it below 90 degrees, or bend the knee enough to get just the thigh perpendicular. You might eventually be able, as the hamstrings surrender, to straighten the knee and take the leg higher. Don’t use the strap, though, to pull the leg beyond where the muscles of the hip and thigh can reasonably take it.
Hold the strap in your left hand, burrow the right thumb into the front groin, and accentuate the outward rotation of the thigh (Figure 1). Rotate the floor leg inward as the outer hip lifts toward the ceiling. Gently furrow the doubled strap into the sole and lift the three points of the vault toward the ceiling.
This is a supine “mirror” of the middle phase of Utthita Hasta Padan-gusthasana. Pay particular attention to the contact of the heel on the wall, and the effect that contact has on the extension of the spine; to the rotation of the two thighs, especially to how the floor thigh rolls in as the hip lifts up; and to the level contact of the back of the pelvis on the floor, and the way it lengthens down through the tail.
Stay for two to five minutes, then exhale and slowly lower the raised leg to the floor, controlling the movement from the hip. Do the left leg for an equal amount of time.
3. Utthita Hasta Padangusthasana With a Chair
Next we’ll approximate Utthita Hasta Padangusthasana by supporting the raised leg on a chair. Get a chair (or any steady support), a strap, a blanket or two, and a block. Set the chair a few inches away from a wall (with its back toward the wall), and pad the chair back with the blanket.
Stand and face the chair, feet together. Spread the balls of the feet and shift your weight to the left, moving the midline of the pelvis over the midline of the left foot (a line from the center of the ankle, across the top of the foot, and out the second toe). Exhale, bend, and lift the right knee as high as you can, and balance on the left foot. Here you’re reproducing the starting position of the previous practice, except now you’re vertical and without the reassuring embrace of the floor.
Bring your hands onto your hips, touch the index fingers to the hip points, and adjust an imaginary line between these two points parallel both to the wall and to the floor. The right hip might be a bit higher than the left: If so, soften the outer left hip, firm the inner left thigh, and release the right front groin to the floor.
Exhale, and as the groin continues dropping, gracefully extend through the right leg, rest the back of the ankle on the padded chair back, and tunnel your heel into the wall. As you do this, keep the left foot steadfastly glued to the floor, pointing straight ahead. In this and the following practices, be sure not to clutch at the floor with your toes, but keep them wide and soft.
It’s common for the right hip now to be somewhat ahead of the left. With your left hand, roll the left hip toward the wall as you press the top left thigh away from the wall—and down into the heel—and release the right groin.
It’s not unheard of for the right hip to be a whole lot ahead of the left. Accompanying symptoms include wobbly knees, hunched back, and a foreboding of imminent doom (Figure 2). More than likely the problem is that your support is too high for the present capacity of your hamstrings. You need to either lower your foot to the chair seat (or to a block on the chair seat), or saw a few inches off each of your chair legs; whichever you decide to do, this supported version is probably as far as you can go with Utthita Hasta Padangusthasana for the time being.
Once the pelvis is neutral, at whatever height you can manage, increase the stretch on the back of the raised leg. Exhale and, with the left heel pressed actively into the floor, lean forward from the hip joints. Rest your hands on your thigh, shin, ankle, or on the wall, whatever your hamstrings will allow (Figure 3).
Stay for one to three minutes on each side. When you’re ready to bring the leg down, inhale to vertical, exhale, then inhale and draw the raised knee back toward the torso (use your hands if needed), and finally exhale and lightly return the foot to the floor. Stand in Tadasana for a few breaths after each side.
4. Utthita Hasta Padangusthasana at a Wall
You might try one more intermediate stage before the full unsupported posture. Lean back against the wall, with your heels a couple of inches out from the wall, in a kind of supported Tadasana (have your strap over one shoulder). Exhale, bend and raise the right knee, clasp the back thigh with your hands, and draw the front thigh toward your abdomen (Figure 4).
Hold the strap in the right hand, reach inside the thigh, and loop it around the ball of the right foot. Inhale, lift the chest, then exhale and extend out through the heel, just as you did in the supported practice. See if you can bring the leg parallel to the floor: If that seems too high, swing your leg down a few degrees; if it’s comfortable, try to elevate the leg a little higher.
Wait a bit, then carefully push your torso off the wall with your left hand, reaching out actively through the right heel and hinging over the left ankle. Brace yourself with the hand against the wall for a few breaths, and finally hook it over the same-side hip. Stay for a minute or two in the middle phase of Utthita Hasta Padangusthasana, then exhale and mindfully lower the foot to the floor. Repeat on the left side.
Step away from the wall for the entire sequence of Utthita Hasta Padangusthasana. You might continue using the strap for a while longer. When you’re primed to try the full posture without any props—and you should occasionally, even if you think it still needs work—grip the big toe as described above.
Benefits of Utthita Hasta Padangusthasana
Utthita Hasta Padangusthasana will strengthen your legs, ankles, feet, and lower back; stretch the back of your legs (the hamstrings, calves, and Achilles tendons); and improve your balance and teach you to stand on one foot.
People who tend to lock or hyperextend their knees should avoid allowing the knee caps—especially on the standing leg—to roll in “cross-eyed.” Align the center of each knee cap with the center of its companion ankle, and contract the front thigh muscles (quadriceps) to lift each kneecap toward the center of its companion hip joint.