
Published March 29, 2026 07:38AM
Yoga Journal’s archives series is a curated collection of articles originally published in past issues beginning in 1975. This article first about Side Bow Pose (Parsva Dhanurasana) appeared in the September-October 1996 issue of Yoga Journal.
Have you ever wondered why there are so many asanas (poses)? Light on Yoga, for example, B.K.S. Iyengar’s standard instructional manual, illustrates and describes 200—more than enough to keep most of us occupied for several lifetimes. But that number is dwarfed by the 840,000 counted by traditional hatha yoga, supposedly one for every living creature though fortunately only 84 “are the best” and 32 “useful for mankind in this world.”
Iyengar notes that by executing the many different “permutations and combinations” of the asanas, we stimulate increasingly wider areas of the motor and sensory cortex in the brain. We also “improve the range of movement in each muscle” to promote “proper alignment of bones and joints and ultimately perfect balance between the left and right sides of the body.”
This physical balance of our two sides—which personify the receptive, witnessing masculine and the active, creative feminine faces of our authentic self—reduces stress and strengthens our body, priming us to stay the course, to persevere through the rigors of our practice. But it also is our first tangible step along the road to equanimity (samatva) in which, as Krishna tells Arjuna, the self “stands motionless and still,” and remains the “same in pleasure as in pain.” Such unshakable composure is regarded, says Georg Feuerstein, as the “greatest spiritual process and establish the final goal of our virtue” and a “precondition for success in yoga.”
Through the many asanas, we join in the perpetual play (lila) of the world and all its living creatures. Remember that these postures are not arbitrary positions; rather, they’re models or in-body-ments of some in-light-ened experience that irradiates all of existence with meaning and purpose. Collectively, the asanas are a looking glass in which we see ourselves reflected in the world and the world reflected in us.
So it’s no coincidence that about 50 asanas (of those cataloged in Light on Yoga) are named after living things—mammals, birds, insects, fish, amphibians and reptiles, and plants—and human-made objects, such as a plow or a dog stretching or a tree, and immediately trigger an associated chain of acquired experiences and expectations in our memory. Like a moving picture, they both inform the specific process and establish the final goal of our yogic balancing act.
But the names do more than just circumscribe the outer contours of the postures; they hint at possibilities for the inner contours as well, evoking a playful spirit that encourages imaginative experimentation, reflection, and self-inquiry. The yogis are never satisfied with only the superficial display of a posture, however well accomplished. They want us to stretch our consciousness at the same time as we stretch our body so that both ultimately conform to the shape of, or are perfectly assimilated to, the original insight from which the asana emerged. The name thus serves as a kind of springboard for free association that can “lead our thinking into deeper levels,” according to Swami Sivananda Radha, a pioneer in the work on the symbolism of the asanas.
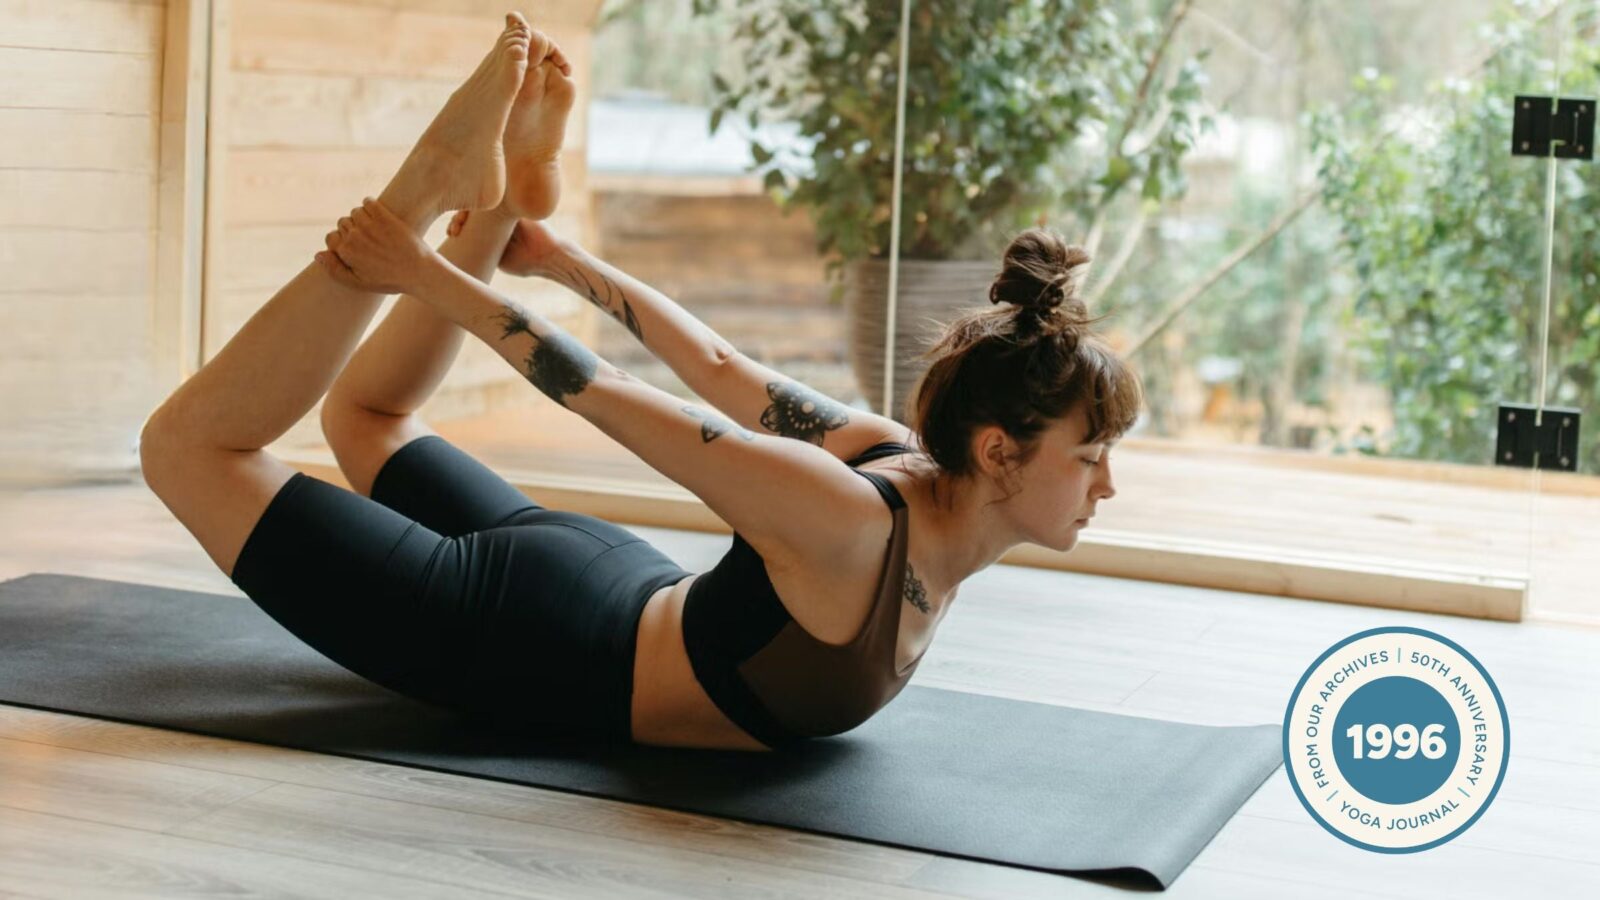
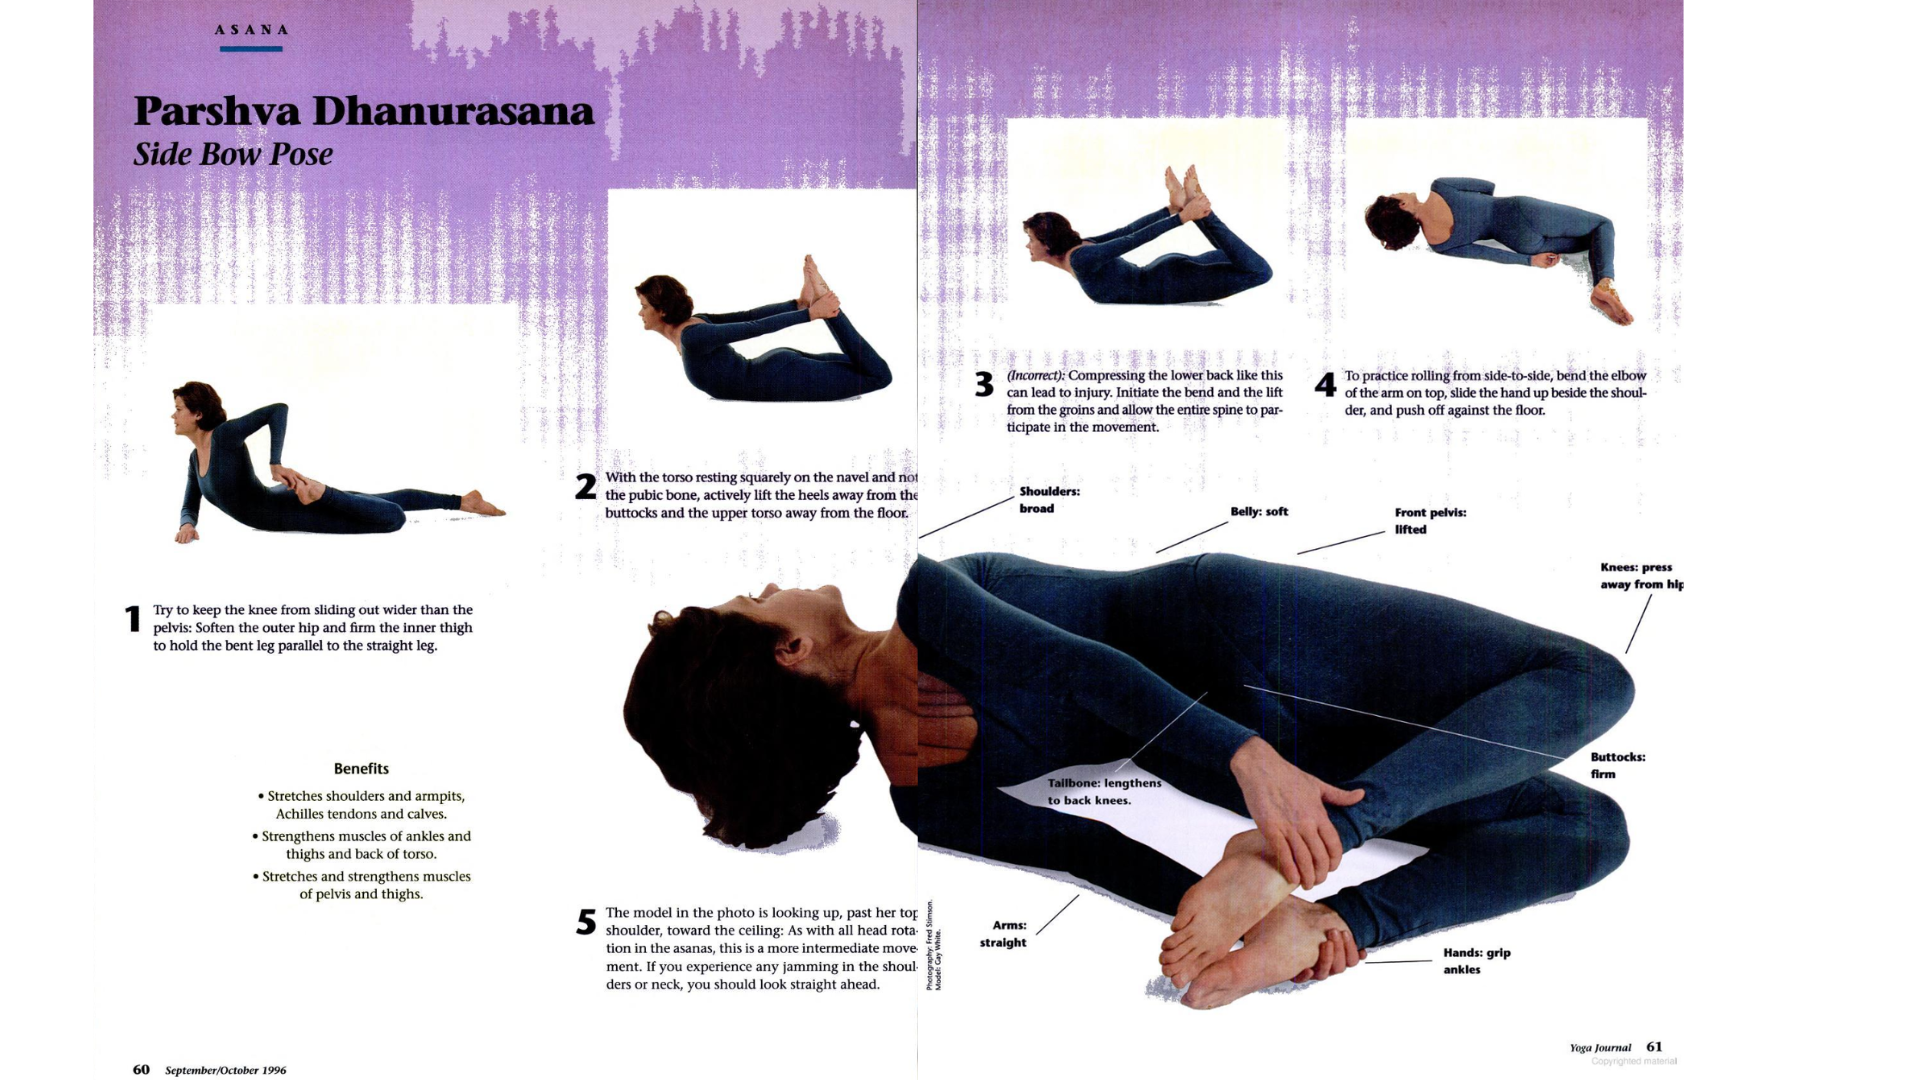
One asana that exemplifies this is a beginning backbend, a variation of Bow Pose (Dhanurasana) called Side Bow (Parshva or Parsva Dhanurasana).
How to Practice Side Bow Pose (Parsva Dhanurasana)
In Side Bow Pose, we start from a prone position with the two “limbs” of the bow, the torso and legs, relaxed. Then we slowly string or “brace” the bow, with the arms between the shoulders and ankles, drawing the upper torso (and head) and thighs off the floor. From here we roll first to one side, then the other, and finish back on the belly.
You might wonder, though—particularly if you’re a new student and not yet accustomed to all the weird things you’re asked to do in a typical yoga class—what does Side Bow add to Bow? Why roll? I found one possible answer in “Posture Plays,” a booklet of exercises for children by Barbara Clark, a movement educator and therapist. Sideways rolling, she writes (though not specifically about Side Bow), develops the “deep muscles of the back, abdomen, thighs, and shoulders, and thereby lessens lordosis (sway back), abdominal protuberance, uneven hips and shoulders, and poor head carriage.”
Backbends teach us to “bend over backward,” both literally and figuratively. They strengthen the muscles of the back and stretch the front of the body—and spine—and so help to counteract our unfortunate leaning or bent toward forward slump. This openness, in turn, improves our posture and the working of the vital organs of the torso, such as the heart and lungs. Rolling in Side Bow intensifies the effects of Bow, especially its contribution to a long front spine and erect bearing. These, in turn, are crucial for sitting in the companion practices of pranayama (yogic breathing) and meditation.
Many students-especially those with back injuries—often feel anxious around back bends. When done properly, however, they can actually have a salubrious effect on most backs. It’s important to recognize, though, what’s proper. What do you think of when you hear the word bend? A smooth curve, like the C-bend in a bow? Or a sharp angle, like the L-bend in your elbow or knee? This latter shows up frequently with beginners practicing backbends, usually concentrated most improperly in the lower spine or lumbar, while the rest of the column is only minimally involved.
When an archer’s bow is drawn, the two limbs are placed under enormous stress; in the more efficient bows, this stress is uniformly distributed along the limbs. The same holds true for the spine in our bow and, actually, in all postures. The force of the movement should be shared equally, with equanimity, among all the individual members of the spine.
There are some backs, however, that just don’t like backbends, regardless of how they’re bowed. Please consult with an experienced instructor before attempting this posture if you have any nagging problems with the sacrum and its pelvic joints, the muscles of the back torso and neck, or the spongy discs between the vertebrae.
Preliminary Exercise
Since this article is dedicated to Side Bow, I won’t go into too much detail about the many preparations for Bow Pose. If you experience any pain in the knees or lower back, or if you find it to be too extreme for whatever reason, then you can just as easily warm up with a simple lunge.
When practicing Side Bow and Bow, pay close attention to the front of the hips, the three- or four-inch area between the topmost thighs and the hip points, which is an important junction for the back extension. Much of the success of backbends depends on the assimilation of the front body into the posture, which requires length along the thighs and front hips, in the belly between the pubis and the bottom of the breast bone (sternum), in the muscles between the ribs (intercostals), and in the inner and outer armpits (the pectoralis major and latissimus dorsi). A backbend could just as accurately be called a “front stretch.”
To get in touch with this important area and the correct backbending action of pelvis and thighs, try this simple exercise.
Kneel on the floor with your knees hip-width apart, toes turned back, and spread your hands on your hips with the fingertips on the hip points.
Inhale and lift the front of the pelvis, as if you’re pulling the hip points toward the shoulders, while using your thumbs to slide the back of the pelvis toward the floor. Notice that the buttocks firm, the lumbar lengthens through the tailbone (coccyx) toward the floor, and the distance between the hip points and the lower front ribs decreases. Use your thumbs to broaden the back of the pelvis by pulling the top buttocks away from the midline of the sacrum.
Now exhale and push the hip points toward the floor: Notice that the buttocks release, the coccyx lifts up and pokes back, the lumbar squeezes, the belly spills over the front rim of the pelvis, and the lower front ribs jut forward. Repeat this rocking action until you feel the difference between the two extremes.
Next, spread your palms against the very top thighs, just below the hip points, with your fingers pointed down. As you lift the hips this time, slide the hands down the thighs so they spread away from the front of the pelvis and feel the stretch along the front hips. The space here helps lengthen the lumbar and recruit the entire spine, all 24 moveable vertebrae, into the back bow. Repeat this exercise until you’re confident that you can recreate it in the shape that follows.
Preparation
This preparation is a modification of Frog Posture (Bhekasana) or Half Frog Posture (Ardha Bhekasana). You might want to do these exercises on a blanket to pad your lower ribs, belly, hip points, thighs, and knees. Have a rolled blanket within reach.
Lie on your belly, legs stretched back on the floor, forehead or chin resting on crossed forearms, left arm above the right. Take a few normal breaths. With your belly pressed against the floor, do your inhalations feel somewhat flat or obstructed? If so, steer your breath more toward the lower back; if you have trouble locating this area, place one hand in the valley of the lumbar. Don’t forget to breathe!
Now exhale and lift your head and the front of your upper torso—the sternum and ribs—away from the floor. If you’re tighter in the front of the body or weaker in the back, you might have some difficulty with this lift, so position the blanket roll under your lower front ribs for support.
Bend the left knee and draw the heel toward the buttock. Then, supporting the weight of the upper torso with the right forearm, twist slightly to the left, reach back with your hand, and press the palm against the top of the foot (Figure 1). Slowly apply hand pressure to the foot, moving the heel closer to the buttock. If you can comfortably touch the heel to the buttock, then try bringing the heel a little to the side of the buttock.
Now extend your elbow away from the shoulder and then rotate the upper torso to face forward once again, stretching across the front of the chest and shoulder joint. Imagine that the elbow and knee are moving back, toward the wall behind you, and that the top of the breast bone (sternum) is moving forward, toward the wall in front. Stay for one to two minutes and repeat for the same time on the right.
Beginning: Bow (Dhanurasana)
Now for Bow. If you needed a blanket roll for the previous exercise, or if either or both your shoulders or your neck were unhappy with their stretch, you might now want a strap (at least 5 feet long).
Lie prone again and reach your arms back, placing the backs of the hands on the floor alongside you.
Then bend your knees, bring your heels near your buttocks, lift your upper chest, and reach one hand back to grab the same-side ankle. If you can’t comfortably hold the ankle—and it should be the ankle, and not the top of the foot—because some part of you somewhere is protesting, then you’ll need to hold the strap looped around the ankles.
Exhale and, keeping the thighs on the floor, actively lift the heels away from the buttocks and the upper torso away from the floor (Figure 2), “stringing” the arms back as long as they will go. Imagine a bow: The two limbs, under tension, pull the ends of the string apart, while the string is valiantly resisting that pull. When amplifying the tension in the limbs, the bow becomes a reservoir of tremendous potential energy, primed to be let loose. How will you use this energy in the posture?
The fronts of your thighs— not the lower back—are the “hinge” of the backbend. The entire spine, from tail to skull, should share in the movement. Beginners are prone to compress the spine in the lower back, which, if repeated over time, can lead to injury (Figure 3). As you did in the kneeling preliminary practice, lengthen the coccyx away from the spine and lift the front of the pelvis toward the lower ribs, as you string the bow. If your ribs dig painfully into the floor, if the back of your head jams down against your upper shoulders, again with painful results, if your breathing stops, or almost stops, because there’s nowhere for it to go and, most of all, if your back complains loudly about your current approach to yoga, especially after you’ve raised your thighs off the floor, STOP. Go back and try the preliminary exercise a few more times, or find an experienced teacher who can guide you into the correct position.
Hold for a few breaths with the thighs on the floor, making sure that you’ve initiated all the actions we’ve worked on up to now. Then exhale and, tugging up on the ankles, lift the thighs a few inches away from the floor. If the knees want to splay wider than the width of the pelvis and the feet turn out, Charlie Chaplin-style, firm the inner thighs and move them closer, at least parallel to each other, and pigeon-toe the feet. Stay for 30 seconds to one minute and release on an exhale. Then repeat a couple times more, raising the torso and thighs together.
Practice: Side Bow (Parshva Dhanurasana)
Now for some fun. To get from Bow to Side Bow, you’ve got to roll over onto your side, and this exercise will teach you a kind of “rolling intelligence” that prepares you for the maneuver.
Lie prone again, as above, but this time bend your knees to a right angle, so that the shins are perpendicular to the floor, and keep your hands on the floor, arms beside the torso. Press the legs together and swing the shins and feet back and forth, pivoting them over the knees like an upside-down pendulum or metronome. Start with a small arc of only a few degrees, and with each complete swing, add a few degrees more. Let the cadence of the movement little by little incorporate more and more of the legs, the torso and, lastly, the head, until you find yourself rolling merrily from one side to the other. To assist this merriment, bend the elbow of the off-side arm, slide the hand up beside the shoulder, and push it against the floor. As you roll back to that side, straighten the arm back alongside the torso (Figure 3).
Coordinate the rhythm of the rolling with the rhythm of the breath: I like to inhale on my side and exhale as I roll across my belly to the other side.
Continuing Practice: Side Bow (Parshva Dhanurasana)
When you’re ready to try the full posture, brace yourself up into Bow first. Then, with an exhale, lever the legs to the right as you did above, pull on the left ankle and simultaneously boost the left shoulder away from the floor, and roll to the right.
Oops! Stuck on your belly, despite all your huffing and puffing, like a turtle on its back? Don’t despair, it happens all the time. Come to a modified Bow, with your thighs on the floor, and when you’re ready to roll, let go of your left ankle and push yourself over with your free hand. Then either grab the ankle again or use the hand to help you flop back onto your belly. Repeat to the left side.
If you made it over without unstring-ing a hand, stay for a few breaths, then exhale and, pulling again on the left ankle and pressing the left shoulder toward the floor, roll back onto your belly. Now repeat the above instructions, substituting “right” for “left,” and stay as long on the left side as you did on the right, before returning to center (Figure 4). Try a few more times, and gradually pick up your pace, deftly rolling from one side to the other on each exhale. Finish up with one last Bow-take a bow-and release on an exhale.
What part does Bow play in the universe of your consciousness? You can take, as the starting point in your meditation, these words from Swami Radha: “The purpose of the arrow is to fly straight and true to the target. The purpose of the bow also needs clear definition. One is useless without the other. And what is the target? Is there a target, a larger one, in the distance, with many intermediate ones along the way? Is the main target well-defined, clear?”