
Published March 26, 2026 01:32PM
Yoga Journal’s archives series is a curated collection of articles originally published in past issues beginning in 1975. This article about the Splits first appeared in the November-December 1994 issue of Yoga Journal.
Many years ago I heard a description—whose source I have long since forgotten—of the correct way for a warrior to walk on a long journey. The warrior, I was told, should fix his gaze on a distant point, forming a clear intention to arrive at that landmark by sundown. By keeping the intention fixed, he can transcend the immediate fatigue or difficulties of the journey. However, the warrior must also pay great attention to the path directly in front of his feet, carefully assessing each stone and turn in the trail to find safe and sure footing. The key to success is knowing how much attention to give to the path immediately in sight and how much attention to give the destination so that each step will be toward the ultimate goal.
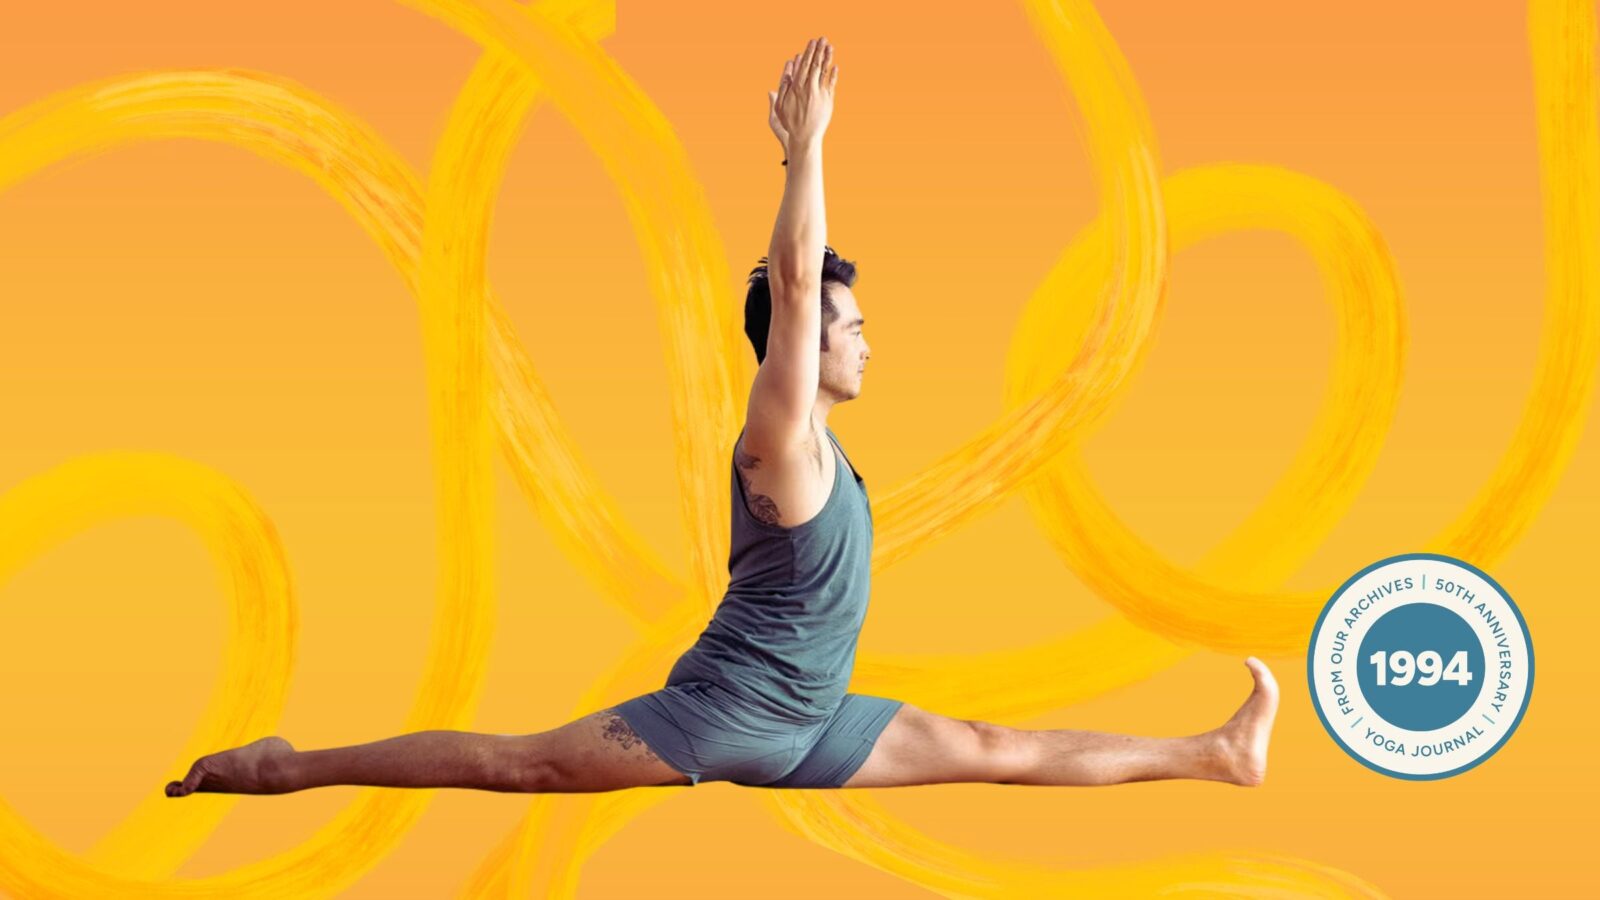
There are many asanas that are “long journeys.” These formidable postures stare back at us from photographs, usually eliciting a hopeless resignation that prevents us from ever attempting them. Or we may have a brief affair with the pose and then, failing on our first or 30th attempt, move on to what might seem like more fruitful relationships. Hanumanasana (King of the Monkeys Pose) is one such posture. Even after moderate adeptness is achieved, it continues to be a long journey that provides endless challenges—not the least of which is maintaining any ground gained through continued, consistent practice.
Poses such as these provide us with special opportunities to learn the skill of the journeying warrior. We must have a vision of the final destination, but the skill (and success) will ultimately lie in our ability to focus our attention on each individual step. To do so, we must develop what I like to call “incremental awareness”—the ability to divide the awareness process into manageable units of time. A fine “metronome” for this process is the length of one breath cycle—that is, an inhalation, an exhalation, and the moments in between.
Observe and note the sensations that arise within one breath cycle, putting your full attention into the present moment. Sometimes, this is the only way we can handle the intensity of a posture (or of a life situation). Even when the task at hand seems insurmountable, we can almost always handle the difficulty that arises within one breath cycle. When the sensation becomes too intense to stay with for even one breath, it is time to come out of the pose or step off the mat for the day.
Unfortunately, the analogy of the journeying warrior doesn’t completely hold true when we apply it to the practice of yoga. We may set ourselves the goal of achieving a certain position, but ultimately that is a false goal, an illusory attainment. The “final” position is only a means to give structure and direction to our awareness in this moment. By focusing our attention, we can enter into a state of enstasy, a term used, as scholar Georg Feuerstein writes, “in opposition to the emotional exuberance of ecstasy, to indicate a condition of tranquility and centralization of one’s whole being in the process of identification with the object of contemplation.” When you truly understand this concept, you can experience the inner equanimity of yoga now, regardless of how far away those final positions appear to be.
Ultimately, whether we achieve the final posture or not is insignificant. Those who do not believe this may be quite disillusioned to discover that nothing particularly remarkable or even pleasant happens when you finally put your feet on the back of your head. If our practice has been driven by hopes of radiant delight in that final moment, we may find ourselves asking, “Is this all there is?” when we achieve our so-called goal. The delight, the remarkable moment, was happening all along, but we were too busy getting somewhere to notice.
Personally, I began practicing Hanumanasana—more commonly known as “the splits”—at age seven in the girls’ bathroom at grammar school, sliding not-so-gracefully down onto the cold concrete floor. There was fierce competition raging among my peers to do the splits, but it was all in good fun. In fact, if you’re even thinking about working on Hanumanasana, a crucial element in this long-journey asana is a really good sense of humor. Your best ally on the road—and it may be a very long trip—will be the ability to laugh at yourself. For who in their right mind would go on such a long trip with a sourpuss for a fellow traveler?
Seeing as how you will be your only companion, you might as well enjoy yourself.
Preparing to Practice the Splits
Before practicing Hanumanasana, the body should be warm through more general work. You may want to do a practice that includes many repetitions of Suryanamaskar (Sun Salutations) interspersed with long stays (one minute each side) in standing postures such as Trikonasana (Triangle Pose), Ardha Chandrasana (Half Moon Pose), Parsvottanasana (Reverse Plank Pose), and Parivrtta Trikonasana (Revolved Triangle Pose).
This will lengthen and open both the front and back of the legs, as well as warming the deep muscles of the hips.
In all the following exercises you can use the breath to divide your awareness process into manageable units. This technique will allow you to hold the pose longer than you might otherwise choose given the whim of the moment. It will also help you to stay with any discomfort that may arise, noting that even discomfort is transitory. Decide how many breaths you are going to stay (11 breath cycles is a good start) and count each breath distinctly in your mind. As you count, focus on the sensations that are occurring within that one breath cycle.
Note when you become distracted or begin to worry about how many breaths you have left to do. Let your awareness within each breath cycle be very relaxed and spacious, as if you were settling down to a long chess game. Most important, be open to the possibility that you may have to come out of the pose or reduce the extremity of the position if the sensations you feel indicate potential injury.

Beginners Practice
A: Once you have warmed up, come into the following stretches from Adho Mukha Svanasana (Downward-Facing Dog).
Bring your right foot forward into a lunge position between the hands, with the forward knee bent. Let your back knee come onto the floor, placing the weight just above the knee cap rather than directly on it. You may want to cushion your knee with a blanket. Keep the hips level and with each successive exhalation deepen the hips toward the floor.
Now, begin to reach back through your left heel, attempting to straighten the leg without lifting the hips away from the floor (Figure 1). You may be unable to straighten the leg very far, but that is unimportant. If you feel a deep opening in the front of the left groin, the stretch is working. Let the opening come from deep within the left side of the belly, so that the left leg is lengthening back from the core of the body with the thigh bone moving away from the pelvis. Stay for your designated breath count and then release, coming back into Adho Mukha Svanasana. Repeat the stretch on the other side.
B: If your groins are particularly tight, you may want to have a bolster or stack of blankets on hand to support the thigh of the back leg in this next position. Bring the right foot forward into a lunge position between your two hands. Keep your left knee on the ground with the toes pointing back. Bring your hips level with the floor and draw the abdomen forward away from the back leg. Now bring your hands up onto your right thigh. Press down into the thigh with your hands as you draw the lower abdomen away from the thigh, working sequentially from the base of the abdomen up into the chest until your torso is upright. Do not straighten the arms completely if this action causes compression in the lower back area.
Keeping the abdomen drawn away from the thigh, deepen your lunge by descending the hips until you feel a strong opening sensation in the front of the groin. If this sensation feels too intense, place a bolster or stack of blankets directly under the top of the thigh, allowing the thigh to relax into the support (Figure 2).
Stay for the breath count you have chosen. As you follow the sensations within each breath cycle, you will begin to identify distinct physical and psychological changes from moment to moment.
Working this way is extremely important when you are practicing difficult, potentially injurious postures. If your mind is completely obsessed with “getting there,” you may injure yourself because you were not present with the sensations of the moment. If you want to intensify the stretch further, begin to reach through the crown of your head, letting your neck arch back.
Direct your breath fully into your chest to sustain the lift through the rib cage and to eliminate any compression in the lower back. Continue to arch back, drawing the hips forward, away from the back leg to intensify the opening in the front of the groin. When you have reached the end of your breath count, release and come back into Adho Mukha Svanasana.
Repeat on the other side.
C: This variation begins to open the hamstring muscles, which run down the back of the leg. In Hanumanasana, the hamstrings of the front leg must lengthen, while the muscles that run along the front of the back leg and groin must also release. This variation stretches both the front and back of the legs and can be modified for your level of ability.
Take Adho Mukha Svanasana with your heels against a wall. Draw the pelvis away from the shoulders so that the torso feels light. Make sure that your hips are parallel with the floor. Now bend the right knee and extend the leg up the wall, keeping the two hips an equal distance from the floor and an equal distance from the shoulders. As you extend the right leg up the wall slowly press the left heel toward the floor (Figure 3). As you feel able, begin to walk your hands in toward the wall so that the legs are being drawn into the “splits” against the wall. Move a few inches at a time, stopping to square the hips, lengthen the torso, and assess the intensity of the stretch before proceeding. If you are a beginner you may find that simply lifting the leg up the wall is sufficiently challenging. Only go as far as you can while maintaining the level position of the pelvis. This will be important for your later success in Hanumanasana on the floor. Rest in Child’s Pose before repeating the pose on the other side.
Advanced Practice
After practicing the preliminary stretches and the beginners’ movements, you may feel ready to attempt full Hanumanasana. In preparation for your attempt, have a few blankets as well as two blocks (or two sturdy books) near your side. Place a blanket the length of your body on top of a sticky yoga mat. This arrangement will cushion your knees and prevent the blanket from slipping.
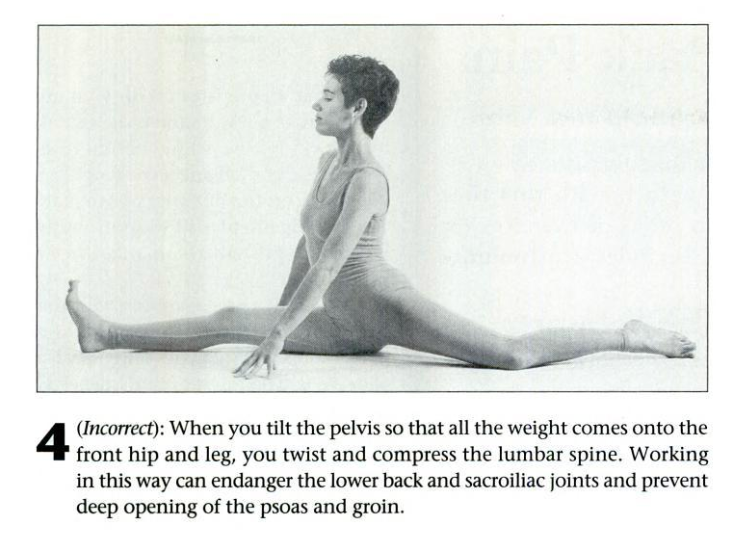
Come into a lunge position with the right leg between your hands. Walk the left knee back so that your lunge is very wide. As you do this, position the pelvis so that the left hip is facing the floor. If you keep the back hip elevated (Figure 4: Incorrect), you will twist and compress the lumbar spine and avoid opening the deeper muscles of the groin, such as the psoas.
Slowly begin to descend the right thigh toward the floor, keeping the knee slightly bent. This approach will prevent strain to the tendons at the back of the right knee and at the insertion points where the muscle attaches to the sitting bones. The stretch should be in the belly of the muscles, not in the tendons at either end that connect the muscles to the bone. As the thigh descends toward the floor, begin to lengthen the right leg out, pressing through the ball of the foot rather than through the heel.
Once the right thigh has touched the floor, you can safely straighten the leg all the way. If the right thigh is still a few inches off the ground, place a folded blanket underneath the length of the thigh and knee to fill the gap. If you have raised the front leg, you may want to support your hands on blocks placed on either side of your shoulders. This will help reduce any strain to the lower back.
Whether you are on the floor or supported with the blanket, you can now turn your attention to the back leg. Roll the left side of the pelvis forward so that the left hip comes level with the right hip. At the same time, turn the right thigh inward so you feel the weight on the outer edge of your right knee. If you are unable to bring the leg square to the floor—in other words, if your left hip remains raised with the left leg rolled out—you are probably going beyond your capacity and should raise the front leg with a folded blanket until the back leg is square.
Release from deep within the two sides of the abdomen, feeling how the legs are connected to the core of the torso. Draw the abdomen upward as you gradually bring the torso upright. Stay for your designated breath count, opening further into the pose as you feel the body relax.
If you had difficulty bringing the front leg all the way to the floor, you may want to try an easier variation, in which you extend the front leg at a 45-degree angle rather than directly in front of you. This variation is an excellent preparation for the full pose.
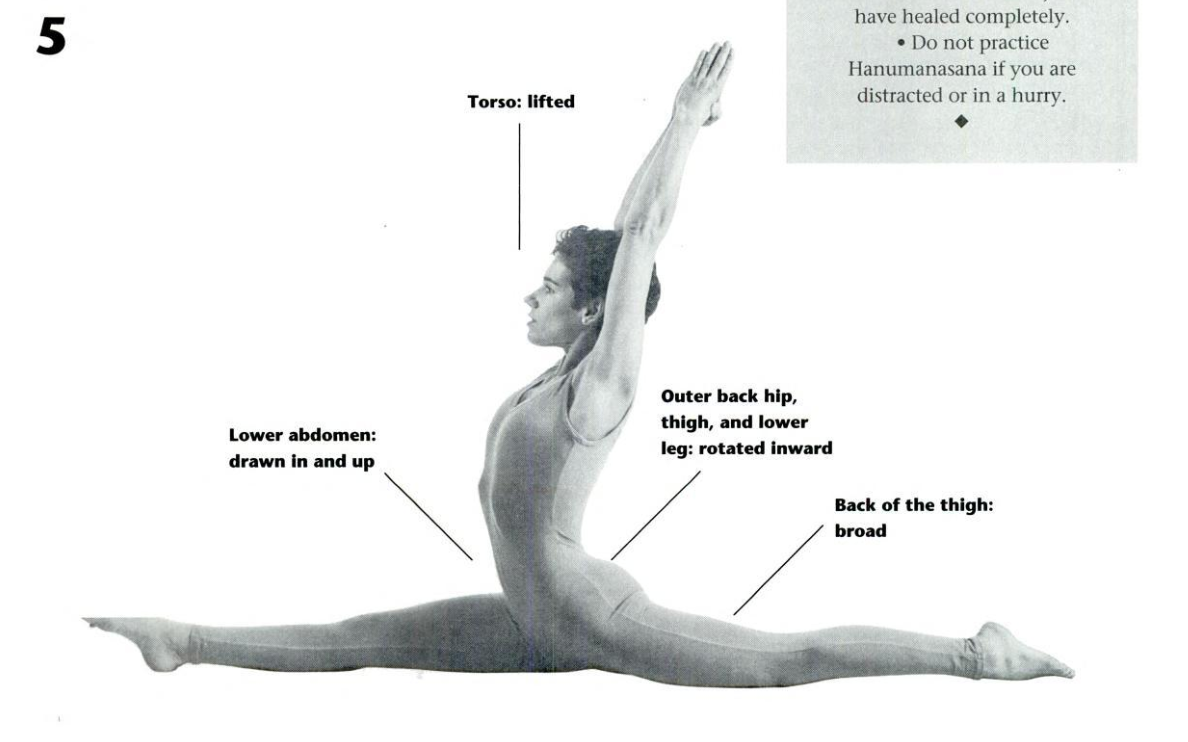
Once the legs are open enough, you can place the full weight of the body onto the floor by bringing the hands into namaste (prayer position) in front of the breastbone. A further extension of the final position is to extend the arms over the head with the thumbs interlocked (Figure 5). While this variation helps to eliminate compression in the back, it also dramatically increases the weight on the groins, so take this final step with caution.
To come out of the pose, support yourself on your arms, bend the front leg, and gently come back into Adho Mukha Svanasana to relax the groins. When you are ready, repeat Hanumanasana on the second side.
If you are serious about embarking on the journey of this asana, it’s a good idea to include it in your regular practice. Hanumanasana is not like riding a bicycle—the body forgets how to do it very quickly. Quite simply, it takes relentless practice. By staying with the discomfort rather than running away from it, you will be able to create deeper and deeper levels of opening. Taking that tenaciousness into your everyday life may prove the most challenging journey of all.