
Published April 8, 2026 11:41AM
Yoga Journal’s archives series is a curated collection of articles originally published in past issues beginning in 1975. This article about chin lock first appeared in the April 1995 issue of Yoga Journal.
The age-old breathing practices of the yogis are known collectively as pranayama. While we in the West tend to emphasize asanas, or postures, in our daily practice, and at times even equate asana practice with yoga, in traditional hatha yoga asana is merely a preparation, a method of strengthening and purifying the body, for the demands of pranayama.
Pranayama is often translated as “breath control,” but this rendering only scratches the surface of the true import of the word. Prana is literally the world. “All the forces of the universe,” writes Lama Govinda, “are modifications of prana.” One of these forces is the breath of life that animates us all, and which the yogis manipulate by way of its gross vehicle, the physical breath.
Ayama means both “stretching, extending,” and “restraining, stopping.” Pranayama, then, is the stretching and restraining of our reservoir of life energy, specifically in the torso, which the yogis compare to a pot (kumbha). This pot normally “leaks” prana at the inlet and outlet of the alimentary canal (the throat and anus). And so to secure the container, the yogi seals it with a pair of muscular locks (bandha), the contraction of the muscles of the bottom of the pelvis (perineum), which is called the root lock (mula bandha), and the contact of the downturned chin with the uplifted breastbone, popularly called the chin or throat lock (jalandhara bandha).
Next the yogi compresses the belly muscles toward the spine: This upward lock (uddiyana bandha), the third major bandha, heats the confined prana. The goal of this odd procedure is to focus the concentrated energy at the base of the spine and rouse the kundalini—the serpentine coiled one, the dormant divine spark in each of us—to swing wide the gate to liberation.
What Is Yogi Chin Lock?
Jalandhara bandha is widely identified in English as the throat or chin lock, but these are really convenient descriptions that—like “breath control” for pranayama—fail to convey the nuances of the Sanskrit.
Jalandhara is made up of two smaller words, jala and dhara. The latter means both “stopping, holding,” and a “vein or tubular vessel of the body.” The former has two variants in Sanskrit, one with a short first a, which means water (or fluid); and one with a long first a, which means net (or web, mesh, or snare).
There is a third, more esoteric purpose for jalandhara bandha. The tens of thousands of subtle channels, called nadis, ordinarily transport prana to every nook and cranny of the body, but it is reported that some are pipelines for a priceless liquid called juice (soma) or immortal (amrita), exuded by a center in the brain (or neck). In the average human, this soma drips into the fires of the solar plexus and is burned up. With chin lock, however, the yogi can dam up these nadis where they pass through the neck and drink this nectar of eternal life.
At this stage, chin lock won’t really function to seal prana in the pot (since prana will trickle out without the root lock), nor will it be needed to protect internal organs from any sudden lightning bolt of energy (since the prana isn’t being charged by the upward lock).
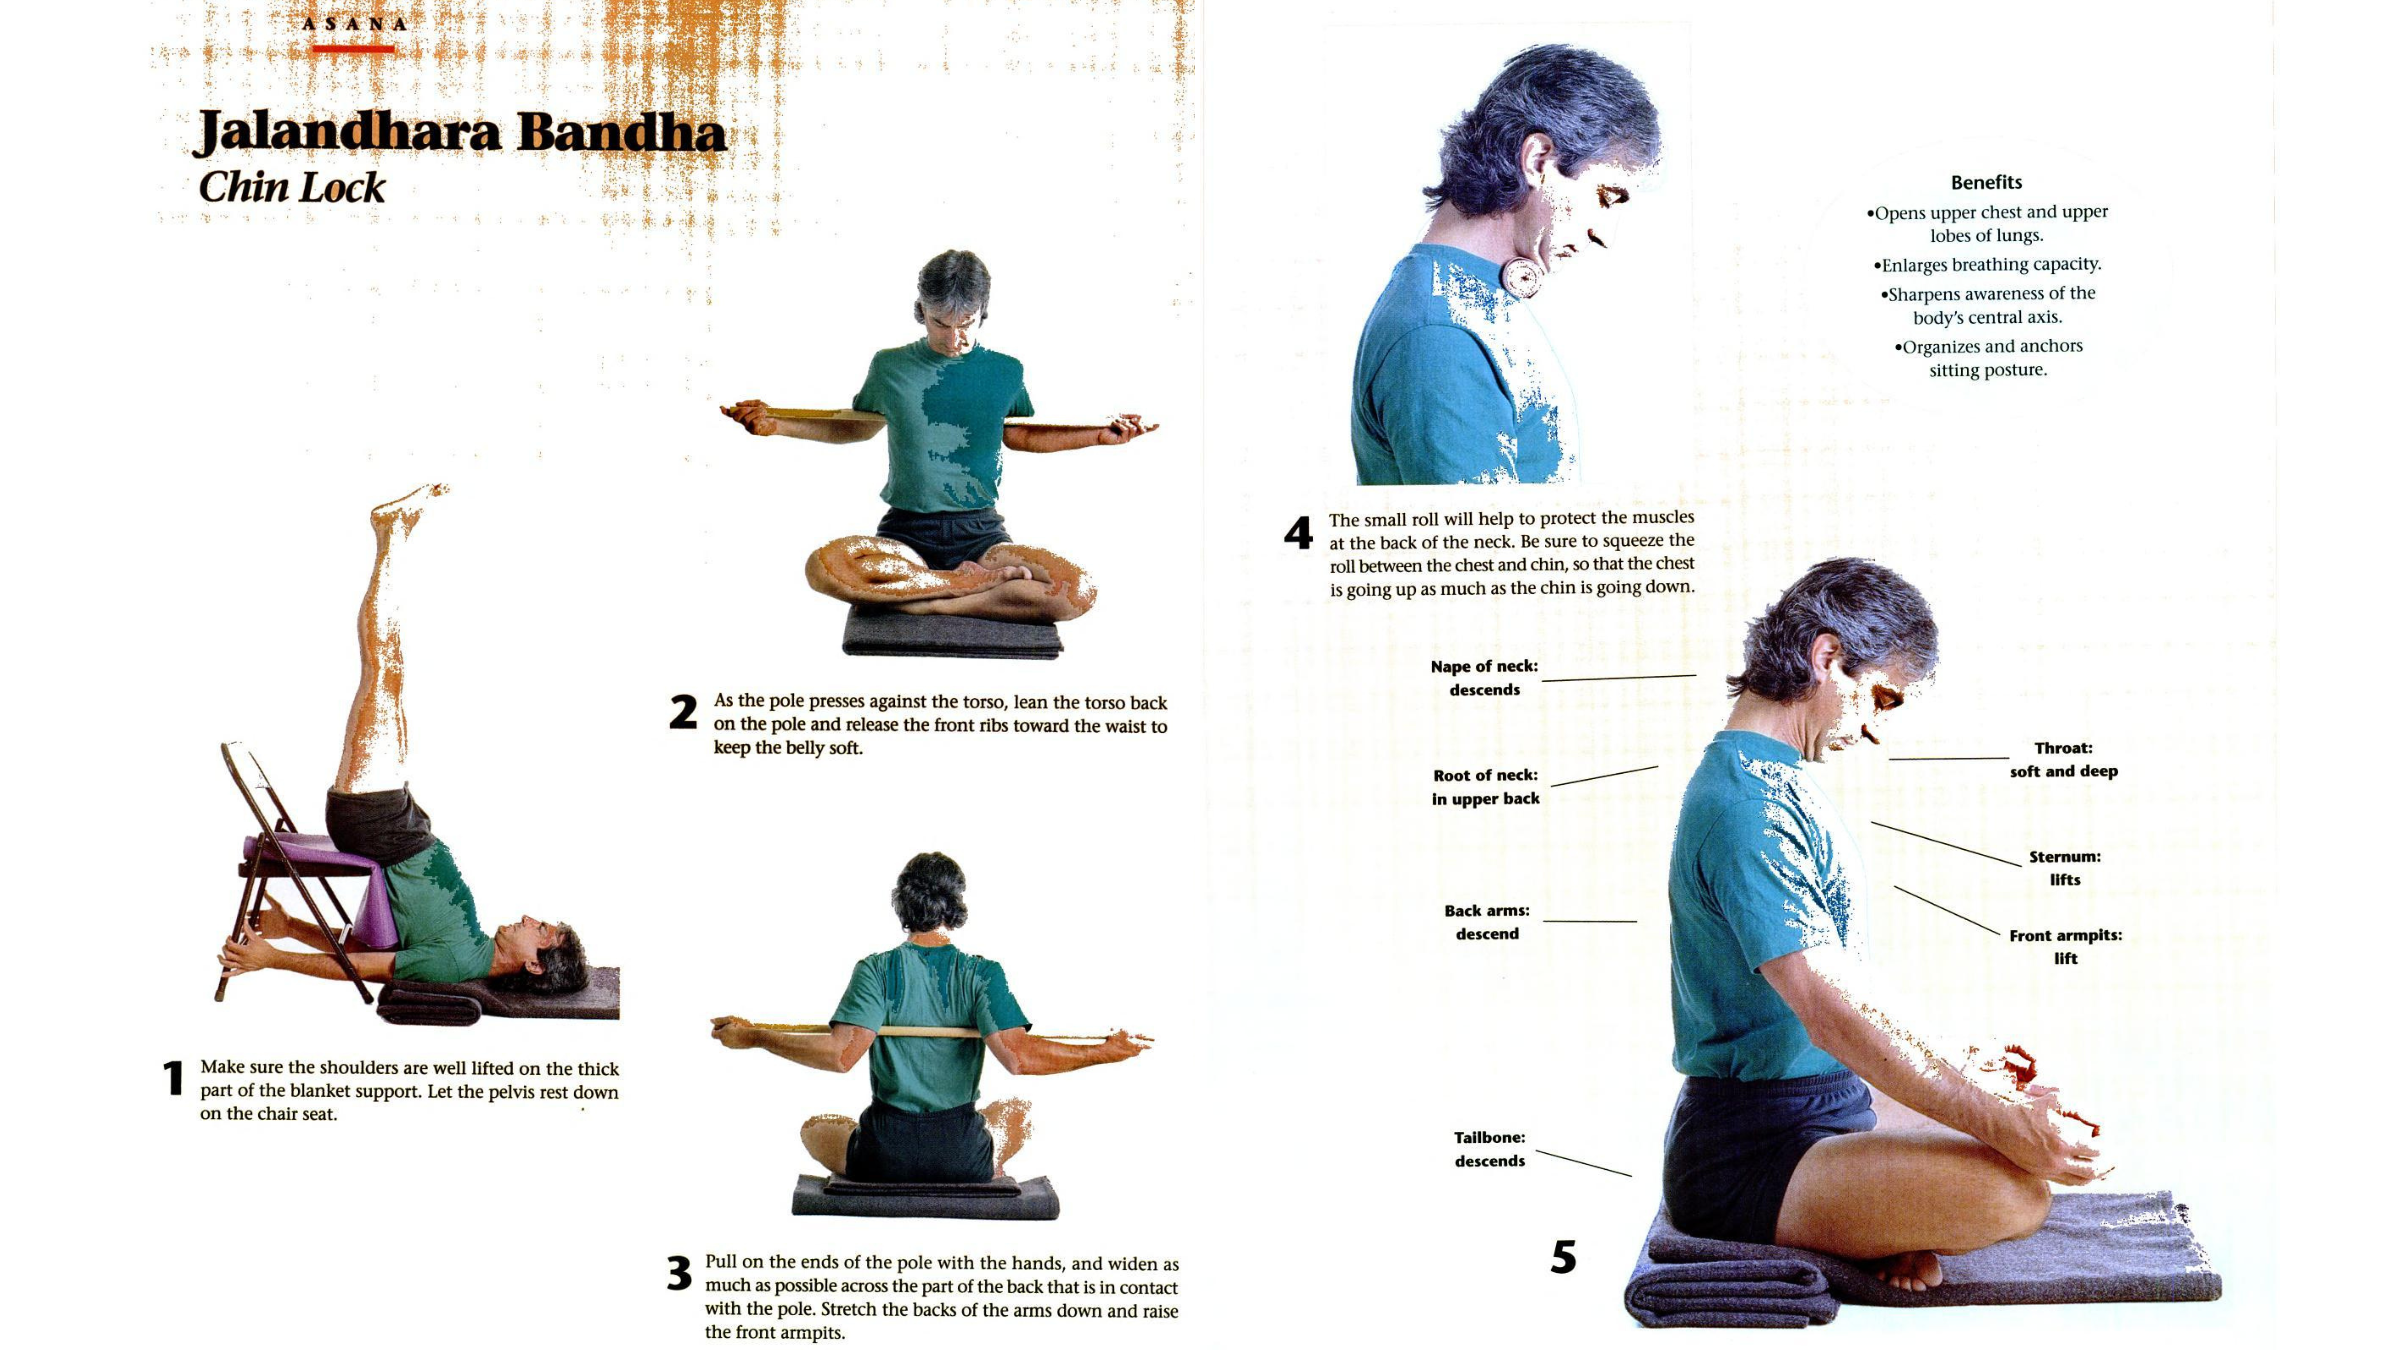
Nevertheless, even in the commencement stage, I have found that benefits accrue from practicing chin lock. Physically, it encourages you to lift the top of your sternum—using the lowered chin as a tactile aid—as well as the front of the spine, the energetic core of the torso. This action does two things: It teaches you how to open the upper chest and the upper lobes of the lungs, which helps to enlarge your breathing capacity; and it sharpens your awareness of your body’s central axis, which then serves to organize and anchor your sitting position.
Also, with your head bowed in a gesture of contemplation and your eyes directed downward toward the heart, chin lock helps to draw your otherwise scattered awareness inward and calm the incessant fluctuations of thoughts. Just as the tips of the thumbs and index fingers are traditionally brought together in meditation to, at least in part, quiet the restless hands, so the contact of chin and sternum steadies the brain and soothes the galloping mind.
Before we move on to the practice, there are two things I want to mention about chin lock to watch out for, which are actually suggested by its somewhat misleading English names.
While “chin lock” seems to imply that jalandhara is fixed solely by the chin pressing on the sternum, this is only half the proper action: Certainly the chin drops toward the sternum, but—in order to avoid overstretching and injuring the muscles of the back of the neck—the sternum must also move up toward the chin.
As T.K.V. Desikachar cautions, “If someone with a very stiff neck tries to force the chin down, he will hurt himself.” Perhaps a more accurate way to characterize the bandha in this sense would be the “chin-sternum lock.”
“Throat lock” could also be misconstrued. Lock is indeed the English equivalent of bandha, but it unfortunately conjures up the notion that jalandhara is clamped down like one of those padlocks in the commercial that can’t be blasted open.
Most of us already hold an excess of tension in the throat, which interferes with the easy flow of normal breathing: Aggravating that tension during pranayama with a rigid chin lock could have some serious consequences, like headaches, dizziness, and irritability. Instead of visualizing the lock on your front door, think of this bandha as a being like a lock in the Panama Canal, with doors that continually respond to the exigencies of the entire system, opening and shutting as the water-or prana-level rises and falls.
How to Practice Yogi Chin Lock
To prepare for chin lock, first imagine that the sternum is rising through the crook of your neck—where the underside of your chin meets the front of your throat—to that small bump (the occipital protuberance) on the back of your head. In other words, before you take your chin down, encourage your chest to go up, then imagine that your chin “drapes” or hinges over the crook as it lowers to the chest. This helps keep the skin and muscles all around your neck soft and the head balanced on the spine.
To get this sensation, lie on your back with your knees bent, soles on the floor, and your heels a comfortable distance from your buttocks. Raise the head a bit off the floor and use your thumbs to find the occipital bump: spread the bump out toward the ears and pull it away from the nape of the neck, then release the nape toward the shoulders.
Settle the head down on the floor again without disturbing the space surrounding the occiput. The underside of the chin should be perpendicular to the floor.
Then, to more clearly define the crook of the neck, place the index fingers lightly, about four inches apart, on either side of the windpipe, just below the jawbone, and draw an imaginary line across the front of the throat between the fingertips. Imagine that this crook is flowing diagonally through the skull to the occipital bump, where the movement divides: the skin on the back of the head circulates up (and over the crown and down the forehead to the bridge of the nose), while the skin on the back of the neck cascades down (along the back spine to the tailbone).
Feel how the widening of the back of the head and the lift of the crook serve to soften and deepen the throat.
3 Ways to Improve Chin Lock and Pranayama
The best warm-up poses boost your bodily awareness while lengthening and strengthening.
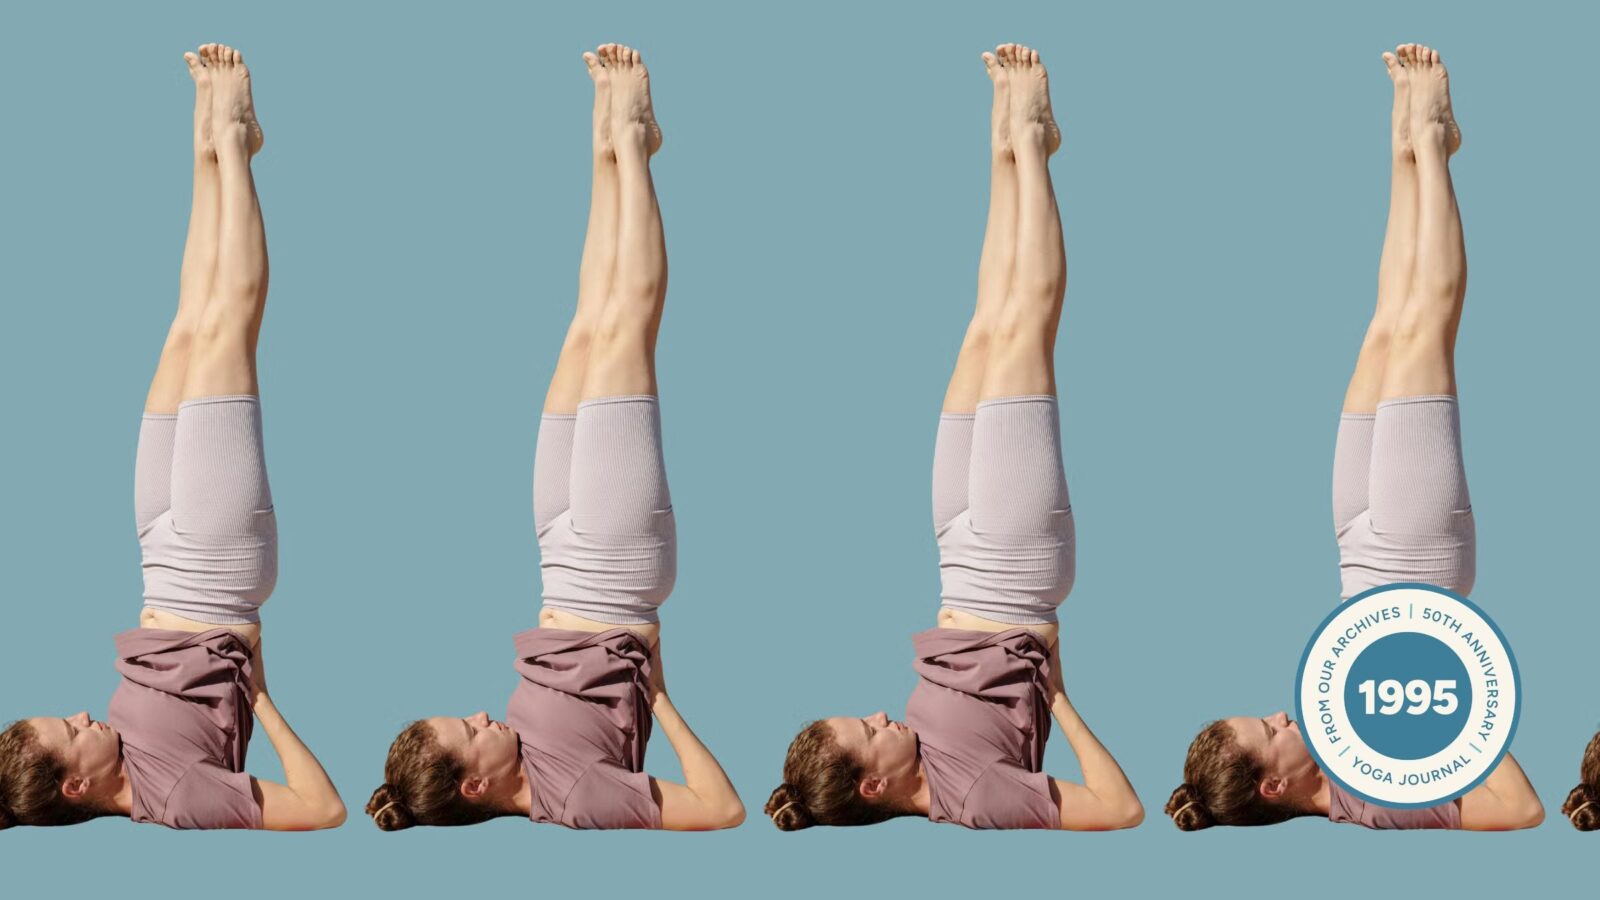
1. Shoulderstand
Because the relationship of the head and torso are similar to chin lock, asanas from the Shoulderstand family—including Shoulderstand (Sarvangasana), Plow Pose (Halasana), and Bridge Pose (Setu Bandhasana)—are recommended as preliminary exercises. They work to lengthen the back of the neck, to increase your awareness of the backs of your upper arms, tops of your shoulders, and back of your head, and to spread and lift the sternum, all of which will contribute to your intelligent performance of chin lock.
Shoulderstand has all the benefits of the full posture with fewer of the drawbacks, and it’s accessible to all levels of students—as long as you’re willing to literally and figuratively bend over backwards, not something that we always do readily and with grace. If you’ve never done this exercise before, look at the photo of the completed position now (Figure 1).
As you can see, you’ll need a sticky mat, two (or perhaps three blankets, and a metal chair. Fold the mat a couple of times and lap it over the front edge of the chair seat to cushion your pelvis and lower back.
Fold one blanket into a long, narrow rectangle—mine measures about one foot by two feet, and three inches thick—and place it with a long edge just below and parallel to the front of the chair seat. Shorter students might need two of these blankets): This blanket lays the foundation for the shoulder support. Fold the second blanket into a rough square about two feet on a side, and lay it half on and half off the first; the half that’s off will pad the back of your head on the floor.
Don’t try this position with the shoulders and head flat on the floor. Most of us need support to protect the muscles, bones, veins, and arteries of the neck. Naturally, all the contraindications that apply to Shoulderstand (such as menstruation and high blood pressure) are in force with this supported variation.
Start by straddling the seat facing the chair back. Move your buttocks close to the back edge of the seat, sling your knees over the top edge of the chair back, and grab onto the chair legs. Inhale and lift your chest, then exhale and—without losing any of the lift of the chest, and keeping the knees hooked over the chair back—slowly lower your torso into a back bend over the front edge of the seat. You might need to wiggle toward the front of the chair seat, without letting your pelvis slide off, until your shoulders just barely touch down on the higher part of the blanket support.
Are you reluctant to dive blindly backward off the seat? Humans—in fact, all primates—have a natural fear of falling backward. We confront this fear in yoga all the time, in postures like Headstand, Handstand, and in dropping back from standing into Upward Bow (Urdhva Dhanurasana). Just remember that in this case, it’s not really that far to fall, and the worst thing that usually happens is that you slide off the chair and collapse into a heap; in this event, just as when you spill off a bicycle, the best thing to do is to get back on and try again. You might also be concerned that the chair will tip over, dumping you on your head.
Chances are very slim that it will, but if you need reassurance, put a heavy bag on the back rung of the chair (or have a bewildered housemate stand on it). Now grip the back legs of the chair. If you’re very tight in the shoulders and armpits, it’s best to position the arms outside the front legs; if you’re more open, you can bring your arms inside the front legs, and either over or under the front rung. The last option is the most extreme:
If you experience any tingling in the hands, back off right away. Finally, with the back of the pelvis sitting on the seat, exhale and extend the legs perpendicular to the floor.
This is the bare bones posture; now let’s add a few details that we’ll duplicate later in chin lock. Beginners have a tendency to overstretch the muscles of the neck in this posture (as well as in full Shoulderstand) by dragging the shoulders too far away from the ears and pinching the shoulder blades (scapulas). So round your shoulders both up toward the ears and up toward the ceiling—as if you were hunching your back-and widen the upper back between the scapulas.
Then exhale and, maintaining this upper back width, press the upper arms and the fronts of the shoulders, just below the outer tips of the collar bones, straight down into the floor. Imagine that the occipital bump is inching away from the shoulders, while the back of the neck feeds into the arms toward the chair.
As the arms press down, elevate the side ribs out of the armpits without jutting the front ribs—keep the front torso gently curved, with a soft belly. Then drive the sternum toward the crook of the neck, and the crook of the neck toward the back of the head, while you relax the root of the tongue and soften the throat from front to back.
Stay for two to five minutes. To come down, bend your knees toward the chest and lift the pelvis off the seat, curling into a ball. Beginners should not bring their feet to the floor over the head, but instead suspend them a good distance off the floor. Then slide the chair to one side, brace your back with your hands, and roll carefully onto the floor, looking behind you to avoid whipping the head and neck forward.
2. Accomplished Pose
Accomplished Pose (Siddhasana), (Figure 2), is endorsed by the Hatha Yoga Pradipika as the “best and most comfortable” sitting position for pranayama. If you’re just beginning to practice, I recommend the simple cross-legged Easy Pose (Sukhasana). Either way, sit on a thickly folded blanket, so that your buttocks are a few inches off the floor, and support each knee with a blanket so the knees are slightly higher than the inner groins. If for some reason you’re not able to sit either cross-legged or on the floor, then sit near the front edge of the metal chair with the knees over the ankles.
The legs are the foundation of the sitting posture, and, like any foundation, they should be firmly planted in the earth. To do this, imagine that the heads of the thighs bones (femurs) are heavy, and let them sink to the floor. You might occasionally sit with weights-10-pound sand bags will do wonders—on your inner thighs to accentuate this action just be sure that your knees are well supported and the inner groins soft).
When most people sit, they slouch so that the front of the spine is shorter than the back. In pranayama sitting, the front of the spine lifts without hardening the back spine or pushing the front ribs forward. As an exercise, think of the torso as a cylinder and the front of the spine as a thin dowel inserted through the center of the cylinder, parallel to its sides. Lie on your back and rock from side to side, feeling the outer circumference of the cylinder turning around the axis of the front spine. Then sit and let the imaginary dowel lengthen up out of the legs, while the circumference of the cylinder (which includes the back of the spine and the front ribs) hangs downward.
Always judge the skillfulness of your sitting posture by the two classical criteria for asana: steady and comfortable. To fine-tune your position, it’s best to consult with a teacher or a book, such as B.K.S. Iyengar’s Light on Pranayama or Geeta Iyengar’s Yoga: A Gem for Women.
Once you’ve established your seat, you can work with chin lock using a prop (inspired by Mr. Iyengar, who uses it in a slightly different context): a pole about four to five feet in length. This pole will help us refine the two basic actions of jalandhara we’ve been cultivating: the lift of the chest or sternum and the dropping of the chin or head.
With the head erect, position the pole across the mid-back, in the vicinity of the lower tips of the scapulas and the back armpits (Figure 3). Use the leverage of the pole to descend the backs of the arms, curl the elbows forward as if wrapping them around to the front of the pole, and draw the scapulas toward the waist. Then press the pole firmly in and up—in toward the lower tips of the scapulas and up toward the top of the sternum. Here, at the lower tips of the scapulas—which dig into the back like shovels—is the real root of the lift of the sternum.
Be sure, at this point, not to poke the front ribs forward: just as you released them in supported Shoulderstand, let them now hang from the top of the sternum. Keep the shoulders passive (rainbow-shaped), and the collarbones broad.
When you’re ready to bring the head down, imagine first that the nape doesn’t end at the top of the shoulders, but trails down the back spine, like a long pony tail, to the spot in contact with the pole. (Here is the root of the back of the neck.) Next exhale and, pivoting over the crook of the neck, take the chin to the notch at the top of the sternum.
You can practice with the pole until you feel confident about your “roots,” and then try chin lock with your hands resting on your knees, palms up. The model (Figure 5) is shown with hands in the “wisdom seal” (jnana mudra). Alternatively, you can rest your hands in your lap in the “meditation seal” (dhyana mudra) with, according to tradition, the right hand resting on top of the left.
Once you are in the posture, sit quietly for two or three minutes with your eyes closed, observing the natural ebb and flow of the breath. Let your mind be relaxed but alert. Let go of any effort to control the breath—instead, see if you can identify and release any habitual holding patterns. Remember that the Hatha Yoga Pradipika exhorts us to “tame” the breath little by little, like “lions, elephants, and tigers.”
3. Alternating Chin Lock
It’s entirely possible that, in the early stages of practice, the chin and the sternum won’t be able to touch: This leaves the chin dangling precipitously and, before long, it’s likely that the neck muscles will begin to ache. One thing you can do is to alternate chin lock with an erect head position: Take one pranayama cycle with chin lock, then two or three cycles of normal breathing with the head erect. Notice the effect that the bandha has on your breath. Another thing to try (and again all the credit for this prop goes to Iyengar) is a tightly rolled washcloth between chin and sternum (Figure 4).
Use chin lock sparingly at first. You must be confident that all of the pieces of the puzzle are in place-especially the elevation of the sternum and the descent of the back of the neck and scapulas-to protect yourself from strain. So don’t hold the bandha for more than two or three minutes consecutively until you’re more experienced; or alternate every few breathing cycles between the bandha and the head in its neutral position.
Most of all, remember not to get too enamored of this technique—or for that matter any yoga technique: They are all tools that are ultimately discarded. As T.K.V. Desikachar eloquently states, the “goal is not to need any technique. If we can just be involved with the breath, an active witness to the breath, that is pranayama, the highest pranayama.”