
Published April 20, 2026 03:23PM
Yoga Journal’s archives series is a curated collection of articles originally published in past issues beginning in 1975. This article about tight shoulders first appeared in the July-August 1994 issue of Yoga Journal.
A familiar image from antiquity is Atlas holding the world on his shoulders. As a punishment for rebelling against Zeus, Atlas was condemned—in Hesiod’s words—”to bear on his back forever / The cruel strength of the crushing world / And the vault of the sky. / Upon his shoulders the great pillar / That holds apart the earth and heaven, / A load not easy to be borne.”
Shoulders are a potent symbol for most of us. We have all been told to “square our shoulders,” to put our “shoulder to the wheel,” or to “shoulder the burden.” A person with broad shoulders is seen as capable and powerful. Small or underdeveloped shoulders suggest an inherent paucity of character.
Dropped shoulders indicate dejection or depression. Rounded shoulders imply that we are cowering or protecting our hearts.
Tight or weak shoulders affect not only our functioning in daily life, but our yoga practice. This article will discuss how poor posture and tight shoulders limit our muscles’ freedom of movement, as well as how we can improve shoulder functioning with yoga poses.
Anatomy of the Shoulders
The shoulder consists of three bones: the scapula (shoulder blade), clavicle (collarbone), and humerus (upper arm bone). Together these bones comprise the shoulder girdle.
The clavicle acts as a strut or support to the front of the girdle and rotates during most shoulder movements. The scapula is the pivotal bone of the shoulder joint—it serves as an anchor for all the shoulder muscles, provides a hollow joint surface for the humerus to connect with, and stabilizes and controls shoulder movements. The humerus interacts with the scapula to create all shoulder actions.
The shoulder joint can move in several different ways. Stand in a simple upright position with your arms hanging easily at your side. Flexion is accomplished by moving the arm forward and up as if to reach to a high shelf. Extension occurs when you move the upper arm back behind you, as if you were beginning to tuck a shirt into the back of your pants. Abduction involves lifting your arm out to the side away from the body.
To perform the opposite movement, adduction, reach across your chest with your upper arm and place your hand on the opposite shoulder. For external rotation, turn the upper arm until the upper inner arm faces forward.
For internal rotation, turn the upper arm so the elbow is toward the front of the body and the shoulder is rolling inward. When these six movements are sequentially combined, the upper arm makes a circular movement called circumduction.
Of these six movements, the most common are flexion and abduction. Whenever you reach over your head to find something on the top shelf of your closet, or whenever you reach out in front of you to type, prepare food, or drive, the shoulder joint is in flexion.
Putting on a coat and reaching across your car to lock the opposite door involve abduction. Internal rotation is used when you button your shirt; extension is necessary when you push yourself up from a low chair. Circumduction is involved in many swimming strokes.
If you have ever had a shoulder injury that limits one of these movements, you have discovered how necessary all of them are to a full and active life.
Many different factors contribute to a fully functioning shoulder joint. Let’s take a closer look at three key components:
1. Position of the Scapula
This is the main determinate of the range and freedom of shoulder joint movements.
Try this exercise. Close your eyes and become aware of the position of your shoulder blades. Move them slightly out to the sides away from the spine, then slightly back toward the spine. Notice how even the slightest movement of the two scapulae affects the positioning of the shoulder joint.
Once again move the scapula bones away from the spine. Hold the bones in this position and try to raise your arms out to the side of your body. Not only will this movement feel awkward, but you will not be able to lift the arms all the way up over the head—they will stop about half way up. If you maintain a habitual posture in which the scapulae are held forward—for example, if you tend to sit hunched over your computer screen—you will irritate the soft tissues around the shoulder joint each time you lift the arms overhead or out to the side.
2. Rotation
An important component of shoulder flexion is external rotation. Stand with your arms hanging easily at your side. Reach across your body and place one hand lightly but firmly on the middle of the other upper arm.
Raise that arm forward in flexion and feel how your upper arm rotates externally under your hand. Without proper rotation, performing much flexion is impossible.
External rotation is also an important component of abduction. Internally rotate your upper arm. Keep this position as you try to lift the arm out to the side. Your body will automatically lean to the side opposite the arm you are lifting in an attempt to compensate for the awkwardness of the movement.
As you can see, in order to increase the range of motion in flexion and abduction, you must also increase the range of motion in rotation. Later in this article specific postures will be given to stretch the muscles that can limit flexion and abduction.
3. Spinal Flexibility
Another important aspect of free shoulder movement is the flexibility of the thoracic or mid-spinal area. Most people do not realize that a stiff or rounded upper back interferes with the functioning of the shoulder joint.
While standing, round the upper back, thus dropping the chest and allowing the scapulae to move out to the sides away from the spine. Holding the body in this position, try to raise your arms in front of you. If you precisely maintain the position of the back and scapulae, it will be impossible to raise the arms fully. Once you have been stopped in the movement, release the back and shoulder blades and resume the attempt to lift the arms. Notice that the upper back begins to straighten and that the arms immediately can move into normal flexion.
4 Stretches for Tight Shoulders
Most of us need both stretching and strengthening in order to improve shoulder function. There are several yoga poses that are particularly good for stretching the muscles of the shoulder girdle. But before practicing them, it is helpful to understand a basic kinesiological principle: the convex-concave law of joint movement, which states that “Maximal range of movement occurs in a joint when the concave surface moves around the stationary convex surface.”
This proclamation is easier to understand than you might suspect at first reading. Remember that a joint is the place where two bones come together. One of the bone surfaces has a concave, or gently hollowed, surface. The other bone in this pair is necessarily convex—that is, it is shaped to fit into the hollow of the concave bone. To get a good visual image of this, make a fist of your right hand and place it in the palm of the left so that the fist is being held firmly. The fist represents the convex surface and the palm represents the concave surface.
For a variety of physiological reasons, any joint movement is healthier when the concave surface moves around a stable convex surface. To try this with your hands, hold the right fist still and move the left hand around the fist.
In the shoulder joint the concave surface is the surface of the scapula and the humerus bone is the convex surface. Unfortunately, most of our normal, daily shoulder movements do not “follow the law.” Usually we stabilize the scapula (the concavity) and move the humerus (the convexity). To visualize this action, try moving the right fist in the palm of the left hand. This movement is what occurs when, for example, you reach forward to pick up an object: The shoulder blade is held still and the humerus is moving.
This type of movement will usually not cause problems as long as there is no injury in the shoulder joint.
But if the shoulder joint is injured or the muscles around the joint are becoming tight, it is best to practice poses that follow the convex-concave law.
In light of this law, raising the arms over the head is not the best way to increase flexibility if you have a problem with the shoulders. The yoga poses presented in this article all follow the concave-convex law of movement and can be used beneficially to increase the range of movement or flexibility of the shoulder joint.
The poses will be presented in two parts. The first section will give instructions for beginning students; the second part will be for those who have more experience. Whichever variation you are practicing, be sure to read the instructions for beginners at least twice, as the instructions for experienced students will not repeat all the basic points. Also remember to use common sense, to keep breathing, and to enjoy yourself.
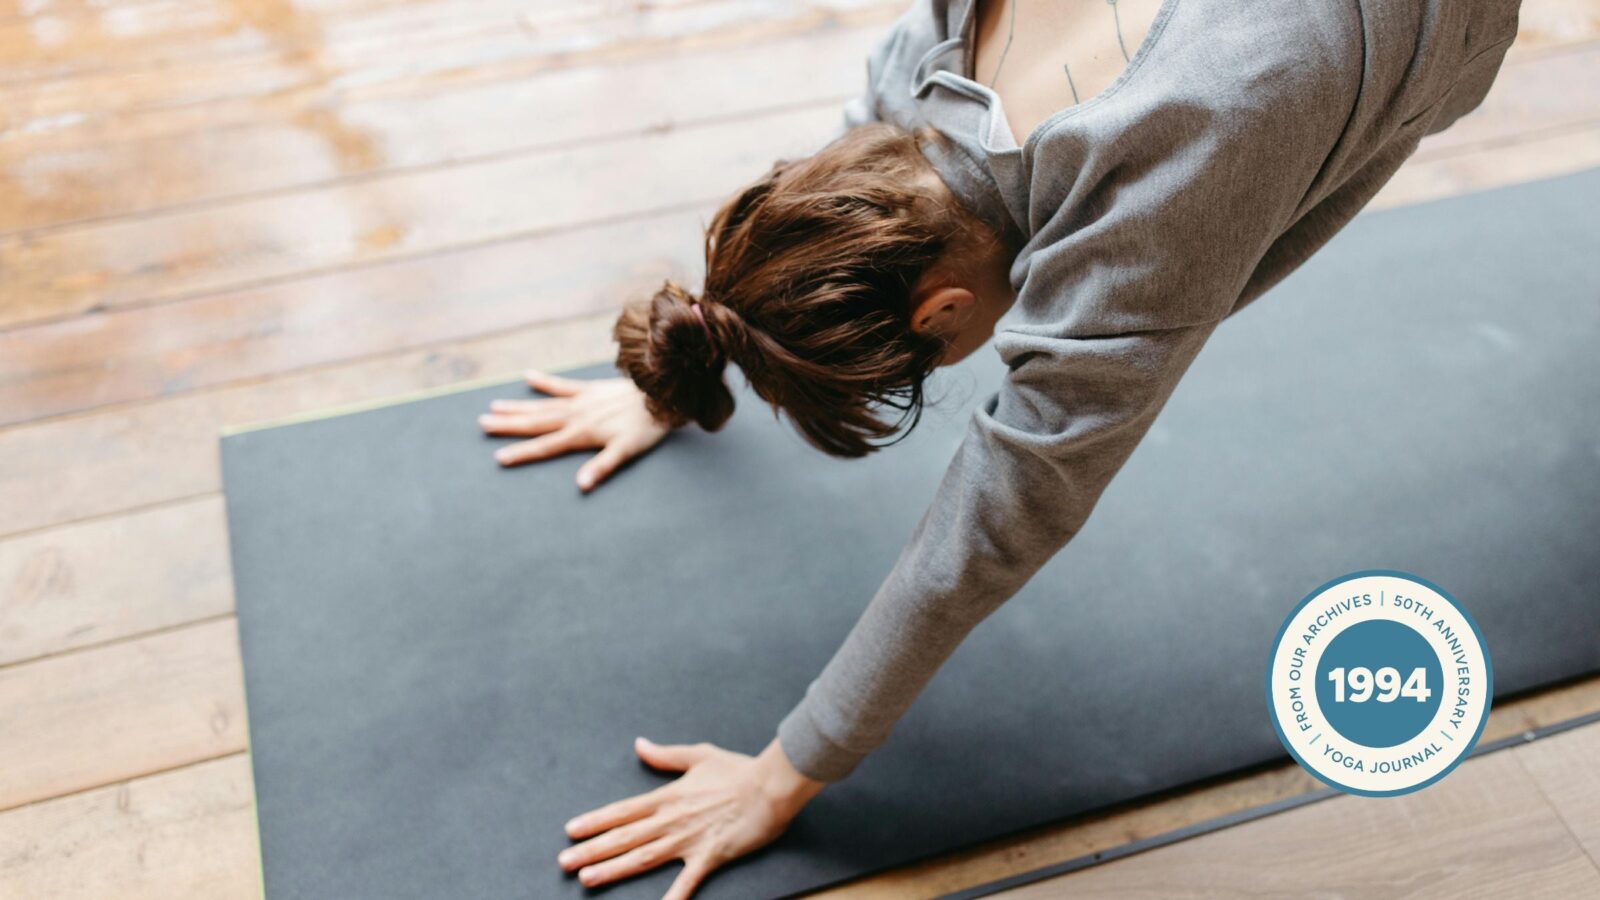
1. Half Dog Pose
Beginners: Face a wall at about arm’s distance, with the feet parallel. Place your hands on the wall at shoulder height and imagine that the hands are glued to the wall. Slowly back away so your back comes down parallel to the floor. Make sure that you exhale as you come down. The head and neck should hang in a relaxed manner (Figure 1a).
Now gently begin to push away from the wall and to lengthen the spine backward toward the center of the room. This pose increases your range of shoulder flexion and helps to bring flexibility to the upper back. (Remember that flexibility of the upper back is an important component of normal, full shoulder movements.)
Hold the pose for 10 to 15 breaths. To come out of the pose, slowly walk toward the wall and stand up.
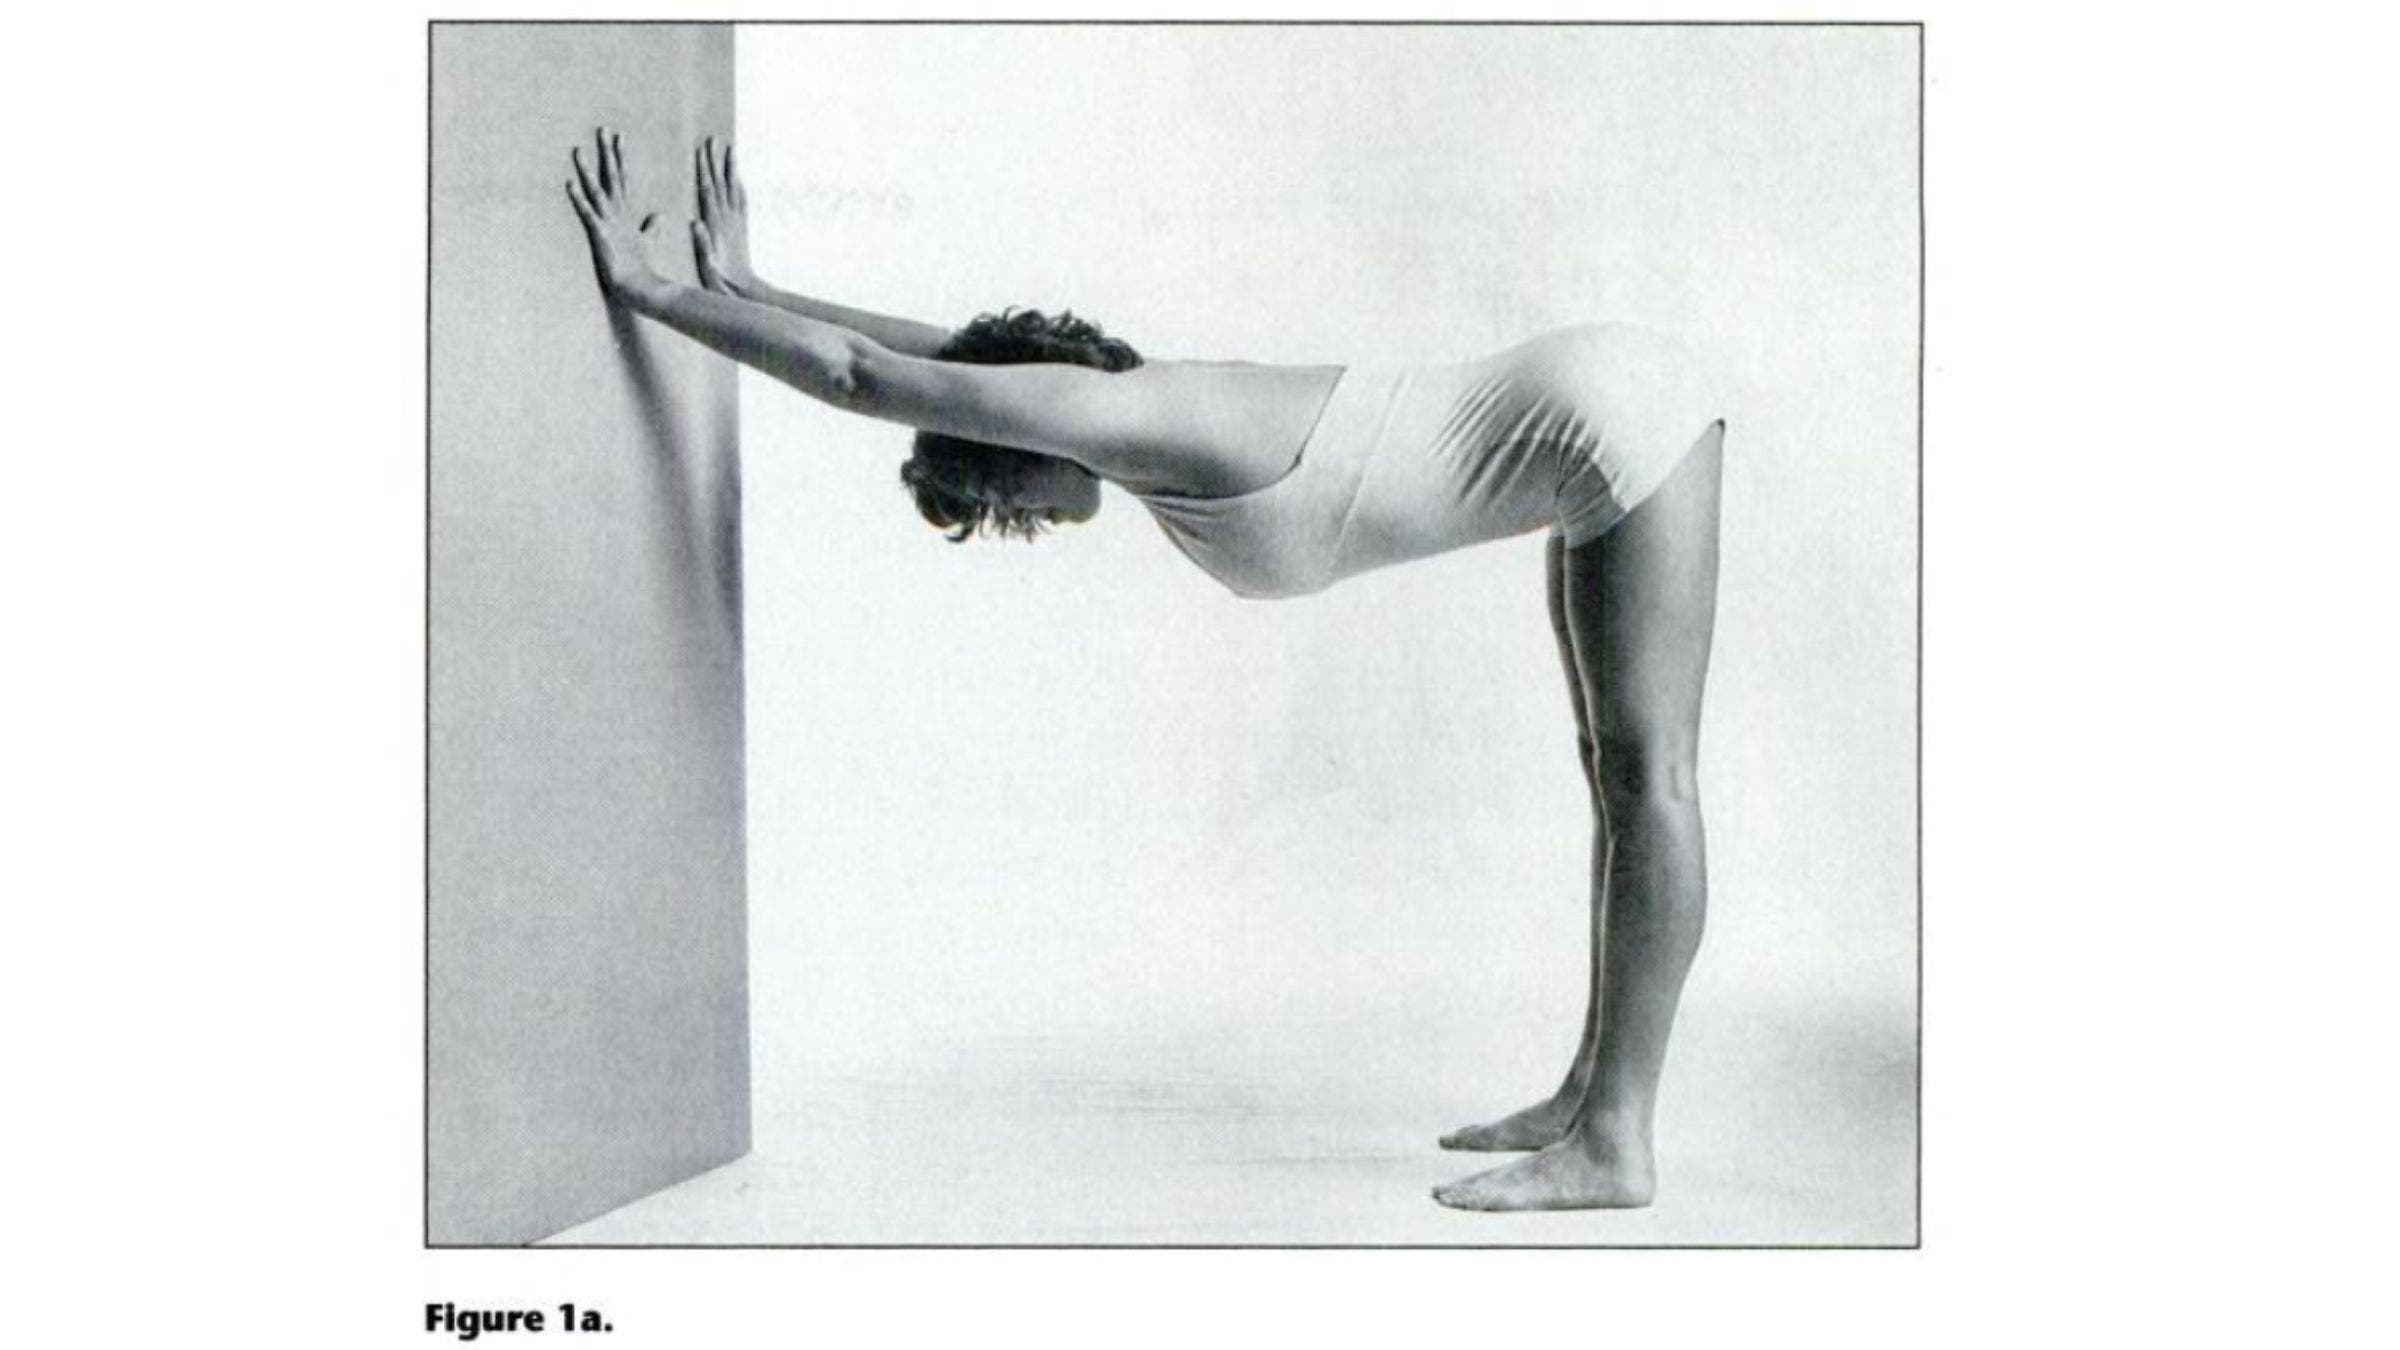
Experienced Students: To make the pose more challenging, come into the pose as detailed above. Once in the pose, begin to walk the hands up the wall, at the same time dropping the back down toward the floor (Figure 1b). Be sure to keep the breath soft and fluid. Let the head hang down and the neck relax. This variation will give an additional stretch to the upper back and the shoulder joints. Hold the pose for as long as is comfortable. Come out of the pose by walking toward the wall and standing up. Stand for a moment and notice the sensations in the shoulders and upper back.
2. Downward-Facing Dog Pose
This is one of the best yoga poses for the shoulders.
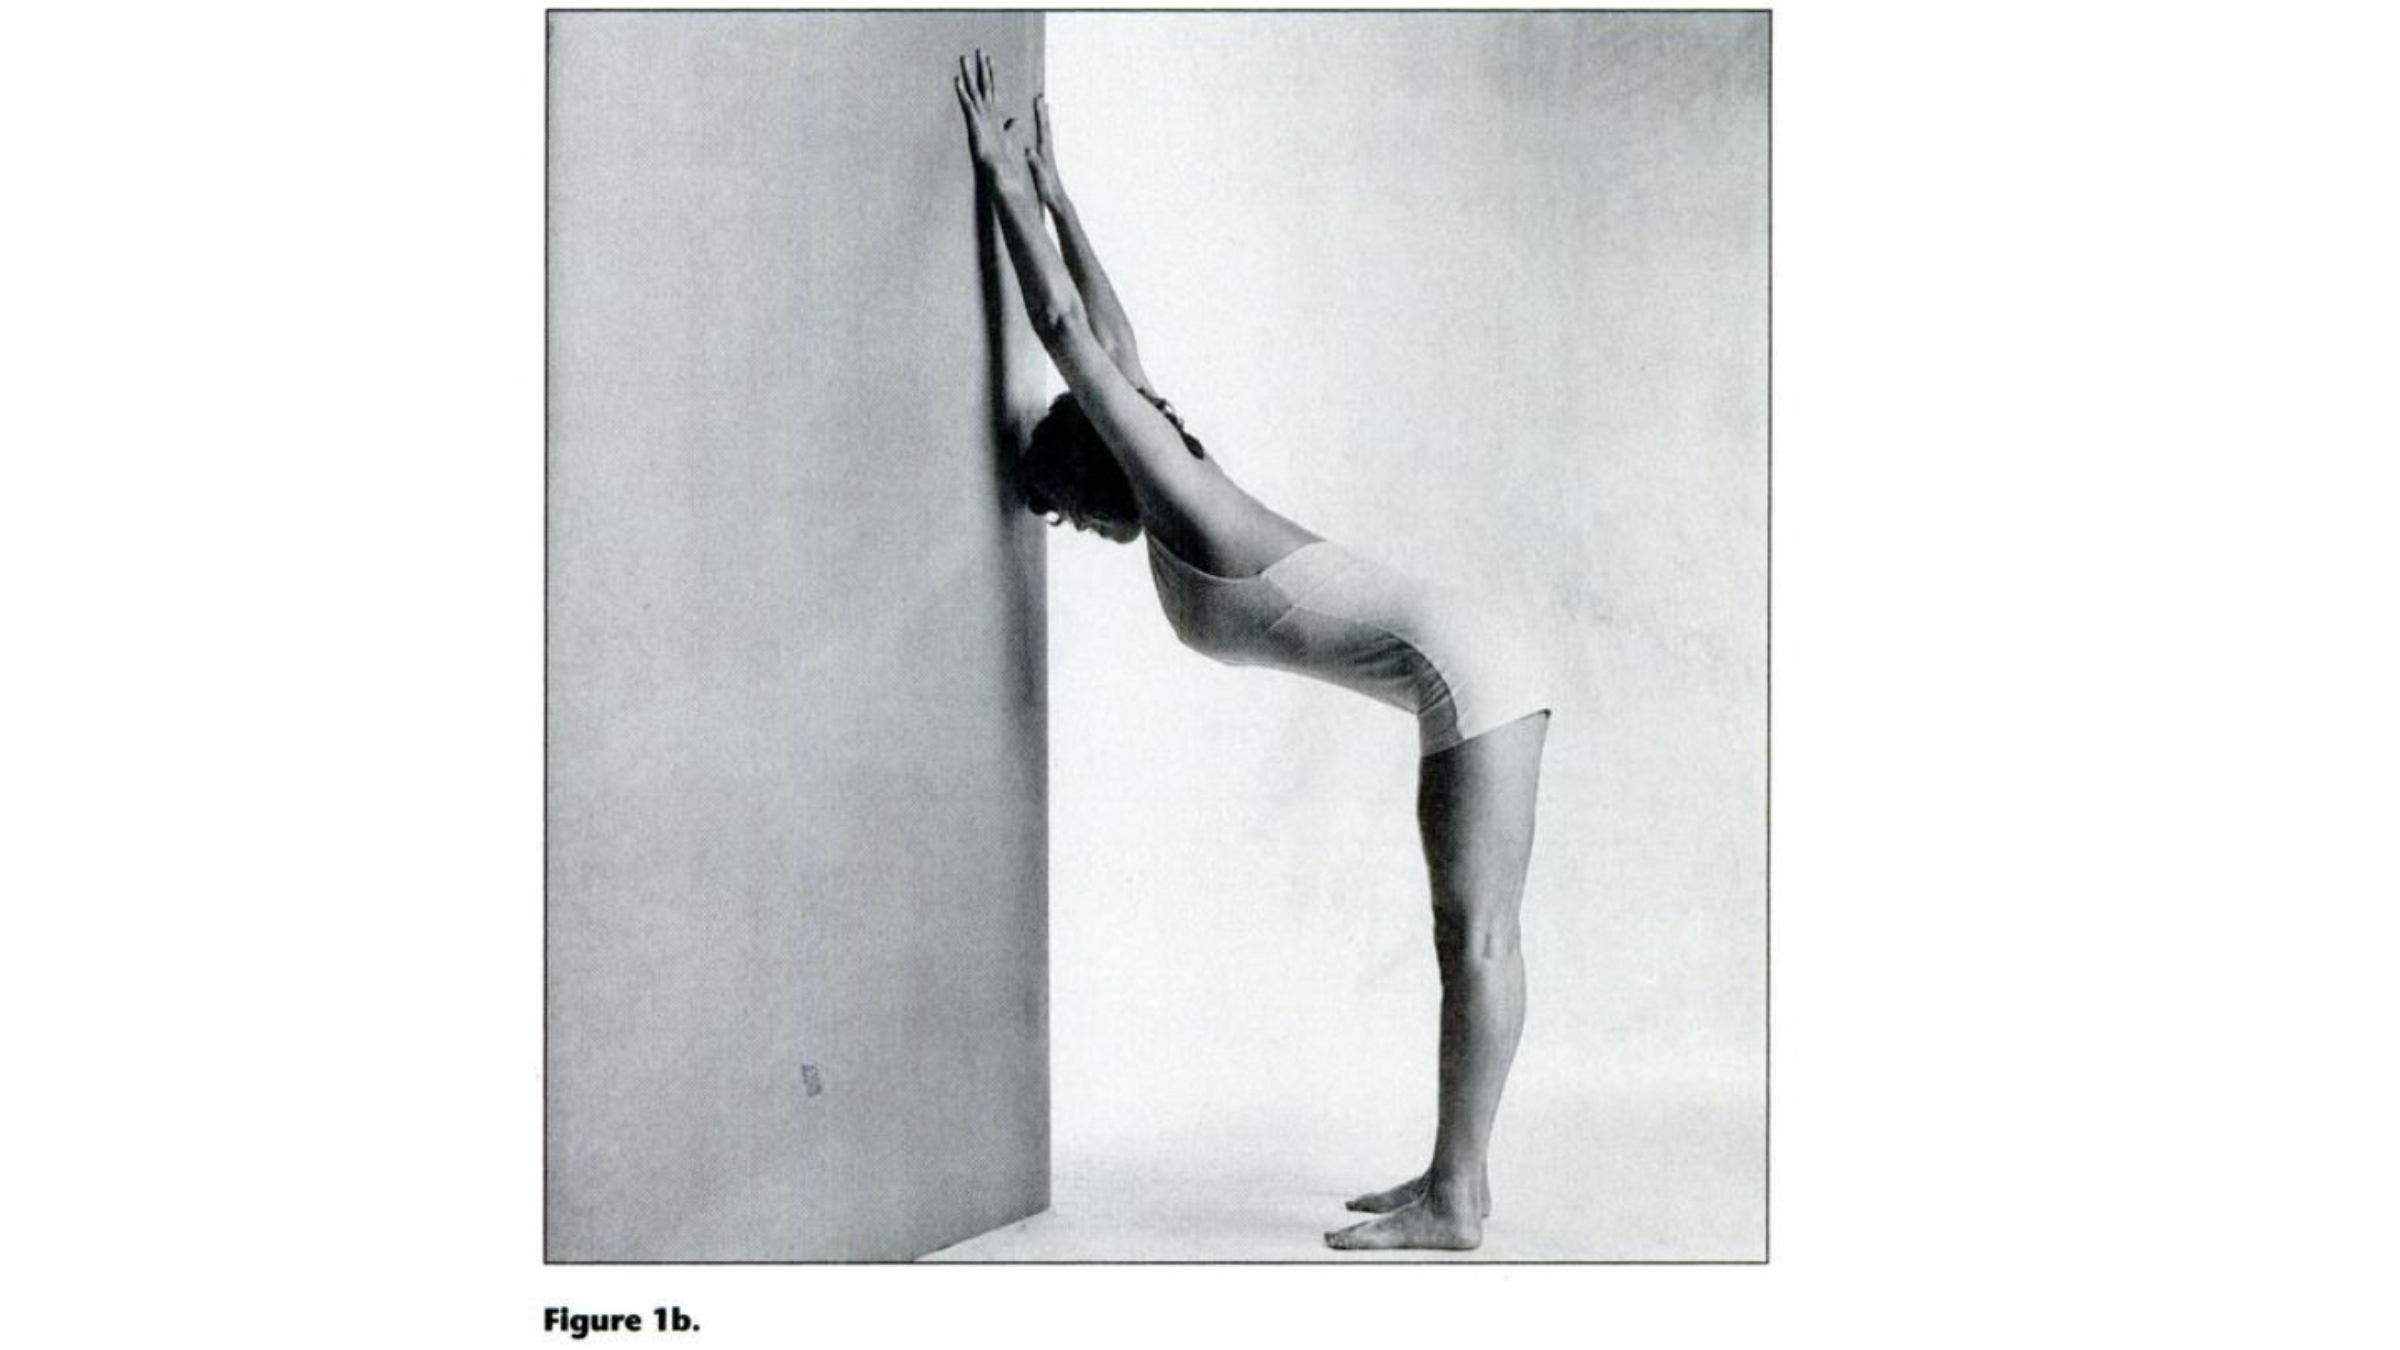
Beginners: Spread out a grippy mat on a bare floor. Kneeling on the hands and knees, place the hands a little wider than the shoulders and spread the fingers. Make sure that the knees are directly under the hips.
Let the head drop in a relaxed manner. Inhale and, with the exhalation, gradually straighten the legs (keeping a slight bend as needed) so your body creates an inverted V shape (Figure 2a). Move the heels toward the floor and the breastbone toward the knees. Keep the breath relaxed in Downward-Facing Dog.
Remember to stretch up and off the hands so the spine feels longer and longer. Imagine a diagonal line that moves from the hands and out through the tailbone. Let the energy move along this line, out and up from hands to pelvis. Feel the shoulders gradually opening and the spine lengthening. Hold the pose for 10 slow breaths, then slowly come down. If you wish, sit back on the heels with the head on the floor and rest for a few moments before repeating. Dog Pose, like Half Dog Pose, stretches the shoulder joints and upper back and feels particularly good if you have been sitting for a long time.
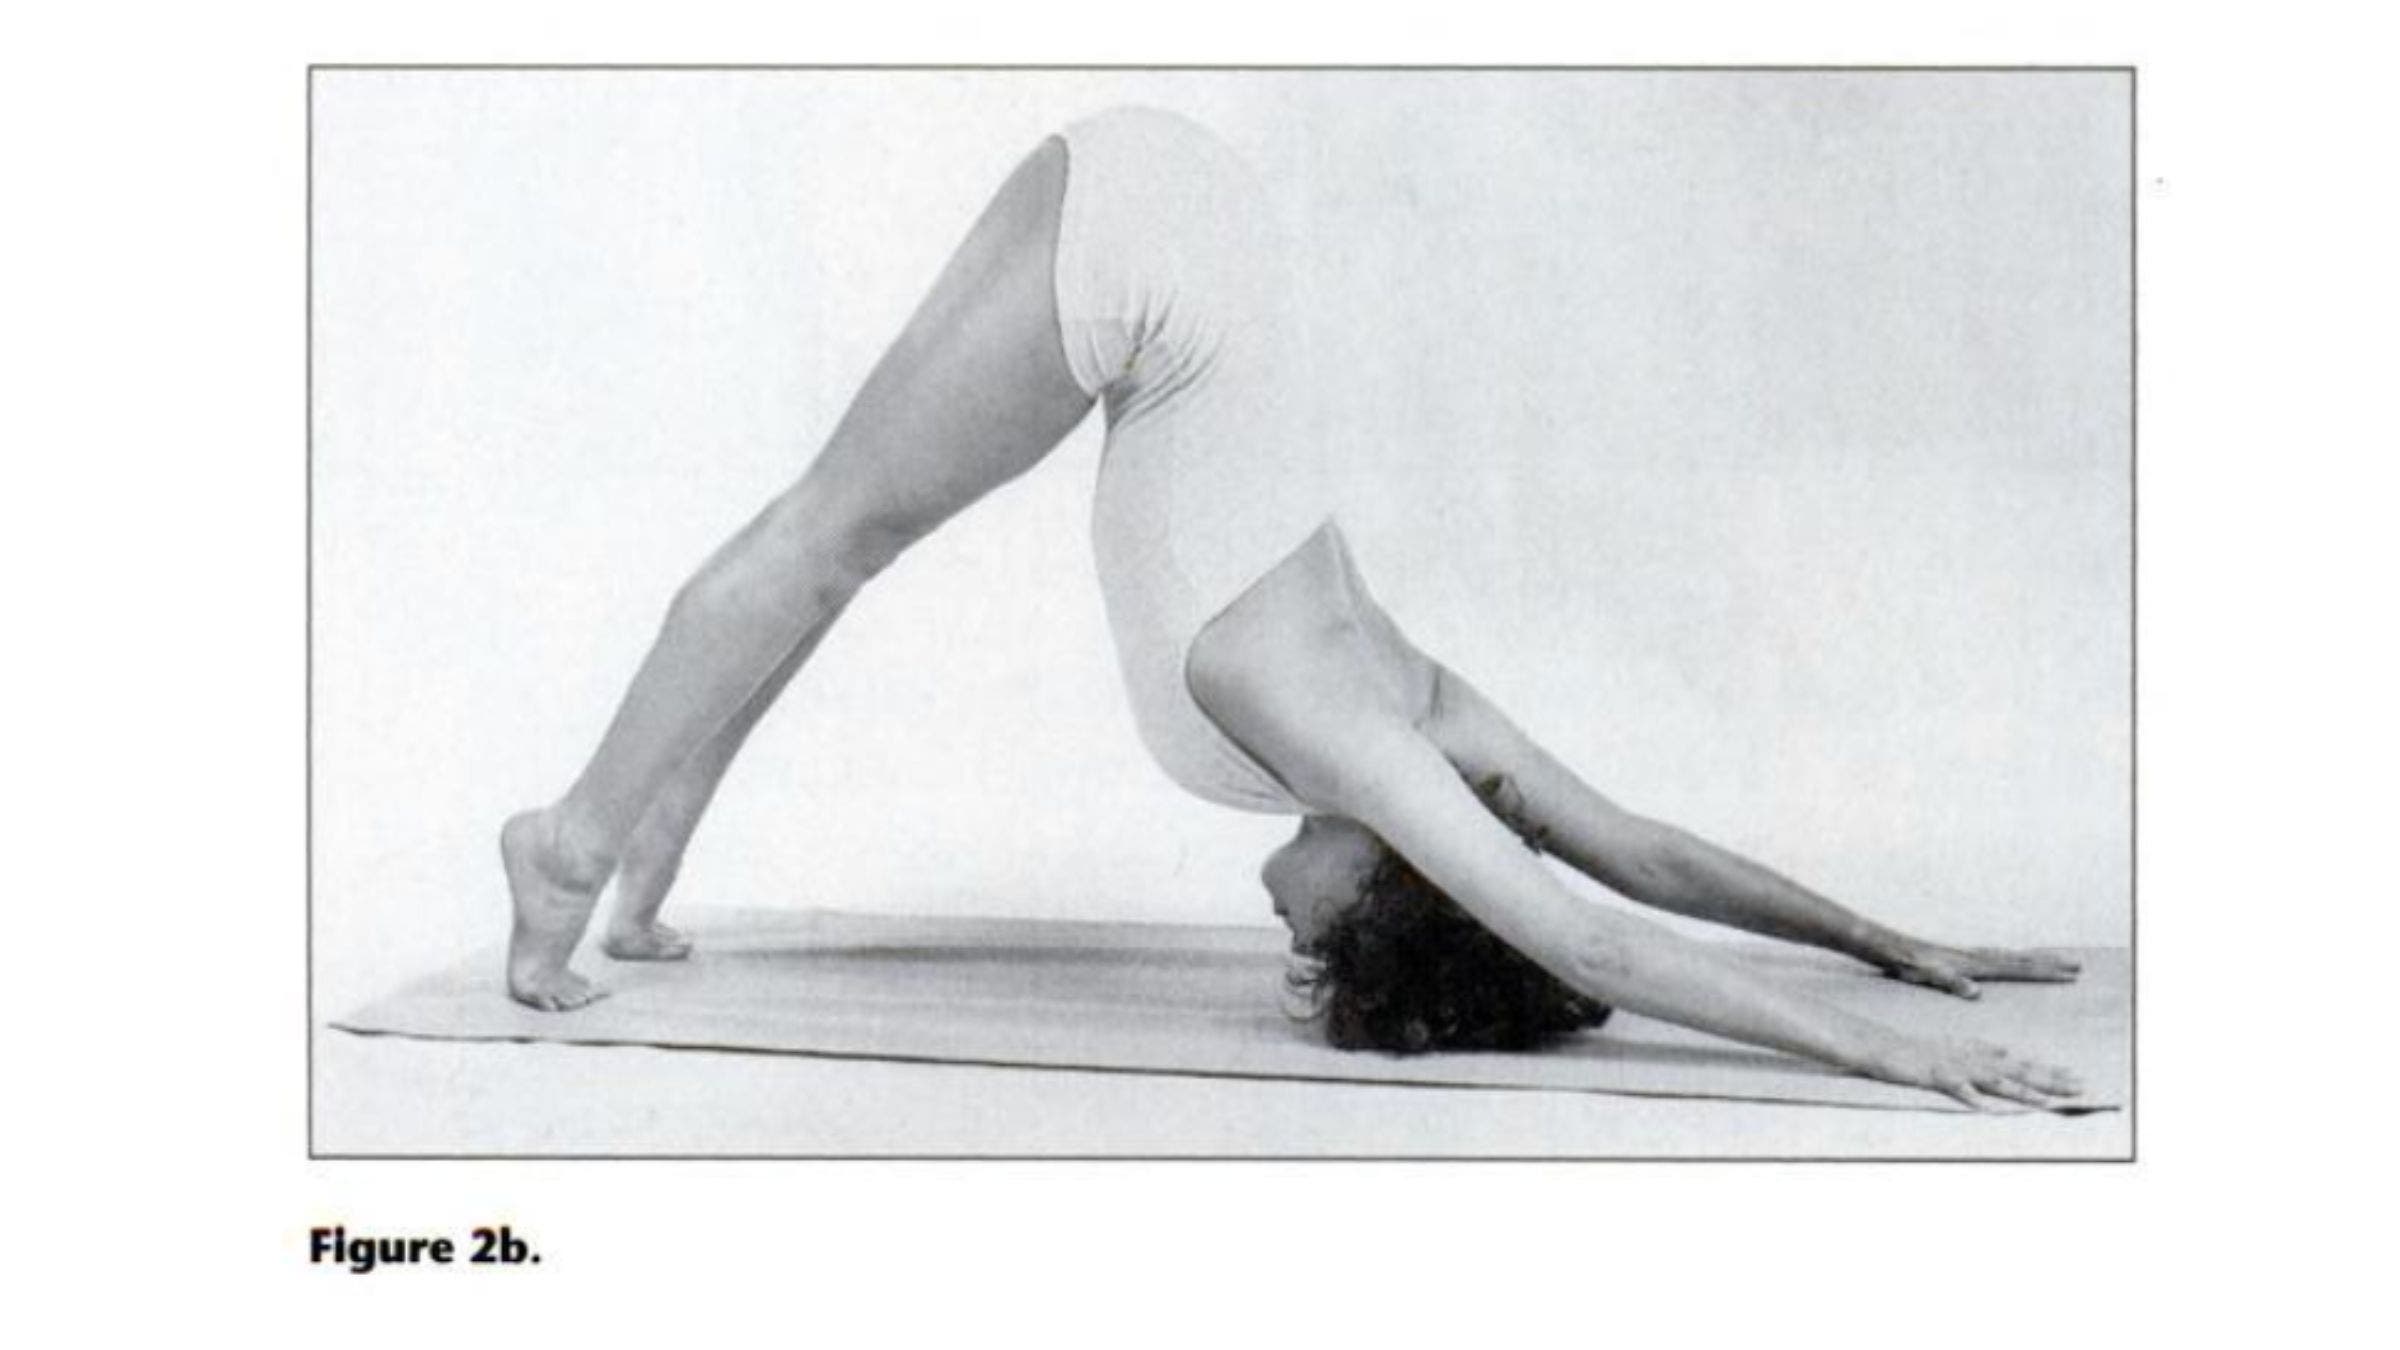
Experienced Students: With an exhalation, move into the basic pose. Then rise up on the balls of the feet, making sure that the ankles are not rolling out to the side but are straight and strong. Move the chest toward the knees with an exhalation, still staying up on the balls of the feet. With the next exhalation, drop the heels and simultaneously take the chest even deeper toward the knees. Then rise up on the balls of the feet again, but this time do not let the chest rise—instead, keep the chest toward the knees (Figure 2b). Drop the chest more deeply, then lower the chest and the heels together. The result will be a very strong stretch for the shoulders.
Remember to keep the breath soft and to exhale on every movement. After several rounds of raising the heels and moving the chest toward the knees, come down, sit back on the heels with the forehead down, and breathe quietly. Repeat the process if you wish.
3. Half Headstand Pose
This posture helps to increase both flexibility and strength in the shoulder joint.
Beginners: Place a grippy mat on the floor. You might like to practice this pose with the mat on top of a carpet to give some padding to your elbows. Or you might choose to fold over one end of the mat and place it on a bare floor. Whichever you choose, make sure that your feet will not slip.
Start on your hands and knees as in Dog Pose. Then place the forearms on the floor and join the hands together, interlacing the fingers so the hands and elbows form a triangle. Make sure that the elbows are directly under the shoulders and not too far out to the side. The upper arms should be perpendicular to the floor, not slanting outward.
Now straighten the legs so your body forms an inverted triangle. Place the feet about hip-width apart.
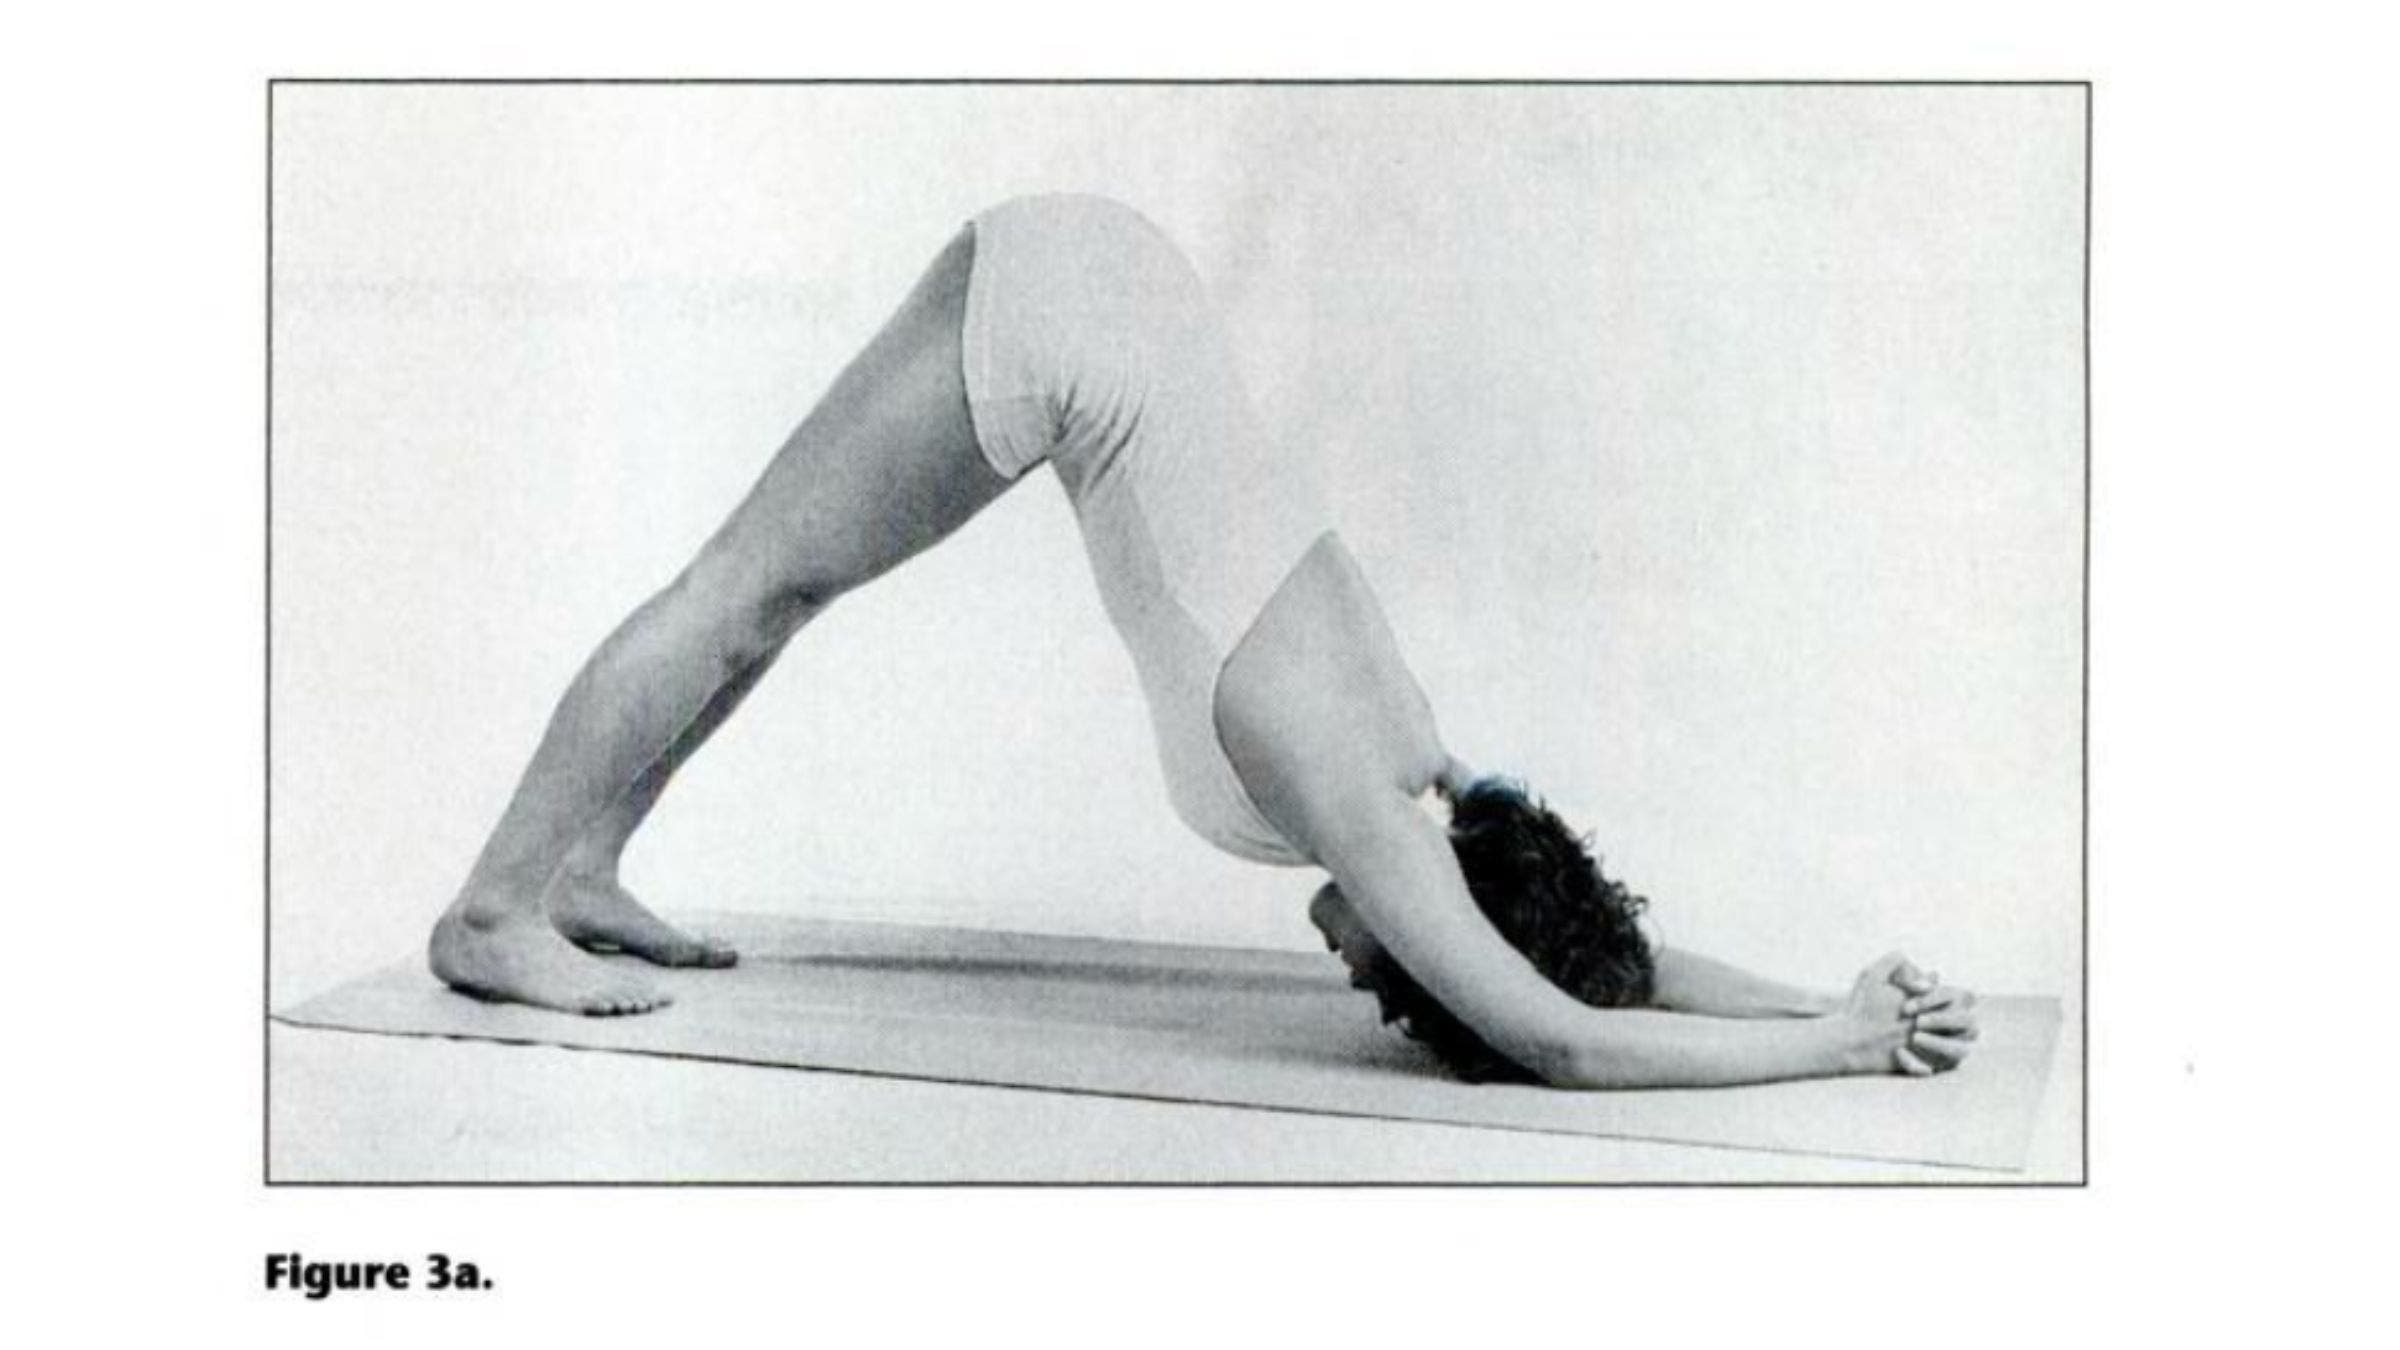
Exhale and gradually begin to stretch the spine back as in Dog Pose (Figure 3a). Press the elbows into the mat to give you the feeling of lifting up and back toward the pelvis. Keep the breath even and slow and allow the shoulder joints to open evenly and without strain. Half Headstand will increase the flexibility of the shoulders and upper back.
To increase the strength of the muscles around the shoulders, add some more movement. Inhale and, as you exhale, move your body forward over the hands until your torso is almost parallel to the floor. Inhaling, lift back to the inverted V shape.
Repeat at least five times in a nonstop but moderately paced action. Then rest by sitting back on the heels with the head down and taking a few slow breaths. Release the fingers and clasp them again with the opposite thumb on top, then repeat the pose with the fingers interlaced the opposite way. You will probably be surprised to find that making such a small change causes the shoulder muscles to work differently. Repeat for five times and then rest.
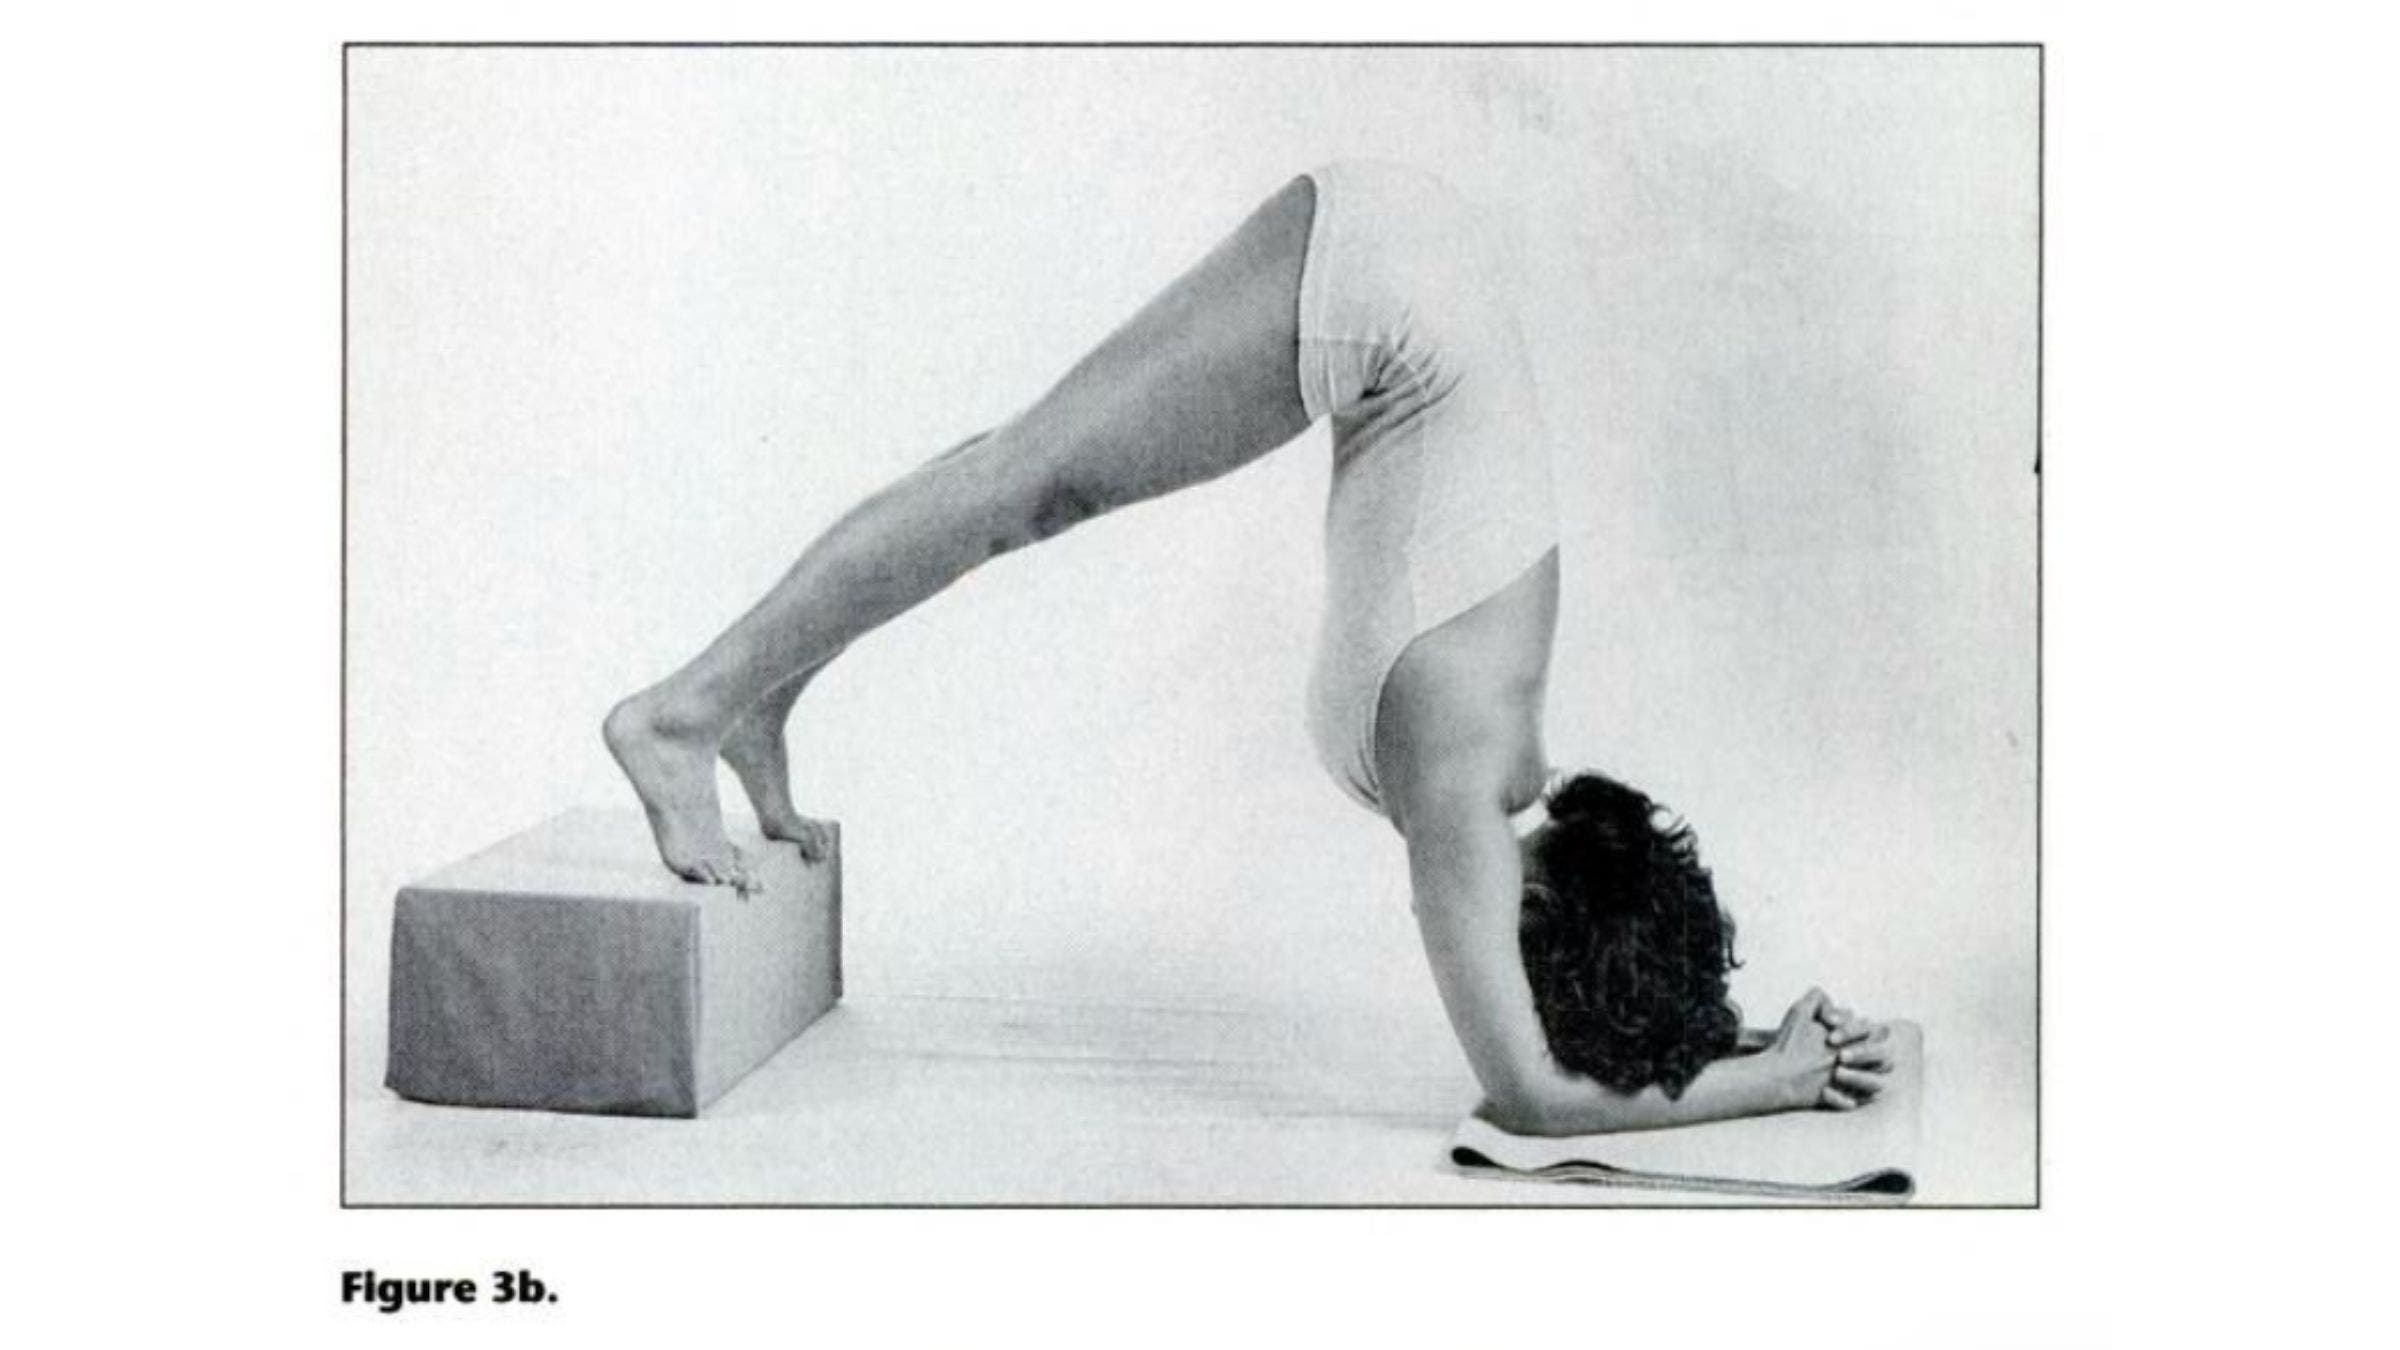
Experienced Students: To increase the demands of the pose, try practicing Half Headstand with the feet elevated. A convenient place to try the pose is with your feet up on the first or second step of a stairway (Figure 3b). Make sure you will not slip and that your elbows are adequately padded. Try the pose several times with the hands interlaced in both directions. This variation will require significantly more strength and flexibility. Remember to rest when you need it and to keep your breathing coordinated with the movements.
4. Lying Twist Pose
This pose stretches the front of the chest wall, which consists mainly of the pectoralis muscles. These muscles attach to the front of the upper arm and to the chest. When the pectoralis muscles contract, they bring the upper arm across the chest. The pectoralis muscles also help to stabilize the arm when you do pushups or any arm balance pose.
When these muscles get tight, they contribute to bringing the shoulders forward, thus rounding the back and interfering with breathing and digestion. This pose will actually help to improve your normal standing posture.
Beginners: Place a blanket or grippy mat on the floor and lie down on your back. Place your arms out to your side so you resemble the letter T. Turn the palms upward. Gradually bring your knees to your chest one by one and with an exhalation roll onto the right side.
Bring the left arm with you, so you are now lying on your right side, knees bent, palms touching, and eyes looking toward your hands.
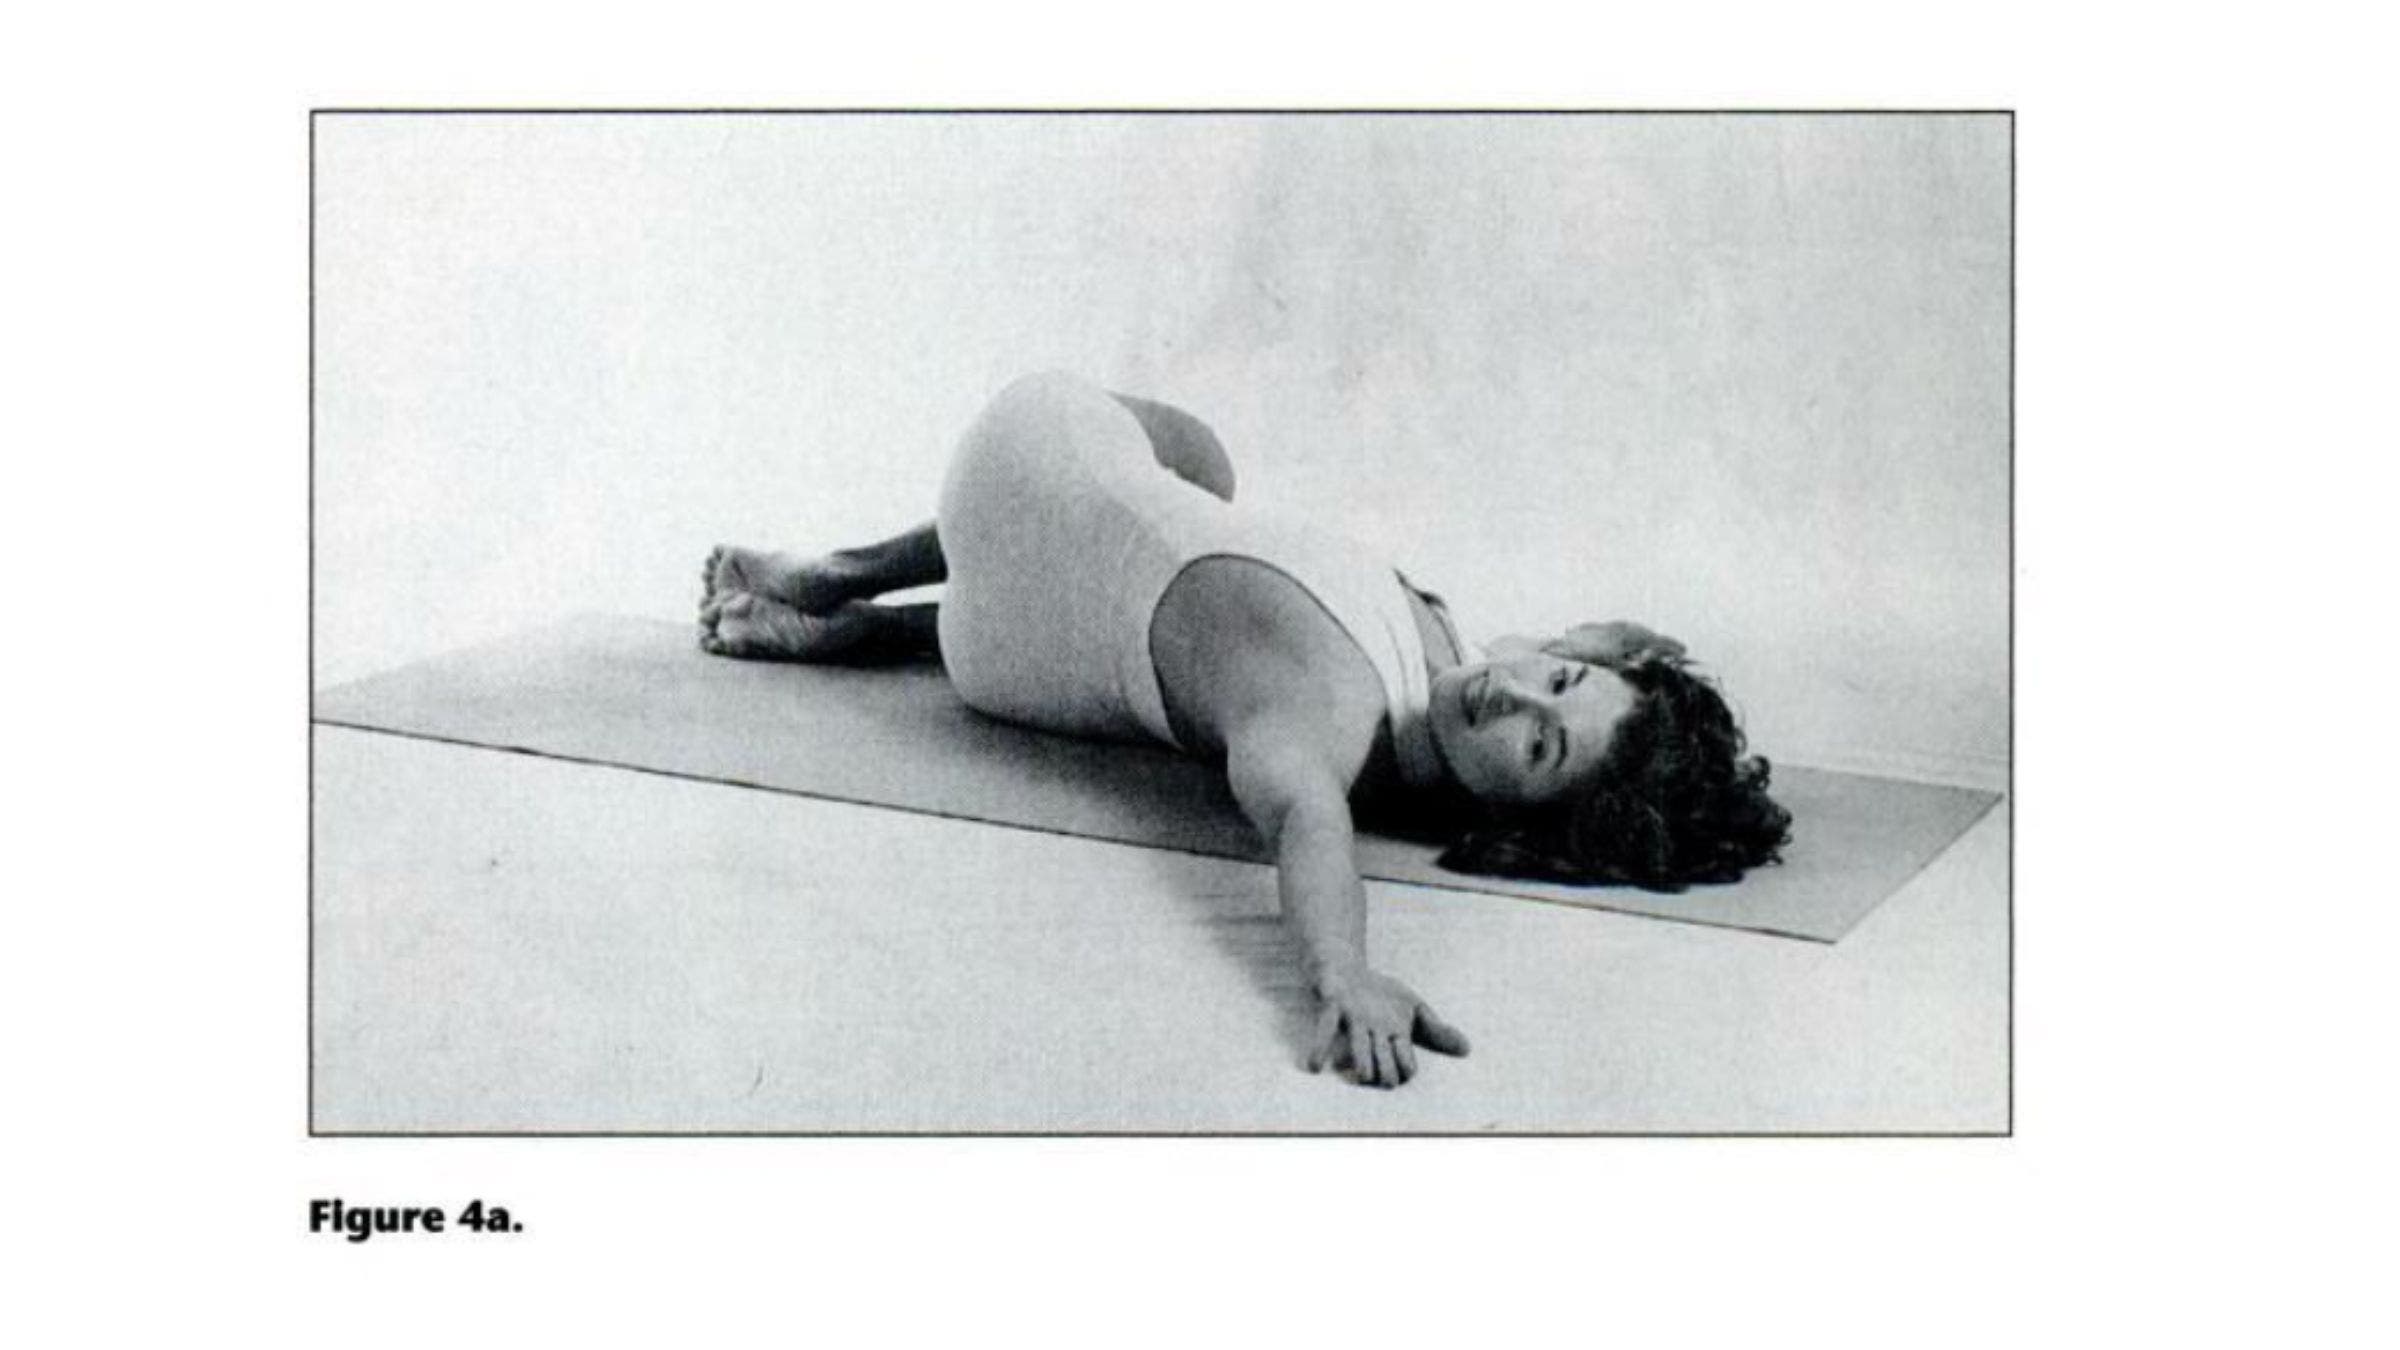
Once the knees are resting on the floor, lift your left arm up and roll it back toward the left (Figure 4a). Slightly lift the left arm toward the ear so it is diagonal to the body. Your arm may be hanging in space, not resting on the floor. Feel the stretch in your upper outer left chest wall. Let your arm hang and stretch gradually; it is not important that your shoulder reach the floor.
After several breaths, roll onto your back once again, and then repeat to the other side.
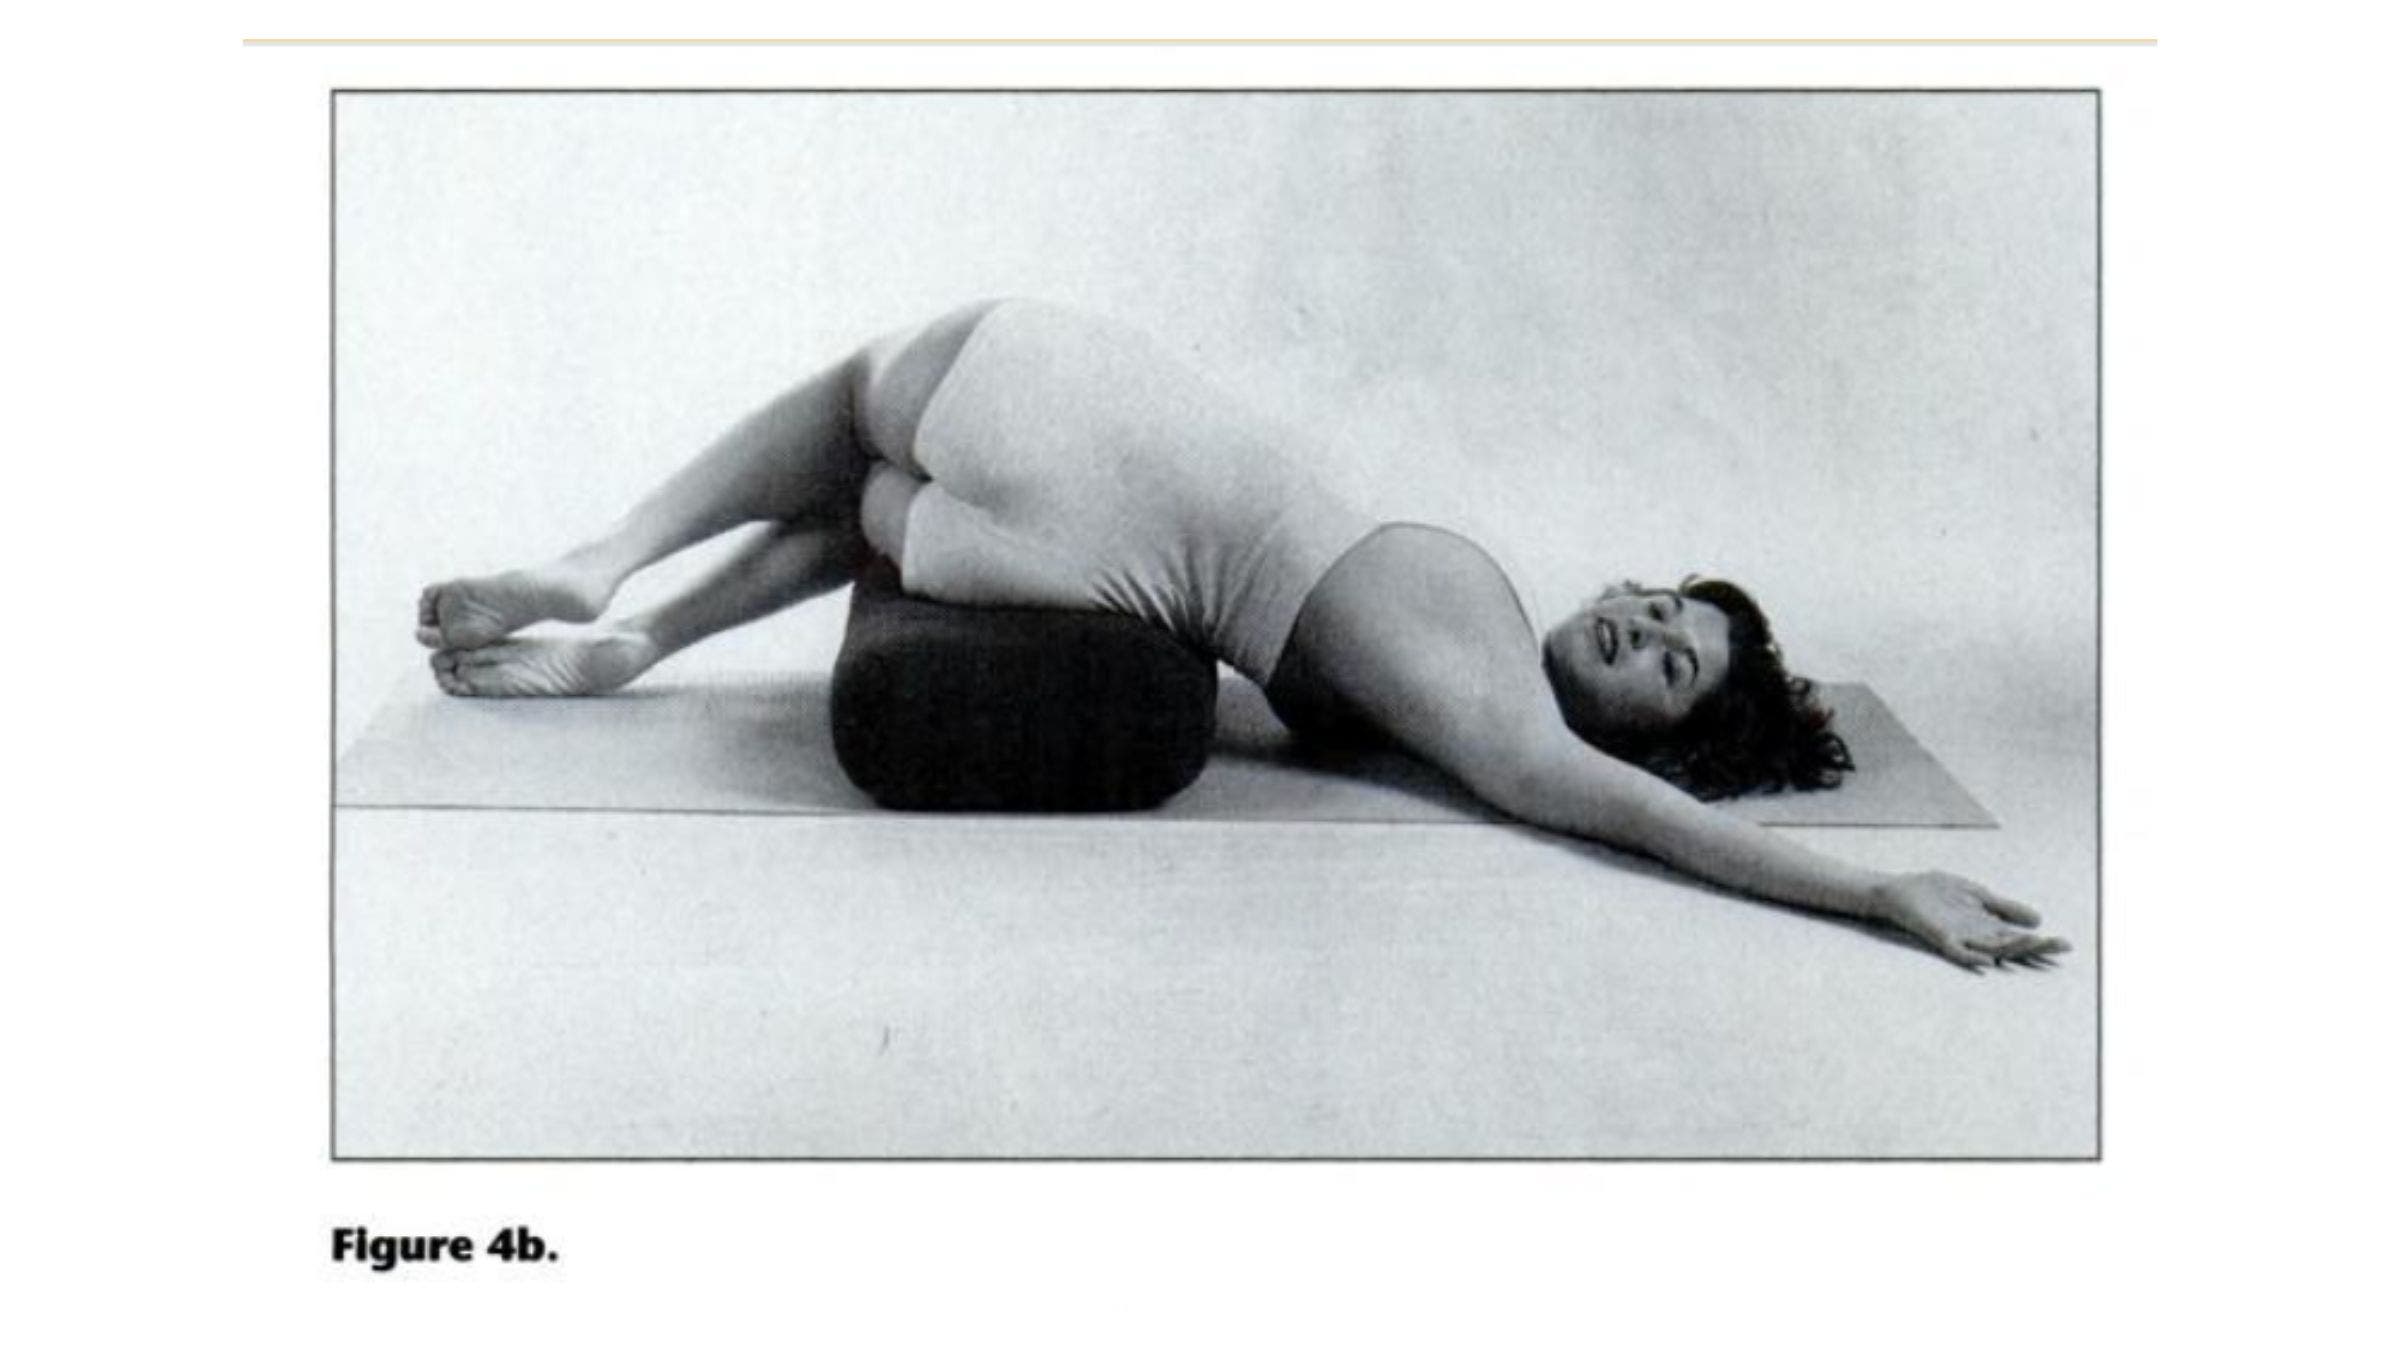
Experienced Students: Try this pose while lying with your shoulders on the floor and your pelvis resting on a bolster or set of folded firm blankets. (The blankets should just reach to the bottom rib.) Practice the pose as detailed above. In this variation, however, the shoulder will be on the floor or very close to it. Increase the stretch in the pectoralis muscles by rotating the knees farther off the blankets (Figure 4b).
Be careful rolling back to the center position. You may want to use your right arm to help you roll back by gently but firmly pressing the right elbow into the floor.
Make sure you are lying on the bolster or blankets with the last rib on the props before you repeat the pose on the opposite side. It is generally beneficial to make all your movements on an exhalation. Hold each side as long as you are comfortable and are enjoying yourself.
3 Exercises for Strengthening the Shoulders
Strengthening the shoulders requires strengthening not just the muscles that are around the shoulder joint, but also those that hold the scapula in place. These include the intrascapular muscles, which are located between the shoulder blades, and the rotator muscles, which connect the outer border of the shoulder blade with the back of the upper arm. To strengthen these muscles, we must ask them to work against the force of gravity, as in the following poses.
1. Simple Backbend
Beginners: Fold a firm blanket in halves or quarters and lie down on it on your abdomen. Place the legs about hip-width apart and turn the knees slightly inward.
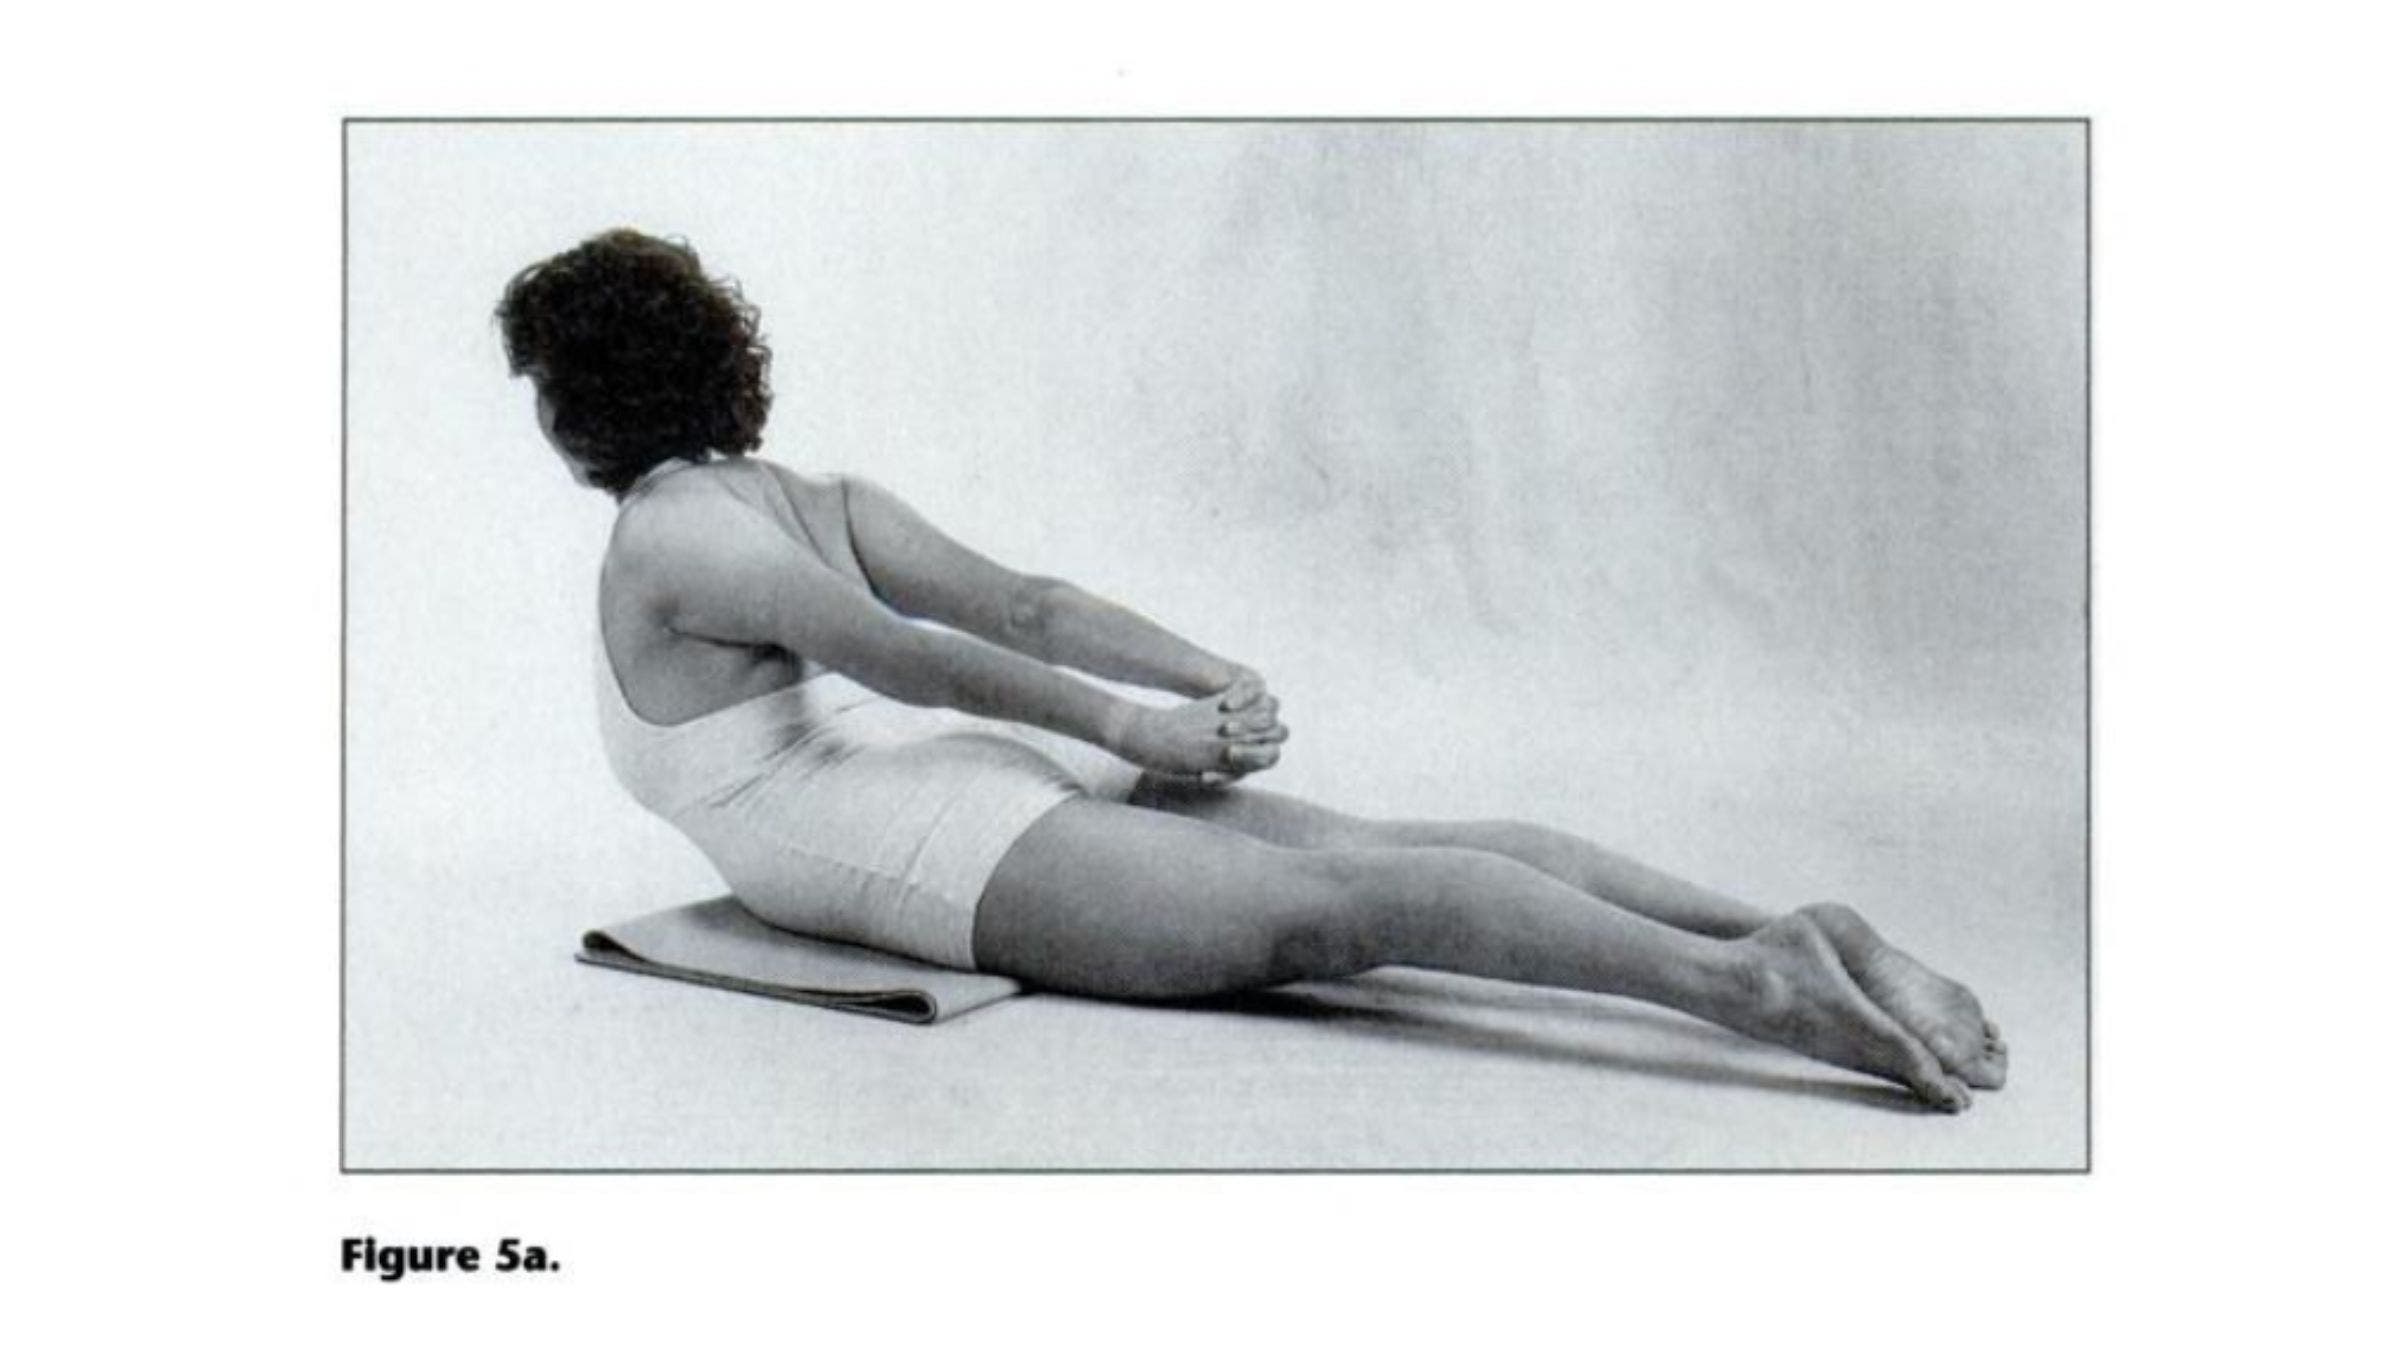
While resting on the forehead, stretch the arms backward and interlock the fingers over the buttocks. The palms are now facing the back of the head and the wrists are as far apart as possible (Figure 5a)
Inhale and, with the exhalation, begin to lift up and backward into an arch. Reach back with your hands as if to hook them over your heels. Draw the shoulders back and the shoulder blades together. Be very careful to keep the back of the neck long by looking slightly downward. Hold the pose for five to 10 breaths and release. Lie on the mat with your arms at your sides for several breaths before repeating with the hands interlocked with the opposite thumb on top.
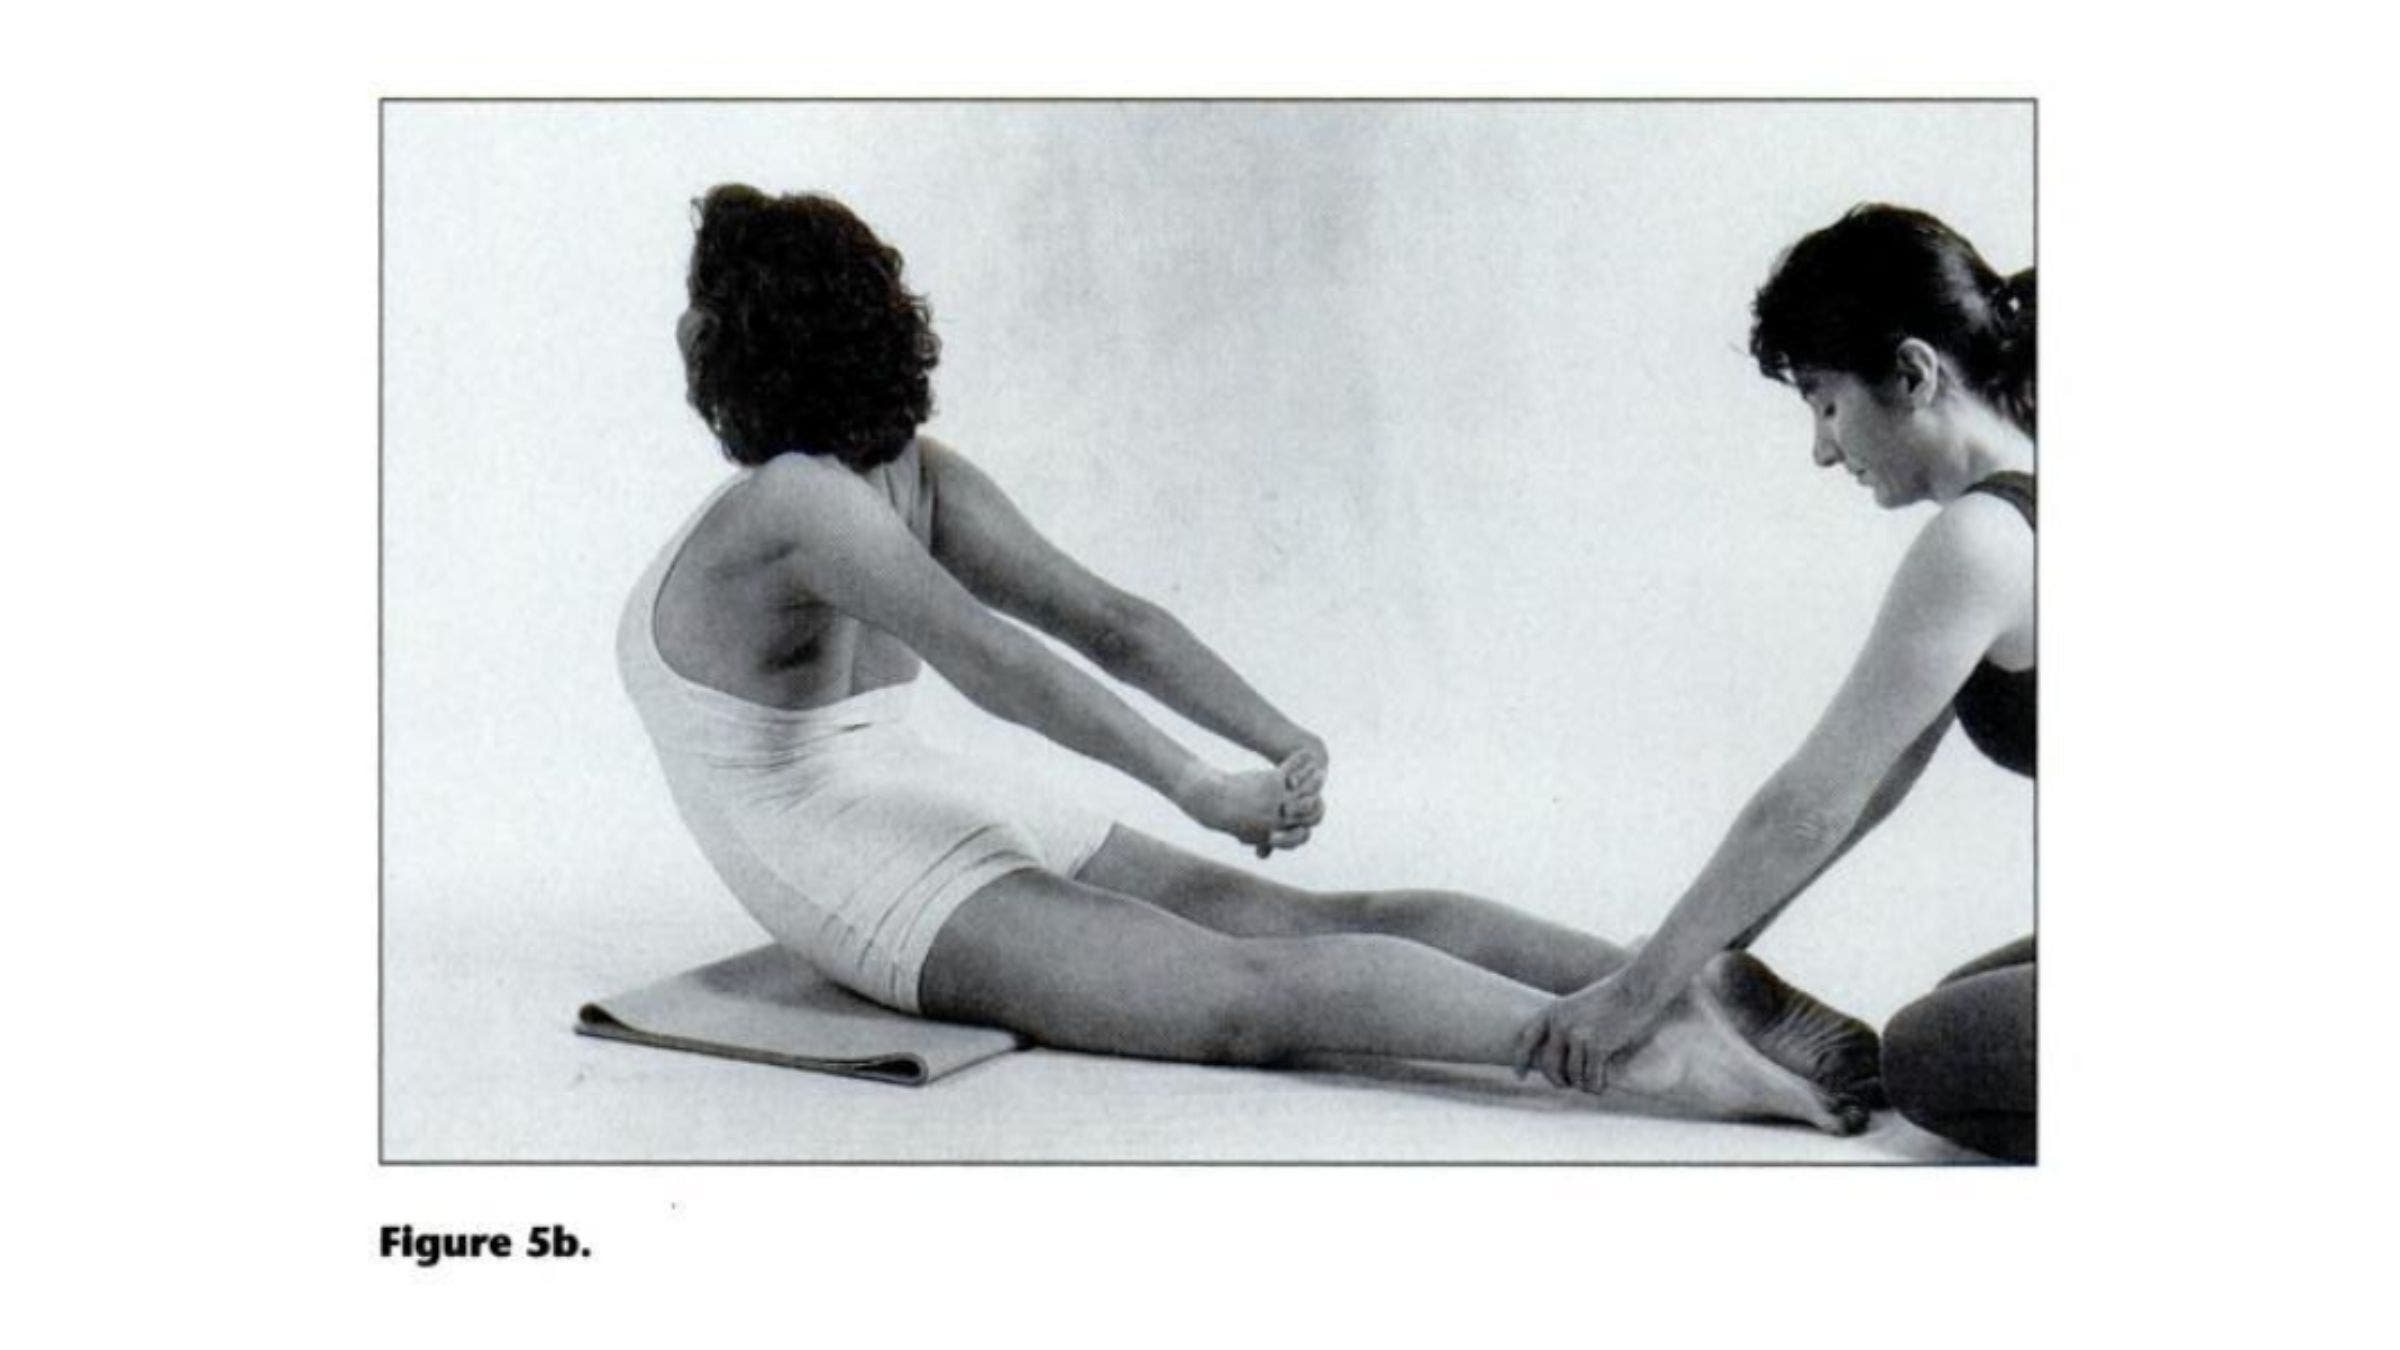
Experienced Students: While this pose is a simple one, it can be quite effective for strengthening the upper back and improving standing posture. To make this pose more challenging, practice it with someone holding your ankles down or with your feet hooked under a very heavy and secure piece of furniture (Figure 5b). The pressure will allow you to lift up higher and hold the pose longer.
Be sure to keep the breath soft and to exhale when you lift up into the pose. If you are lifting up higher, you will notice that not only does this pose strengthen the back shoulder muscles, but it also stretches the front chest muscles. Repeat the pose twice for maximum benefit, making sure to change the interlock of the fingers the second time.
2. Plank Pose
Although it looks deceptively simple, this pose requires precise alignment as well as strength. It is especially good for beginners who are just starting to focus on developing strength in the shoulder girdle.
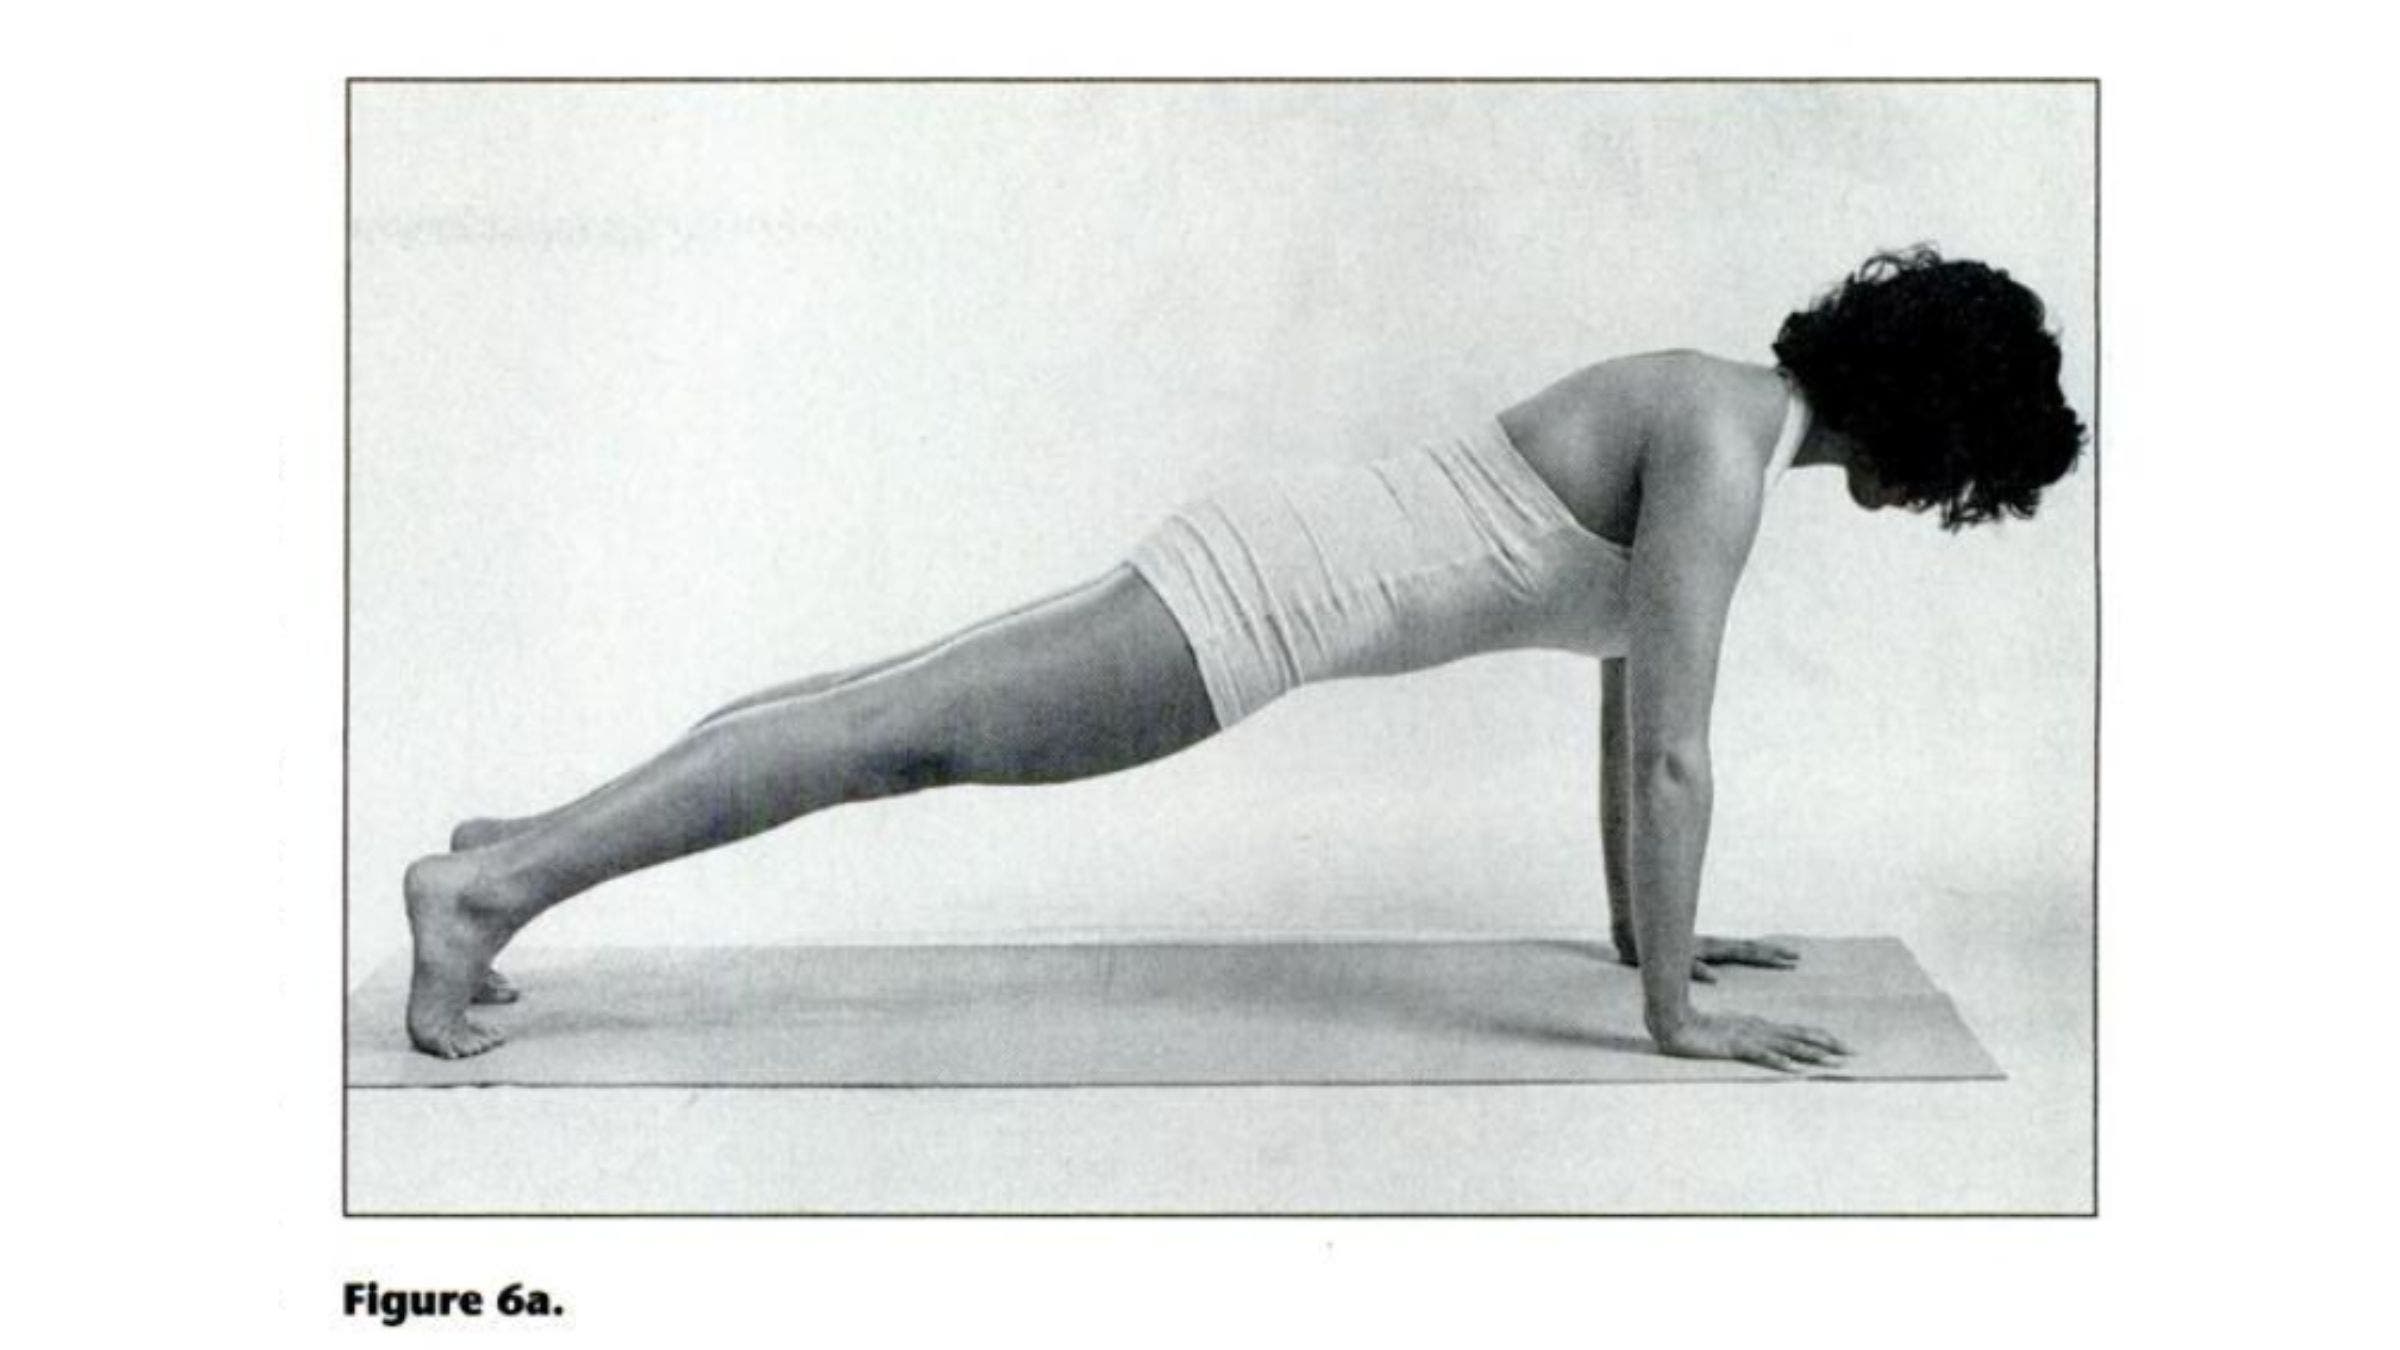
Beginners: Kneel on the hands and knees on a nonskid mat. Make sure the hands are open, shoulder-width apart, and firmly in contact with the mat. Gradually walk the feet backward until you are resting on your hands and the balls of your feet and the body is in a straight line from shoulders to feet (Figure бa).
Keep the breathing even and slow. Pay attention to the upper back between the shoulder blades. If possible, let this portion of the spine drop down slightly lower than the shoulder blades. Keep the abdominal muscles firm and the legs actively stretching backward. Engage all the large muscles of the body—such as the abdominals, buttocks, and legs—not just the shoulder and back muscles. Hold the pose for five to 10 breaths and come down by bending the knees and sitting back to rest.
Experienced Students: Practice Plank Pose as detailed above. Once you are in the pose, place the feet together and slowly lift the right arm straight above the head.
As you do this, roll to the outside of the left foot, turning the torso to face to the right (Figure 6b). Keep the feet together; they should remain as if you were standing on the floor in a normal upright position.
A tricky part of the pose is balance. The pelvis has a tendency to roll too far back, thus causing you to fall out of the pose. Firm abdominal muscles will help to prevent this error. Keep the pelvis in line with the shoulders, stretch out through the legs, and actively lift upward from the abdomen.
After you have held the pose for five to 10 breaths, drop the right arm back to the Plank Pose and repeat by lifting the opposite arm. Be sure that you rest on the outer side of the right foot and that the upper foot stays next to the lower foot.
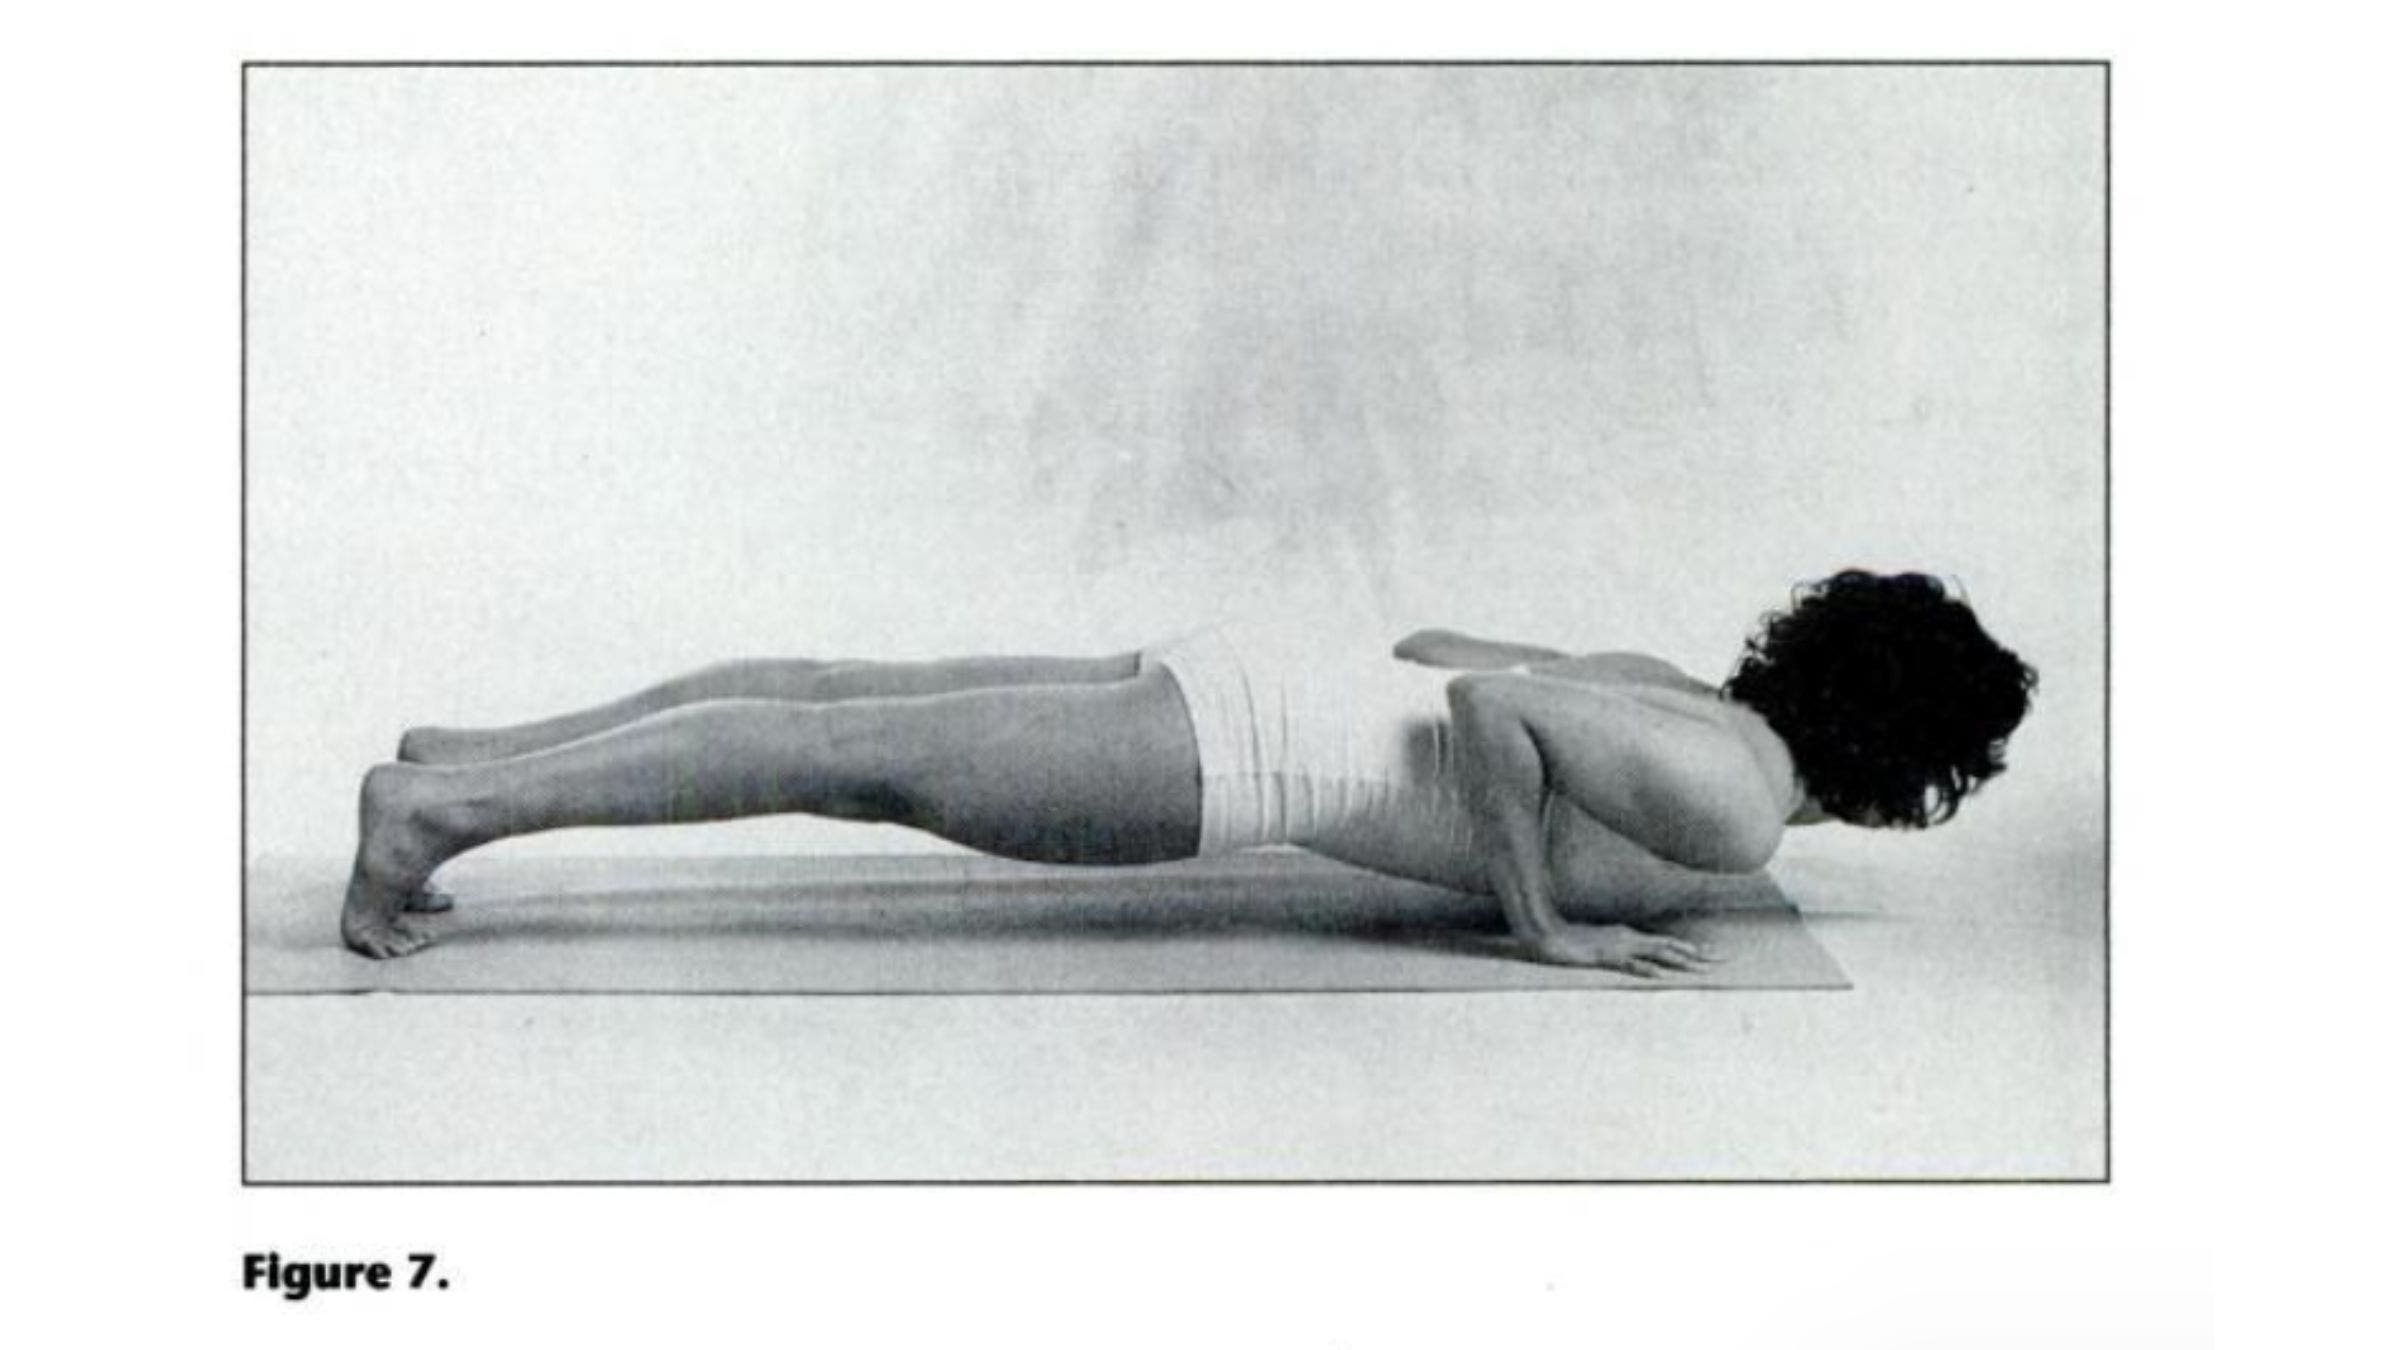
3. Rod Pose
This challenging pose requires a great deal of strength in the whole upper body and is not for beginners. If you are relatively weak in the upper body, practice the Plank Pose for six months before you attempt Rod Pose.
Experienced Students: Do not practice this pose on a plush carpet, as it will cause your wrists to hyperextend.
Enter Plank Pose. Slowly begin to bend the elbows and lower the body, while maintaining a straight body line.
Keep the elbows close to the body. Bring the body down as close to the floor as you can without touching the floor and hold for three to five breaths (Figure 7).